Category: Bread & Baking

  • Apple Cinnamon Bread Pudding

    Apple Cinnamon Bread Pudding

    This is the kind of dessert that belongs to a cold, rainy day.

    Not fancy. Not loud. Just warm bread, soft apples, cinnamon, brown sugar, and enough custard to turn what might have been leftover into something that feels intentional.

    It would pair beautifully with the Green Chile Mushroom Soup. The soup brings earth and heat. The bread beside it brings comfort. This dessert carries that comfort into something sweet.

    A quiet ending.

    Ingredients

    • 6 cups day-old bread, cubed
    • homemade bread, brioche, challah, French bread, or sandwich bread all work
    • 2 medium apples, peeled and diced
    • Honeycrisp, Gala, Fuji, or Granny Smith
    • 4 tablespoons butter, divided
    • 1/3 cup brown sugar
    • 1 teaspoon cinnamon
    • 1/4 teaspoon nutmeg, optional
    • Pinch of salt
    • 3 large eggs
    • 2 cups whole milk
    • 1/2 cup heavy cream
    • Or use all milk if you want it lighter
    • 1/2 cup granulated sugar
    • 2 teaspoons vanilla extract

    Optional Topping

    • 2 tablespoons melted butter
    • 2 tablespoons brown sugar
    • 1/2 teaspoon cinnamon

    Method

    Preheat the oven to 350°F.

    Grease an 8×8-inch baking dish or a similar-sized casserole dish.

    Place the bread cubes in a large bowl.

    In a skillet over medium heat, melt 2 tablespoons of butter. Add the diced apples, brown sugar, cinnamon, nutmeg if using, and a pinch of salt.

    Cook for 5 to 7 minutes, until the apples soften slightly and the sugar begins to turn syrupy.

    Pour the warm apples over the bread cubes and gently toss.

    In another bowl, whisk together the eggs, milk, heavy cream, granulated sugar, and vanilla.

    Pour the custard over the bread and apples. Press the bread down gently so it can soak up the custard.

    Let it sit for 15 to 20 minutes.

    Pour the mixture into the prepared baking dish.

    For the topping, mix the melted butter, brown sugar, and cinnamon together, then drizzle it over the top.

    Bake for 40 to 45 minutes, until the top is golden and the center is set but still soft.

    Let it rest for 10 minutes before serving.

    Optional Vanilla Glaze

    • 1/2 cup powdered sugar
    • 1 tablespoon milk or cream
    • 1/2 teaspoon vanilla extract

    Stir together until smooth. Drizzle over the warm bread pudding just before serving.

    Notes From My Kitchen

    Day-old bread works best because it absorbs the custard without falling apart.

    This is also a good place to use any leftover homemade bread from the Green Chile Mushroom Soup meal. The bread that sat beside the bowl can come back one more time, softened with apples, cinnamon, and custard.

    For a richer dessert, use brioche or challah.

    For something more practical and still good, use whatever bread you already have.

    Add pecans or walnuts for some crunch.

    Serve it warm, plain, glazed, or with a small scoop of vanilla ice cream.

    This is not a dessert trying to impress the room.

    It is the kind that waits quietly at the end of the meal.

    Kyle J. Hayes

    kylehayesblog.com

    Please like, comment, and share

    Resources for Hard Times

    If you’re looking for practical help, food support, or community resources, you can visit the Salt, Ink & Soul Resources Page.

    👉 Resources for Hard Times

  • Green Chile Mushroom Soup

    Green Chile Mushroom Soup

    Some people in places that truly know cold may find this laughable.

    They may hear me talk about a cooler, rainy day in New Mexico and smile the way people smile when they know winter has not really shown its full hand. They may think of snow piled against doors, wind that cuts through coats, mornings where the car has to be scraped before the day can begin.

    And they would not be wrong.

    But cold is not always measured by the thermometer alone. Sometimes it is measured by what the body asks for. A gray sky. A little rain. A day that loses its sharp edges. The kind of weather that makes the house feel quieter than usual.

    That is soup weather.

    For me, one of the soups that always comes back is mushroom soup. There is something honest about it. Earthy. Deep. Not loud. Not trying to impress anyone. Mushrooms have a way of making a pot feel older than it is, as if the flavor has been waiting somewhere underground before it ever reached the skillet.

    But I live in New Mexico.

    So, of course, there has to be green chile.

    The Chile changes the soup without overwhelming it. It brings warmth, smoke, and a little edge. It reminds the mushrooms not to get too soft. It reminds the cream not to get too comfortable. It turns a simple mushroom soup into something that belongs here, in this place, under this sky.

    And then there is the bread.

    A big piece of homemade bread beside a bowl of soup feels less like an addition and more like a promise. Something to tear. Something to dip. Something to drag through the bottom of the bowl when the spoon has done all it can.

    I will link my homemade bread recipe here, because this soup deserves that kind of company.

    Green Chile Mushroom Soup

    Ingredients

    • 1 pound mushrooms, sliced
    • cremini, baby bella, or white mushrooms all work well
    • 2 tablespoons butter
    • 1 tablespoon olive oil
    • 1 small onion, diced
    • 3 cloves garlic, minced
    • 1/2 cup roasted green chile, chopped
    • mild, medium, or hot, depending on your taste
    • 1 teaspoon salt, plus more to taste
    • 1/2 teaspoon black pepper
    • 1/2 teaspoon cumin
    • 1/2 teaspoon smoked paprika
    • 1/4 teaspoon oregano
    • 3 tablespoons flour
    • 4 cups chicken broth or vegetable broth
    • 1 cup half-and-half or heavy cream
    • 1/2 cup shredded Monterey Jack, pepper jack, or white cheddar, optional
    • 1 tablespoon lime juice
    • Cilantro, parsley, or green onion for garnish, optional

    Method

    Set a heavy pot over medium heat. Add the butter and olive oil.

    Add the mushrooms and let them cook down slowly. Do not rush them. They will release their water first, then begin to brown. Stir now and then until most of the moisture has cooked off, about 8 to 10 minutes.

    Add the onion and cook until softened, about 4 minutes.

    Add the garlic, green chile, salt, black pepper, cumin, smoked paprika, and oregano. Stir and cook for another 2 minutes, just until everything smells warm and alive.

    Sprinkle the flour over the vegetables. Stir well so the flour coats the mushrooms and chile. Cook for 1 to 2 minutes to remove the raw flour taste.

    Slowly pour in the broth, stirring as you go. Bring the soup to a gentle simmer.

    Let it cook for 15 to 20 minutes, until slightly thickened and the flavors have come together.

    Lower the heat. Stir in the half-and-half or cream. Do not let it boil hard after the cream goes in.

    For a smoother soup, blend part of it with an immersion blender, leaving some mushrooms whole for texture. For a more rustic soup, leave it as it is.

    Stir in the cheese, if using, until melted.

    Finish with the lime juice. Taste and adjust the salt.

    Serve warm, with herbs or green onion on top.

    And do not forget the bread.

    Notes From My Kitchen

    For a thicker soup, use heavy cream and cheese.

    For a lighter soup, use half-and-half and skip the cheese.

    For more heat, add extra green chile or a pinch of cayenne.

    For a heartier meal, serve it with homemade bread, toasted focaccia, cornbread, tortillas, or a grilled cheese sandwich.

    The mushrooms bring the earth.

    The green chile is a must.

    The bread makes it perfect.

    Kyle J. Hayes

    kylehayesblog.com

    Please like, comment, and share

    Resources for Hard Times

    If you’re looking for practical help, food support, or community resources, you can visit the Salt, Ink & Soul Resources Page.

    👉 Resources for Hard Times

  • Honey Butter Brown Sugar Detroit-Style Dessert Pizza

    Honey Butter Brown Sugar Detroit-Style Dessert Pizza

    A Different Kind of Ending

    There’s a moment at the end of a meal where you realize you don’t need more.

    Not more weight. Not more richness. Not something trying to outdo what came before it.

    Just something that settles in gently.

    Something warm. Slightly sweet. Familiar in a way that doesn’t ask for attention.

    This comes from the same place as the main dish.

    Same dough. At the same time. Same care.

    It just chooses a different direction.

    Ingredients

    Base

    Topping

    • 3 tablespoons unsalted butter
    • ¼ cup brown sugar
    • 1–2 tablespoons honey
    • Pinch of sea salt

       Method

    1. Bring the dough back

    Remove your overnight dough from the refrigerator about 2 hours before baking.

    Let it come to room temperature.

    Transfer it to your well-oiled 9×13 pan and gently stretch it toward the edges.

    If it resists, let it rest.

    Then come back to it.

    Let it rise until it looks soft. Slightly puffy. Ready.

    2. Prepare the butter

    Melt the butter gently over low heat.

    If you want to take it a step further, let it cook just long enough to turn lightly golden—until it smells slightly nutty.

    Not dark. Not burnt. Just deeper.

    3. Build the base

    Brush the dough generously with the melted butter.

    Sprinkle the brown sugar evenly across the surface.

    Not too much. Just enough to melt into the dough as it bakes.

    4. Bake

    Preheat your oven to 500°F (or as high as it will go).

    Bake for 12–15 minutes.

    You’re looking for:

    • A golden surface
    • Light caramelization
    • Edges that crisp slightly against the pan

    5. Finish

    As soon as it comes out of the oven:

    • Drizzle with honey
    • Add a small pinch of sea salt

    Let it rest for about 5 minutes.

    Then slice.

    This wasn’t the beginning.

    It started with something structured. Something that took time.

    Not Every Square Pizza Is Detroit Style 

    And somewhere in between, there was something that brought it back into balance.

    What Cuts Through the Richness 

    This is just where it settles.

    Kyle J. Hayes

    kylehayesblog.com

    If this found you at the right time,

    Feel free to like, comment, or share it with someone who might need it too.

    Resources for Hard Times

    If you’re looking for practical help, food support, or community resources, you can visit the Salt, Ink & Soul Resources Page.

    👉 Resources for Hard Times

  • Not Every Square Pizza Is Detroit Style

    Not Every Square Pizza Is Detroit Style

    It seems lately that everywhere I turn, I see the words “Detroit-style pizza.”

    On menus. In passing conversations. In videos where the crust is held up like proof of something—something important, something worth noticing. For a while, I thought I understood it. I thought the difference was simple. That Detroit-style pizza was just pizza that had been squared off. A shape. A presentation. Something visual.

    I was wrong.

    That’s the danger of distance. From far enough away, everything starts to look the same. Dough becomes Dough. Pizza becomes pizza. Regions blur into each other until all that’s left is the outline of something that used to mean more.

    But I’m from the Midwest, and the Midwest doesn’t really believe in sameness, no matter how often it’s flattened into that idea.

    Chicago is not Detroit.

    Casey’s is not Chicago.

    And Detroit is not trying to be either one.

    Each of them carries something specific. Built from the people who made it. The work they did. The pace at which they lived. The kind of hunger they came home with. Food like this isn’t accidental. It doesn’t happen because someone wanted to be different. It happens because the difference was already there.

    And maybe that’s why I kept seeing it.

    Because something in me recognized that I had mistaken shape for substance.

    So here I am, in Albuquerque, New Mexico, standing in a kitchen far from where this pizza began, trying to understand it the only way that ever really works—by making it.

    Not quickly. Not forcefully. But with time.

    Because Detroit-style pizza, the kind people talk about like it matters, doesn’t come together in a rush. The Dough sits overnight. It rests. It changes. It becomes something else while you’re doing something else. And by the time you come back to it, it’s no longer just ingredients. It’s something with structure. With intention.

    And that feels familiar.

    Because many things in life don’t reveal themselves immediately, a lot of things ask you to wait. Ask you to trust that something is happening even when you can’t see it yet.

    This is my attempt at that kind of patience.

    My attempt at making something I once misunderstood.
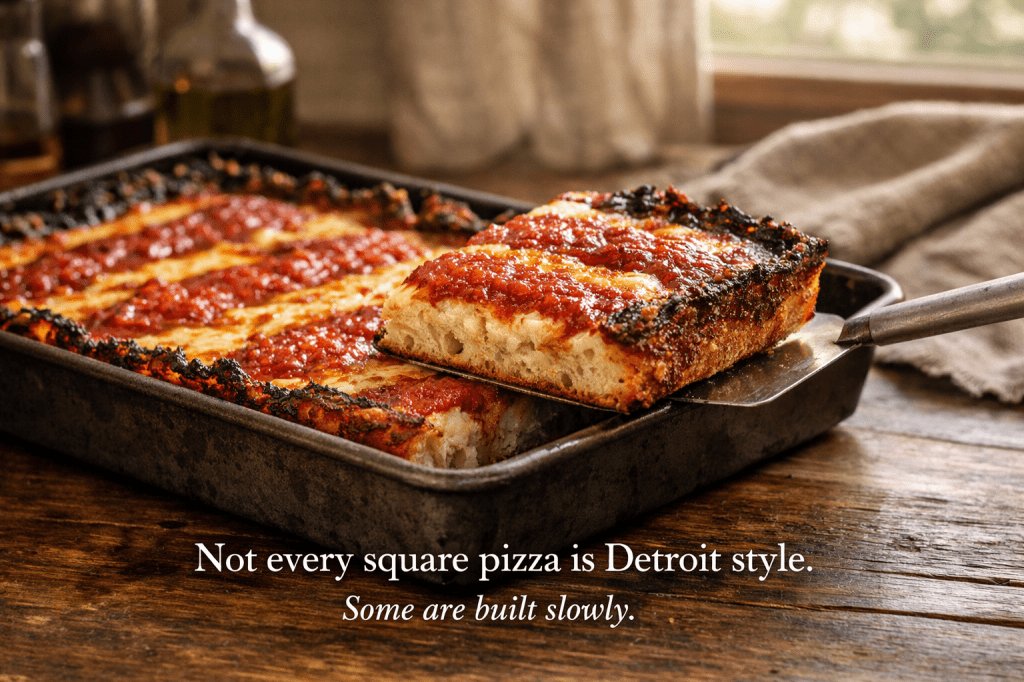
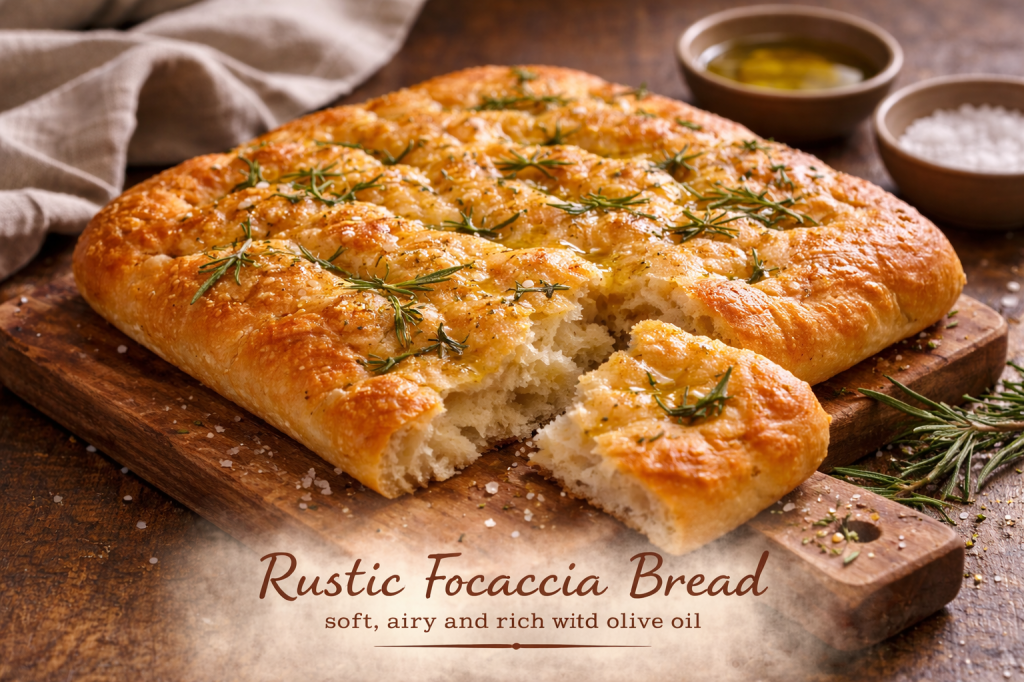
    Detroit-Style Pizza

    9 x 13 Pan — Overnight Dough

    Why This Pizza Is Different

    Detroit-style pizza isn’t just square.

    It’s built in layers that challenge expectations.

    Cheese goes to the edges.

    Sauce comes last.

    Oil becomes part of the crust, not just something used to keep it from sticking.

    And the Dough—maybe the most important part—takes its time.

    Dough Ingredients (Overnight Fermentation)

    • 2 ½ cups (300g) bread flour
    • 1 teaspoon salt
    • 1 teaspoon sugar
    • ½ teaspoon instant yeast
    • 1 cup (240g) warm water
    • 1 tablespoon olive oil

    For the Pan

    • 2 to 3 tablespoons olive oil

    Cheese and Toppings

    • 12 to 16 ounces low-moisture mozzarella, shredded or cubed
    • Optional: brick cheese, if available
    • Pepperoni, if desired

    Sauce

    • 1 cup crushed tomatoes
    • 1 tablespoon olive oil
    • 1 clove garlic, grated
    • Salt to taste
    • Pinch of sugar (optional)
    • Dried oregano or basil

    Method

    Night Before — Let It Begin

    In a bowl, combine the flour, salt, sugar, yeast, warm water, and olive oil. Stir until a sticky, shaggy dough forms.

    It won’t look finished. That’s fine.

    Let it rest for about 10 to 15 minutes. Then, if you want, do one gentle stretch and fold in the bowl. Just once. Enough to give it some direction without forcing it into something it isn’t ready to be.

    Cover the bowl and refrigerate overnight.

    12 to 18 hours.

    This is where the real work happens. Quietly. Without you.

    Next Day — Bring It Back

    Take the Dough out of the refrigerator about 2 hours before you plan to bake. Let it come to room temperature slowly.

    Oil your 9 x 13 pan with 2 to 3 tablespoons of olive oil. Spread it generously.

    Transfer the Dough into the pan and gently stretch it toward the corners.

    If it resists, don’t force it. Let it rest. Come back in 10 to 15 minutes. Dough responds better to patience than pressure.

    Second Rise — In the Pan

    Let the Dough rise in the pan for 1 to 2 hours.

    It should look soft. Puffy. Alive in a quiet way.

    Make the Sauce

    In a small saucepan, combine the crushed tomatoes, olive oil, garlic, salt, and herbs. Add a pinch of sugar if needed.

    Simmer for 10 to 15 minutes until slightly thickened.

    Set aside.

    Build the Pizza

    Preheat your oven to 500°F, or as high as it will go.

    Add the cheese across the entire surface of the Dough, pushing it to the edges. This matters more than it seems. The cheese that touches the pan becomes something else entirely—dark, crisp, almost laced into the crust itself.

    Add pepperoni if you like.

    Bake

    Place the pizza in the oven and bake for 12 to 15 minutes, until the cheese is bubbling and the edges are deeply golden.

    Remove it briefly and spoon the sauce across the top in stripes.

    Return it to the oven for another 3 to 5 minutes.

    Finish

    Let the pizza rest in the pan for about 5 minutes.

    Then carefully loosen it and lift it out.

    If everything came together the way it should, the bottom will be crisp, the inside soft and airy, and the edges will carry that deep, caramelized texture that makes this style unmistakable.

    Notes From My Kitchen

    Overnight Dough changes things.

    Not dramatically. Not in a way that demands attention. But in a way, you notice once you’ve had it.

    The flavor is deeper. Slightly more complex. The texture feels more settled. More certain of itself.

    That could be the part that stays with me.

    Because we live in a time that pushes for speed. For immediacy. For results that appear as quickly as the desire for them.

    But some things don’t respond well to that kind of urgency.

    Some things need to sit.

    Need to rest.

    Need to become.

    This pizza reminded me of that.

    Reminded me that what looks simple from the outside often carries more intention than we realize. That shape isn’t the story. That time is part of the recipe, whether we acknowledge it or not.

    And that sometimes, if you’re willing to wait—

    What you end up with isn’t just better.

    It’s understood.

    Kyle J. Hayes

    kylehayesblog.com

    If this found you at the right time,

    Feel free to like, comment, or share it with someone who might need it too.

    Resources for Hard Times

    If you’re looking for practical help, food support, or community resources, you can visit the Salt, Ink & Soul Resources Page.

    👉 Resources for Hard Times

  • Rustic Focaccia Bread

    Rustic Focaccia Bread

    A warm loaf meant for tearing, dipping, and sharing.

    There’s something about bread coming out of the oven that changes the mood of a kitchen.

    The smell alone is enough to make people wander in from other rooms. Someone leans against the counter. Someone else tears off a corner before it has properly cooled.

    Focaccia has always been one of the more forgiving breads. It doesn’t ask for perfection. No elaborate shaping. No delicate scoring. Just Flour, Water, Yeast, olive oil, and a few dimples pressed into the dough with your fingertips.

    It’s the kind of bread that feels alive while you’re making it.

    This particular loaf pairs beautifully with a bright tomato salad or with the Tuscan chicken we shared earlier this week. Something about olive oil, tomatoes, and warm bread feels like it belongs on the same table.

    Simple ingredients.

    A hot oven.

    And a loaf of bread that’s meant to be torn apart while it’s still warm.

    Rustic Focaccia Bread

    Yield: 1 large focaccia or 2 small

    Prep Time: 50 minutes

    Cook Time: 6–10 minutes

    Ingredients

    Plain Flour — 400 g

    The bread’s foundation creates a soft interior and crisp edges.

    Warm Water — 320 ml

    Warm Water helps activate the Yeast and bring the dough together.

    Salt — 8 g

    Salt strengthens the dough and deepens the flavor.

    Sugar — 8 g

    Just enough to help the Yeast begin its work.

    Instant Yeast — 7 g (1 sachet)

    The quiet engine that lifts the dough.

    Olive Oil — 3 tablespoons (for greasing the pan)

    Creates the crisp, golden underside that makes focaccia so satisfying.

    Olive Oil — 3 tablespoons (for topping)

    Focaccia loves olive oil. Don’t be shy.

    Sea Salt — to taste

    Optional toppings

    • Fresh herbs (rosemary or thyme work beautifully)

    • Garlic granules

    Method

    1. Preheat the oven.

    Preheat your oven to 250°C (482°F).

    A hot oven is what gives focaccia its golden crust.

    2. Activate the Yeast

    In a food processor, combine:

    • warm Water
    • sugar
    • instant Yeast

    Pulse briefly until the Yeast and sugar dissolve.

    3. Form the Dough

    Add the Flour and salt to the food processor.

    Pulse until the mixture comes together into a rough dough ball.

    It doesn’t need to be perfectly smooth at this stage.

    4. First Rise

    Transfer the dough to a large bowl.

    Fold the dough over itself 3–4 times to tighten it into a compact shape.

    Cover and allow it to rise for 15 minutes.

    5. Prepare the Pan

    Pour 3 tablespoons of olive oil into a baking tray and spread it evenly to grease the surface.

    Place the dough into the tray and gently stretch it toward the edges.

    Cover and let the dough rise for another 10 minutes.

    6. Add Toppings

    Drizzle the remaining 3 tablespoons of olive oil across the surface of the dough.

    Sprinkle with:

    • sea salt
    • herbs (if using)
    • garlic granules (optional)

    Using your fingertips, press dimples across the surface of the dough.

    Those little pockets will catch the olive oil while it bakes.

    7. Final Rise

    Allow the dough to rest for 10–15 minutes.

    You’ll see it soften and puff slightly.

    8. Bake

    Place the tray into the hot oven and bake for 6–10 minutes, until the focaccia turns golden.

    The edges should be crisp while the center remains soft.

    Notes From My Kitchen

    Focaccia is best eaten warm.

    Tear it apart, dip it in the olive oil that collects in the dimples, and don’t worry too much about neat slices.

    It’s the kind of bread that belongs beside simple food.

    A plate of tomatoes.

    A pan of Tuscan chicken.

    Or just a small dish of olive oil and a quiet moment in the kitchen.

    Sometimes the simplest bread is exactly the one you need.

    Kyle J. Hayes

    kylehayesblog.com

    Please like, comment, and share

    Resources for Hard Times

    If you’re looking for practical help, food support, or community resources, you can visit the Salt, Ink & Soul Resources Page.

    👉 Resources for Hard Times