Category: Dessert

  • Keto Blueberry Cheesecake

    Keto Blueberry Cheesecake

    It’s just a nice, bright Sunday morning.

    Not the rushing kind of Sunday or the Sunday where you are already thinking about Monday.

    But the quiet one.

    The one where the house is still.

    The coffee is hot.

    The light comes through the window, soft enough to forgive you for moving slowly.

    That is where this cheesecake belongs.

    A cheesecake is not a loud dessert. It does not beg for attention. It waits. It chills overnight. It asks you to be patient. It reminds you that some good things cannot be hurried, no matter how badly we want to taste them.

    And maybe that is part of why I like it.

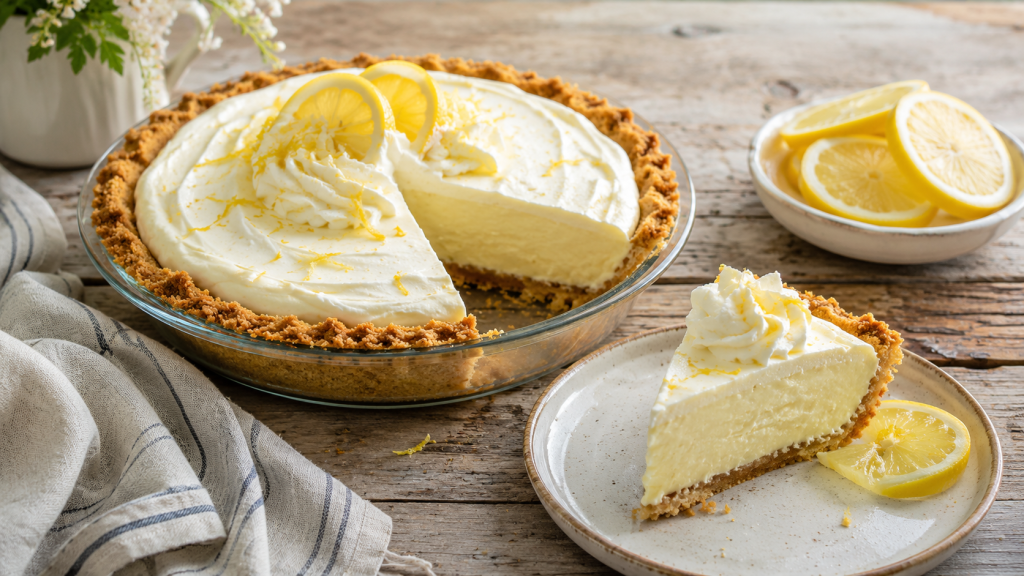
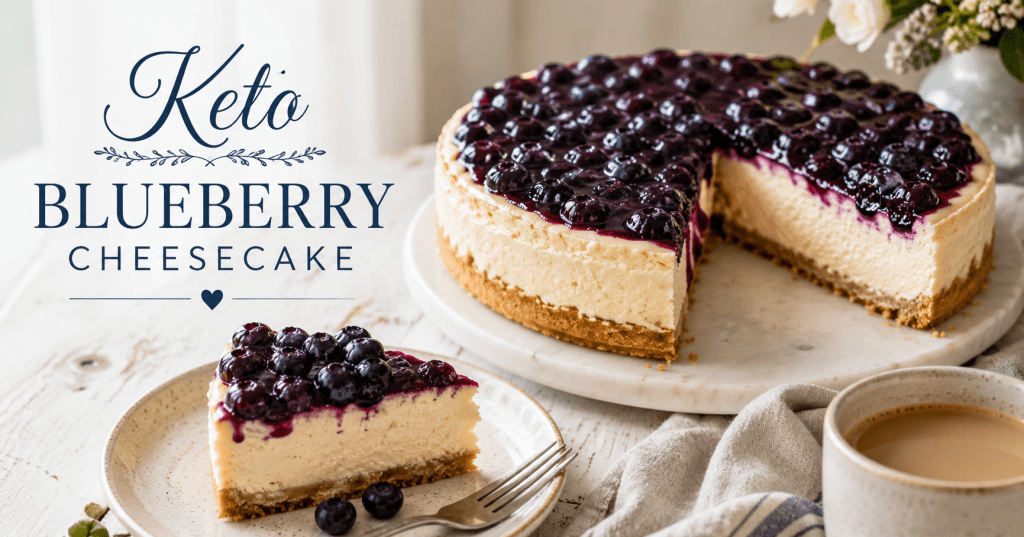
    This keto blueberry cheesecake is rich, creamy, and low-carb, but it does not feel like punishment. It does not taste like something pretending to be dessert. It has a buttery almond flour shortbread crust, a smooth vanilla cheesecake filling, and a blueberry topping that cooks down into something deep, glossy, and almost old-fashioned.

    The kind of dessert you make when you want something sweet, but you still want to take care of yourself.

    The kind of dessert you cut slowly.

    The kind you serve on a small plate on a Sunday morning, or after Sunday dinner, when the day is almost done, and everyone is just a little quieter than they were before.

    There is something peaceful about that.

    A dessert made with intention.

    A dessert made with restraint.

    A dessert that says sweetness still belongs here.

    Keto Blueberry Cheesecake

    Ingredients

    Shortbread Cookie Crust

    • 1 ¼ cups 140 g blanched almond flour
    • ¼ cup 40 g confectioners’ Swerve
    • ¼ cup 56 g melted butter
    • 1 teaspoon pure vanilla extract
    • 1 large egg
    • Pinch of salt

    Cheesecake Filling

    • 24 ounces cream cheese, softened
    • ¾ cup powdered monk fruit or erythritol sweetener, about 140–145 g
    • 3 large eggs, room temperature
    • ¾ cup sour cream, about 180 g
    • 1 tablespoon pure vanilla extract
    • 1 tablespoon lemon juice
    • 1 teaspoon lemon zest, optional
    • Pinch of salt

    Keto Blueberry Topping

    • 1 bag 16 oz frozen blueberries
    • ¼ cup powdered monk fruit or erythritol sweetener
    • 2 tablespoons lemon juice
    • ¼ cup water
    • 1 teaspoon pure vanilla extract
    • Pinch of salt
    • ¼ to ½ teaspoon xanthan gum, optional, for thickening

    Use ¼ teaspoon xanthan gum for a looser blueberry sauce.

    Use ½ teaspoon xanthan gum for a thicker, pie-filling-style topping.

    Instructions

    1. Prepare the crust

    Preheat the oven to 325°F.

    Toast the almond flour in a dry pan over medium-low heat for a few minutes, stirring often, until lightly golden and fragrant. Watch it closely. Almond flour can go from toasted to burned quickly.

    In a mixing bowl, combine the toasted almond flour, confectioners’ Swerve, melted butter, vanilla extract, egg, and salt.

    Mix until a soft dough forms.

    Line the bottom of a 9-inch springform pan with parchment paper.

    Press the crust mixture evenly into the bottom of the pan.

    Bake the crust for 10–14 minutes, until lightly golden and set.

    Remove it from the oven and let it cool while you prepare the cheesecake filling.

    2. Make the cheesecake filling

    In a large bowl, beat the softened cream cheese until smooth and creamy.

    Add the powdered monk fruit or erythritol sweetener and mix until fully combined.

    Add the eggs one at a time, mixing gently after each egg. Do not overmix. Too much air can cause the cheesecake to crack.

    Add the sour cream, vanilla extract, lemon juice, lemon zest, and salt.

    Mix until the filling is smooth and creamy.

    3. Bake the cheesecake

    Pour the cheesecake filling over the cooled shortbread crust.

    Smooth the top with a spatula.

    Place the springform pan on a baking sheet.

    Bake at 325°F for 45–55 minutes, or until the edges are set and the center still has a slight jiggle.

    Turn off the oven, crack the door open, and let the cheesecake rest inside for 45 minutes.

    Remove the cheesecake from the oven and let it cool to room temperature.

    Refrigerate for at least 6 hours, but overnight is best.

    4. Make the blueberry topping

    Add the frozen blueberries, sweetener, lemon juice, water, vanilla extract, and salt to a medium saucepan.

    Cook over medium heat for 8–12 minutes, stirring occasionally, until the blueberries thaw, soften, and release their juices.

    Lightly mash some of the blueberries with the back of a spoon, leaving some whole for texture.

    Let the mixture simmer for another 3–5 minutes, until it reduces slightly.

    For a thicker topping, lightly sprinkle in the xanthan gum while stirring constantly. Do not dump it all at once, or it may clump.

    Simmer for 1–2 more minutes, then remove from the heat.

    Let the topping cool completely before adding it to the cheesecake.

    5. Chill and serve

    Once the cheesecake has fully chilled, spoon the cooled blueberry topping over the whole cheesecake.

    For cleaner slices, keep the topping separate and spoon it over each slice when serving.

    Slice with a sharp knife. Wipe the knife between cuts to keep the edges clean.

    Serve cold.

    And take your time.

    Helpful Notes

    Because the crust contains an egg, it should be pre-baked before adding the cheesecake filling.

    The cheesecake is done when the edges are set, but the center still has a slight jiggle.

    The blueberry topping will thicken more as it cools.

    For the best flavor and texture, chill the cheesecake overnight before serving.

    This cheesecake is rich, so small slices work well.

    It does not need much else. Maybe coffee. Maybe silence. Maybe somebody at the table who understands that food does not have to be complicated to feel like care.

    Sometimes care is a pot on the stove.

    Sometimes it is a crust pressed into a pan.

    Sometimes it is blueberries breaking open slowly in their own juice.

    And sometimes it is choosing sweetness without abandoning yourself.

    Kyle J. Hayes

    kylehayesblog.com

    Please like, comment, and share

    Resources for Hard Times

    If you’re looking for practical help, food support, or community resources, you can visit the Salt, Ink & Soul Resources Page.

    👉 Resources for Hard Times

  • Apple Cinnamon Bread Pudding

    Apple Cinnamon Bread Pudding

    This is the kind of dessert that belongs to a cold, rainy day.

    Not fancy. Not loud. Just warm bread, soft apples, cinnamon, brown sugar, and enough custard to turn what might have been leftover into something that feels intentional.

    It would pair beautifully with the Green Chile Mushroom Soup. The soup brings earth and heat. The bread beside it brings comfort. This dessert carries that comfort into something sweet.

    A quiet ending.

    Ingredients

    • 6 cups day-old bread, cubed
    • homemade bread, brioche, challah, French bread, or sandwich bread all work
    • 2 medium apples, peeled and diced
    • Honeycrisp, Gala, Fuji, or Granny Smith
    • 4 tablespoons butter, divided
    • 1/3 cup brown sugar
    • 1 teaspoon cinnamon
    • 1/4 teaspoon nutmeg, optional
    • Pinch of salt
    • 3 large eggs
    • 2 cups whole milk
    • 1/2 cup heavy cream
    • Or use all milk if you want it lighter
    • 1/2 cup granulated sugar
    • 2 teaspoons vanilla extract

    Optional Topping

    • 2 tablespoons melted butter
    • 2 tablespoons brown sugar
    • 1/2 teaspoon cinnamon

    Method

    Preheat the oven to 350°F.

    Grease an 8×8-inch baking dish or a similar-sized casserole dish.

    Place the bread cubes in a large bowl.

    In a skillet over medium heat, melt 2 tablespoons of butter. Add the diced apples, brown sugar, cinnamon, nutmeg if using, and a pinch of salt.

    Cook for 5 to 7 minutes, until the apples soften slightly and the sugar begins to turn syrupy.

    Pour the warm apples over the bread cubes and gently toss.

    In another bowl, whisk together the eggs, milk, heavy cream, granulated sugar, and vanilla.

    Pour the custard over the bread and apples. Press the bread down gently so it can soak up the custard.

    Let it sit for 15 to 20 minutes.

    Pour the mixture into the prepared baking dish.

    For the topping, mix the melted butter, brown sugar, and cinnamon together, then drizzle it over the top.

    Bake for 40 to 45 minutes, until the top is golden and the center is set but still soft.

    Let it rest for 10 minutes before serving.

    Optional Vanilla Glaze

    • 1/2 cup powdered sugar
    • 1 tablespoon milk or cream
    • 1/2 teaspoon vanilla extract

    Stir together until smooth. Drizzle over the warm bread pudding just before serving.

    Notes From My Kitchen

    Day-old bread works best because it absorbs the custard without falling apart.

    This is also a good place to use any leftover homemade bread from the Green Chile Mushroom Soup meal. The bread that sat beside the bowl can come back one more time, softened with apples, cinnamon, and custard.

    For a richer dessert, use brioche or challah.

    For something more practical and still good, use whatever bread you already have.

    Add pecans or walnuts for some crunch.

    Serve it warm, plain, glazed, or with a small scoop of vanilla ice cream.

    This is not a dessert trying to impress the room.

    It is the kind that waits quietly at the end of the meal.

    Kyle J. Hayes

    kylehayesblog.com

    Please like, comment, and share

    Resources for Hard Times

    If you’re looking for practical help, food support, or community resources, you can visit the Salt, Ink & Soul Resources Page.

    👉 Resources for Hard Times

  • Grilled Mangoes with Chile and Lime

    Grilled Mangoes with Chile and Lime

    Some recipes feel less like cooking and more like paying attention.

    A mango is already almost enough by itself. Sweet. Soft. Bright. A little wild when it is ripe enough. The kind of fruit that asks very little from you, except maybe a knife and a moment of quiet.

    But heat changes it.

    A few minutes on the grill brings the sugar forward. The edges darken. The fruit softens. The sweetness deepens into something warmer, almost smoky. Then comes the chile, the lime, the salt. Suddenly, it is no longer just fruit. It is a small plate of summer. Sweetness with a little fire behind it. Brightness with a little edge.

    This is simple food.

    Not dessert exactly. Not a side dish exactly. Something in between. Something you can serve beside grilled chicken, tacos, a sandwich, or eat standing in the kitchen before anyone else notices.

    And sometimes that is the best kind of recipe.

    Grilled Mangoes with Chile and Lime

    Ingredients

    • 2 ripe but firm mangoes
    • 1 tablespoon neutral oil or melted butter
    • 1 tablespoon fresh lime juice
    • 1 teaspoon honey, optional
    • 1/2 teaspoon chili powder
    • 1/4 teaspoon New Mexico red chile powder, optional
    • Pinch of cayenne, optional
    • 1/4 teaspoon salt
    • Zest of 1 lime, optional
    • Fresh cilantro or mint, optional
    • Extra lime wedges, for serving

    Instructions

    Heat a grill, grill pan, or cast-iron skillet over medium-high heat.

    Cut the mangoes along both sides of the pit, leaving you with two wide mango cheeks from each fruit. You can score the flesh lightly in a crosshatch pattern, but do not cut through the skin. This helps the seasoning settle in and makes the mango easier to eat later.

    In a small bowl, stir together the oil or melted butter, lime juice, honey (if using), chili powder, New Mexico red chile powder, cayenne (if using), and salt.

    Brush the cut side of each mango with the chile-lime mixture.

    Place the mangoes cut-side down on the hot grill. Cook for 2 to 4 minutes, until grill marks appear and the fruit begins to soften.

    Turn them over and cook for another 1 to 2 minutes on the skin side, just to warm them through.

    Remove from the grill.

    Finish with lime zest, a little more chile powder, fresh cilantro or mint if desired, and a squeeze of fresh lime.

    Serve warm.

    Notes From My Kitchen

    Use ripe but still firm mangoes. If they are too soft, they may fall apart on the grill.

    A grill pan works well if you do not want to cook outside. A cast-iron skillet will not give you the same marks, but it will still caramelize the fruit.

    For a New Mexico version, use a little New Mexico red chile powder in the seasoning. It brings warmth without taking away from the mango.

    For something closer to street fruit, finish with tajín or a chile-lime seasoning.

    For a richer version, brush the mangoes with melted butter instead of oil.

    For a dessert version, add a spoonful of Greek yogurt, whipped cream, or vanilla ice cream beside the warm mango.

    What to Serve With It

    These grilled mangoes would sit beautifully beside Green Chile Chicken Pizza, especially if you want something bright and sweet after all that cheese, chile, and crust.

    They would also work with grilled chicken, fish tacos, carne asada, or a simple bowl of rice and beans.

    Final Note

    This is the kind of food that reminds you how little a good ingredient needs.

    A little heat.

    A little salt.

    A little lime.

    Enough chile to wake it up.

    And suddenly, the mango becomes more than just sweet. It becomes summer with a spark.

    Kyle J. Hayes

    kylehayesblog.com

    Please like, comment, and share

    Resources for Hard Times

    If you’re looking for practical help, food support, or community resources, you can visit the Salt, Ink & Soul Resources Page.

    👉 Resources for Hard Times

  • No-Bake Lemon Icebox Pie

    No-Bake Lemon Icebox Pie

    A Cold Sweet Mercy

    Some desserts are built for relief.

    Not the loud kind. Not the kind that needs fire, timing, layers, or faith in an oven. Just something cold, bright, sweet, and simple enough to make the day feel a little less heavy.

    That is what this No-Bake Lemon Icebox Pie is here to do.

    After the heat of the Green Chile Chicken Melt on Focaccia, and the brightness of the Corn, Tomato, and Cucumber Salad, the week needs something cool at the end. Something that does not ask much from you. Something that waits in the refrigerator and improves with time because you gave it time.

    This pie is simple.

    Graham cracker crust. Sweetened condensed milk. Lemon juice. Lemon zest. Whipped topping or whipped cream. A little patience.

    That is it.

    No oven. No complicated crust. No scratch cake drama. Just a pie that sits in the cold and gives back something clean, sharp, creamy, and kind.

    It tastes like summer without having to make a speech about summer.

    It tastes like somebody opened the refrigerator after dinner and remembered there was still one good thing waiting.

    No-Bake Lemon Icebox Pie

    Ingredients

    • 1 prepared graham cracker crust
    • 1 can sweetened condensed milk, 14 ounces
    • ½ cup fresh lemon juice
    • 1 tablespoon lemon zest
    • 1 teaspoon vanilla extract
    • 1 container whipped topping, 8 ounces, thawed
    • or 2 cups homemade whipped cream
    • Pinch of salt, optional
    • Extra lemon zest or whipped cream, for topping

    Method

    1. Make the lemon filling

    In a large bowl, whisk together the sweetened condensed milk, lemon juice, lemon zest, vanilla, and a small pinch of salt if using.

    The mixture will begin to thicken as the lemon juice meets the condensed milk.

    Let it happen.

    Some things do not need force. They just need the right conditions.

    2. Fold in the whipped topping

    Gently fold in the whipped topping or whipped cream.

    Do not beat it hard. You want the filling smooth and light, not tired.

    Fold until everything is combined and no large streaks remain.

    3. Fill the crust

    Spoon the lemon filling into the graham cracker crust.

    Smooth the top with a spatula.

    It does not have to be perfect. A few soft waves on top look more human anyway.

    4. Chill

    Cover the pie and refrigerate for at least 4 hours, or overnight if possible.

    The longer it chills, the better it sets.

    This is the rare dessert that rewards waiting.

    5. Garnish and serve

    Before serving, add extra lemon zest, whipped cream, or a few thin lemon slices to finish it.

    Slice cold and serve straight from the refrigerator.

    Notes From My Kitchen

    Fresh lemon juice is best here. Bottled lemon juice will work in a pinch, but fresh lemon gives the pie its brightness.

    The Graham cracker crust can be store-bought. There is no shame in that. This dessert is about ease.

    If you want a firmer pie, freeze it for 1 to 2 hours before serving. It will slice cleaner and feel almost like a frozen lemon cream pie.

    For more lemon flavor, add extra zest. For more sweetness, add a little more whipped topping.

    A pinch of salt helps balance the sweetness.

    If using homemade whipped cream, make sure it is whipped to medium peaks before folding it into the lemon mixture.

    What to Serve With It

    This pie closes the week’s Salt, Ink & Soul arc.

    The Green Chile Chicken Melt on Focaccia brought the heat.

    The Corn, Tomato, and Cucumber Salad brought the brightness.

    This No-Bake Lemon Icebox Pie brings the relief.

    Cold. Sweet. Simple. Kind.

    Read more recipes and reflections at Salt, Ink & Soul.

    Kyle J. Hayes

    kylehayesblog.com

    Please like, comment, and share

    Resources for Hard Times

    If you’re looking for practical help, food support, or community resources, you can visit the Salt, Ink & Soul Resources Page.

    👉 Resources for Hard Times

  • Peach Cobbler Dump Cake

    Peach Cobbler Dump Cake

    A Sweet Ending Without Much Fuss

    Some desserts arrive with ceremony.

    The careful measuring. The softened butter. The flour is dusting the counter. The stand mixer waits like a machine built for confidence. The kind of baking that asks you to believe, fully and without fear, that the cake will rise, the crumb will behave, and the center will not betray you.

    This is not that dessert.

    This one begins with canned peaches and a box of cake mix.

    And I am at peace with that.

    If you know my personal history with making cakes from scratch, then you understand why there is wisdom here. Some recipes are not about proving anything. Some recipes are about getting something warm and sweet on the table without turning dessert into a personal trial.

    This Peach Cobbler Dump Cake says summer backyard cookout.

    It says folding chair in the shade. Paper plates. Smoke is still hanging somewhere in the air. Somebody laughing too loud. Somebody going back for seconds before pretending they were “just evening out the pan.”

    It fits this week’s meal because it does not fight for attention. The BBQ Chicken Focaccia brought the smoke and sweetness. The Creamy Apple Slaw brought the cool crunch. This dessert brings the soft landing.

    Warm peaches. Butter. Cinnamon. Brown sugar. Cake mix turning golden and crisp at the edges.

    Nothing complicated.

    Nothing precious.

    Just something sweet enough to close the week gently.

    Peach Cobbler Dump Cake

    Ingredients

    • 2 cans sliced peaches in syrup or juice, about 15 ounces each
    • 1 teaspoon vanilla extract
    • 1 teaspoon ground cinnamon
    • 2 tablespoons brown sugar
    • 1 box yellow cake mix
    • ¾ cup butter, melted or sliced thin
    • ½ cup chopped pecans, optional
    • Pinch of salt, optional
    • Vanilla ice cream or whipped cream, optional for serving

    Method

    1. Prepare the dish

    Preheat the oven to 350°F.

    Lightly grease a 9×13-inch baking dish.

    This is not the time to make life harder. Grease the dish and keep moving.

    2. Add the peaches

    Pour the canned peaches into the baking dish, syrup and all.

    Stir in the vanilla, cinnamon, brown sugar, and a small pinch of salt if using.

    Spread the peaches into an even layer.

    The peaches are the foundation here. Sweet, soft, familiar. They do not need much help. Just a little warmth, a little spice, and enough vanilla to make the kitchen smell like somebody cared.

    3. Add the cake mix

    Sprinkle the dry yellow cake mix evenly over the peaches.

    Do not stir.

    That feels wrong the first time you do it. Trust the process.

    The cake mix will sit on top and do what it came to do.

    4. Add the butter

    Pour the melted butter evenly over the cake mix.

    Or, if using sliced butter, place thin slices across the top until most of the cake mix is covered.

    Try to cover as much dry mix as possible. The butter is what turns the top golden, tender, and crisp around the edges.

    5. Add pecans, if using

    Sprinkle chopped pecans over the top.

    They are optional, but they add a little crunch and depth. That matters when everything else is soft and sweet.

    6. Bake

    Bake for 40 to 50 minutes, or until the top is golden brown and the peach filling is bubbling around the edges.

    If there are a few dry patches of cake mix, do not panic. That is part of dump cake life. You can gently drizzle a little extra melted butter over those spots near the end if needed.

    7. Rest and serve

    Let the cake rest for 10 to 15 minutes before serving.

    Serve warm with vanilla ice cream, whipped cream, or nothing at all.

    It knows what it is.

    Notes From My Kitchen

    Use peaches in syrup for a sweeter, richer dessert. Use peaches in juice if you want it a little lighter.

    Yellow cake mix works best here, but white cake mix or butter cake mix can also work.

    Melted butter gives more even coverage. Thin slices of butter give you those golden patches that feel a little more rustic.

    The pecans are optional, but they make the dessert feel more like a cookout table.

    A little nutmeg would also work if you want more warmth, but do not overdo it. This dessert does not need to be complicated.

    This is best served warm, but leftovers are still dangerous in the refrigerator with a spoon nearby.

    What to Serve With It

    This Peach Cobbler Dump Cake completes the week’s plate.

    First came the BBQ Chicken Focaccia Sandwich — smoky, rich, sweet, and sharp.

    Then came the Creamy Apple Slaw — cool, crisp, bright, and balancing.

    Now comes this dessert — warm, simple, generous, and familiar.

    Together, they feel like a backyard cookout without needing the whole neighborhood to come over.

    Closing Reflection

    There is something kind about an easy dessert.

    Not lazy.

    Kind.

    There are weeks when the body is tired. Weeks when the routine is still coming back together. Weeks when you want to make something good, but you do not want the kitchen to become another battlefield.

    That is where this dessert belongs.

    It does not ask too much.

    It lets the peaches do what peaches do. It lets the cake mix carry what scratch baking sometimes makes heavy. It lets butter, cinnamon, and brown sugar handle the rest.

    And maybe there is wisdom in that.

    Maybe after a week of returning to rhythm, after the smoke and crunch and all the small efforts to get back to yourself, dessert does not need to be a test.

    Maybe it can simply be a soft landing.

    Something warm.

    Something sweet.

    Something easy enough to make without losing the peace you were trying to protect.

    If this dessert finds its way to your table, I hope it reminds you that simple still counts. Sometimes the kindest thing you can make is the thing that lets you keep your peace.

    Read more recipes and reflections at Salt, Ink & Soul.

    Kyle J. Hayes

    kylehayesblog.com

    Please like, comment, and share

    Resources for Hard Times

    If you’re looking for practical help, food support, or community resources, you can visit the Salt, Ink & Soul Resources Page.

    👉 Resources for Hard Times

  • Keto Mexican Chocolate Pudding Cups

    Keto Mexican Chocolate Pudding Cups

    Dessert does not always need flour.

    It does not always need a crust, a cake pan, or the kind of sweetness that leaves the body tired afterward.

    Sometimes dessert can be small.

    Cold.

    Dark.

    Quiet.

    A spoon moving through chocolate thickened by cream and patience.

    This week began with green chile lime chicken and cauliflower rice. Then came the green chile avocado salad, cool and sharp and full of New Mexico brightness. So, for dessert, I wanted something that didn’t break the rhythm. Something chilled. Something keto-friendly. Something with depth instead of heaviness.

    That brought me to Mexican-style chocolate.

    I want to be clear about that.

    I am not Latino, and this is not me claiming a tradition that is not mine. This pudding is inspired by the flavors often associated with Mexican chocolate—cocoa, cinnamon, vanilla, and a small whisper of chile. I use those flavors with respect and gratitude, because good food deserves credit. Flavor has a lineage. Ingredients have memory. And when we borrow from a tradition, the least we can do is credit the source.

    This is not a traditional Mexican dessert.

    It is a keto chocolate pudding cup shaped like that.

    Rich cream. Unsweetened cocoa. Cinnamon. Vanilla. A pinch of salt. A little chile powder or cayenne if you want the heat to arrive at the end, quietly, like a door opening in another room.

    The sweetness is controlled.

    The texture is soft.

    The portion is small enough to feel reasonable and rich enough to feel like a dessert.

    Because even when you are trying to eat lighter, even when you are watching carbs, even when you tell yourself you do not need anything after dinner, there is still room for a little something sweet.

    Especially if it knows how to leave gently.

    Keto Mexican Chocolate Pudding Cups

    Serves

    4 small pudding cups

    Ingredients

    • 480 ml heavy cream
    • 25 g unsweetened cocoa powder
    • 40 g powdered monk fruit sweetener or powdered allulose
    • 1 teaspoon vanilla extract
    • 1 teaspoon ground cinnamon
    • ⅛ teaspoon cayenne pepper or ancho chile powder, optional
    • ¼ teaspoon salt
    • 2 large egg yolks
    • 15 g unsalted butter

    Optional Toppings

    • 120 ml heavy cream, whipped
    • 1 teaspoon powdered monk fruit or allulose, for whipped cream
    • A light dusting of cinnamon
    • Sugar-free dark chocolate shavings
    • 15 g chopped pecans or almonds

    Method

    1. Warm the Cream

    In a medium saucepan, add the heavy cream, cocoa powder, powdered sweetener, cinnamon, chile powder if using, and salt.

    Set the pan over medium-low heat.

    Whisk slowly until the cocoa dissolves and the cream begins to steam.

    Do not boil it.

    Chocolate does not need violence to become itself.

    2. Temper the Egg Yolks

    In a small bowl, whisk the egg yolks.

    Slowly pour a small amount of the warm chocolate cream into the egg yolks while whisking constantly.

    This warms the yolks gently so they do not scramble.

    Add the yolk mixture back into the saucepan.

    3. Thicken the Pudding

    Keep the heat on low.

    Whisk constantly for about 5 to 8 minutes, until the pudding thickens enough to coat the back of a spoon.

    Do not rush this part.

    Low heat gives you silk.

    High heat gives you regret.

    4. Finish

    Remove the pan from the heat.

    Stir in the vanilla extract and butter until smooth.

    Taste carefully.

    If you want more warmth, add a pinch more cinnamon or chile.

    If you want more sweetness, add a little more powdered sweetener.

    Let the pudding tell you what it needs.

    5. Chill

    Divide the pudding into 4 small cups or jars.

    Cover and refrigerate for at least 2 hours, or until fully chilled and set.

    6. Serve

    Top with lightly sweetened whipped cream, a dusting of cinnamon, sugar-free dark chocolate shavings, or chopped nuts.

    Serve cold.

    Small spoon recommended.

    Not because you have to be delicate.

    Because this is the kind of dessert that deserves to last a little longer.

    Notes From My Kitchen

    For the smoothest pudding, use powdered sweetener instead of granulated. Granulated sweeteners can leave a gritty texture.

    Allulose usually gives a softer, more sugar-like finish. Monk fruit works well too, especially if powdered.

    Chile is optional. Use just enough to warm the chocolate, not enough to dominate it.

    Ancho chile powder gives a deeper, earthier flavor. Cayenne gives sharper heat.

    For a dairy-free version, use full-fat coconut milk instead of heavy cream and coconut oil instead of butter, though the flavor will change.

    If you want a thicker pudding, chill it longer.

    Why This Dessert Works

    The chocolate brings depth.

    The cinnamon brings warmth.

    The Chile brings a small spark.

    The cream brings softness.

    And the keto structure keeps it from becoming heavier than the meal needs.

    It is a dessert without collapse.

    Sweetness without surrender.

    A small ending after a warm week of green chile, lime, avocado, and sun.

    And while it is only inspired by Mexican-style chocolate, that inspiration matters.

    Because food should not erase where its beauty comes from.

    It should be remembered.

    It should give thanks.

    Then it should be served cold, in a small cup, with a spoon.

    Kyle J. Hayes

    kylehayesblog.com

    Please like, comment, and share

    Resources for Hard Times

    If you’re looking for practical help, food support, or community resources, you can visit the Salt, Ink & Soul Resources Page.

    👉 Resources for Hard Times

  • Lemon Berry Parfait

    Lemon Berry Parfait

    Most meals do not need dessert.

    That is the sensible answer.

    The practical answer.

    The answer given by people who look at the table, see a sandwich and a bowl of soup, and decide the matter is finished.

    And maybe they are right.

    The Caprese Focaccia Press already brings enough. Crisp bread. Warm mozzarella. Tomato. Pesto. That little touch of balsamic glaze. The tomato soup sits beside it like an old friend, red and steady, made for dipping and slowing down.

    That could be the whole meal.

    But sometimes enough is not the same as complete.

    Sometimes the body does not ask for something heavy. It does not ask for cake, or pie, or anything that demands a fork and a commitment. Sometimes it only asks for a small, bright ending.

    A little coolness after all that warmth.

    A little lemon.

    A little berry.

    A little sweetness that does not shout.

    That is where this parfait belongs.

    It is not here to steal the meal. It is here to close it gently.

    Layered yogurt, berries, lemon zest, and something crisp at the bottom or between the layers. Granola, if you want breakfast to sneak into dessert. Crushed graham crackers, if you want it to feel softer, more like childhood. Shortbread crumbs if you want to pretend you planned all of this from the beginning.

    There is no shame in a light dessert.

    There is only the small mercy of giving yourself something pleasant at the end.

    Lemon Berry Parfait

    Ingredients

    • 1 cup Greek yogurt, vanilla yogurt, or lightly sweetened whipped cream
    • 1 cup mixed berries, such as strawberries, blueberries, raspberries, or blackberries
    • 1 to 2 teaspoons honey or maple syrup
    • 1 teaspoon lemon zest
    • 1 to 2 teaspoons lemon juice
    • ¼ cup granola, crushed graham crackers, or shortbread crumbs
    • Optional: fresh mint

    Method

    In a small bowl, whisk together the yogurt, lemon zest, lemon juice, and honey.

    Taste it.

    That matters.

    Some yogurts are already sweet. Some berries carry their own sugar. Some lemons are sharper than others. Let the mixture tell you what it needs before you decide.

    In a glass, small bowl, or jar, add a spoonful of the lemon yogurt.

    Add a layer of berries.

    Add a little granola, crushed graham cracker, or shortbread crumbs.

    Repeat the layers until the glass is full or until you have enough.

    Finish with more berries on top, a little extra lemon zest, and a drizzle of honey if the day calls for it.

    Add a mint leaf if you have one.

    Do not go to the store just for the mint.

    To Serve

    Serve chilled.

    This is best after the sandwich and soup, when the plate is nearly clean, and the table has gone quiet.

    The parfait brings brightness back into the room. Lemon cuts through the richness. Berries bring color. The yogurt keeps it light. The crumbs remind you that dessert does not have to be large to be real.

    Most people may say dessert is not needed.

    Maybe not.

    But there is always room for a little something sweet.

    Kyle J. Hayes

    kylehayesblog.com

    Please like, comment, and share

    Resources for Hard Times

    If you’re looking for practical help, food support, or community resources, you can visit the Salt, Ink & Soul Resources Page.

    👉 Resources for Hard Times