Tag: ComfortFood

  • Chicken Mac and Cheese Casserole

    Chicken Mac and Cheese Casserole

    A dish that understands gathering

    Some meals feel like Sunday even when it isn’t.

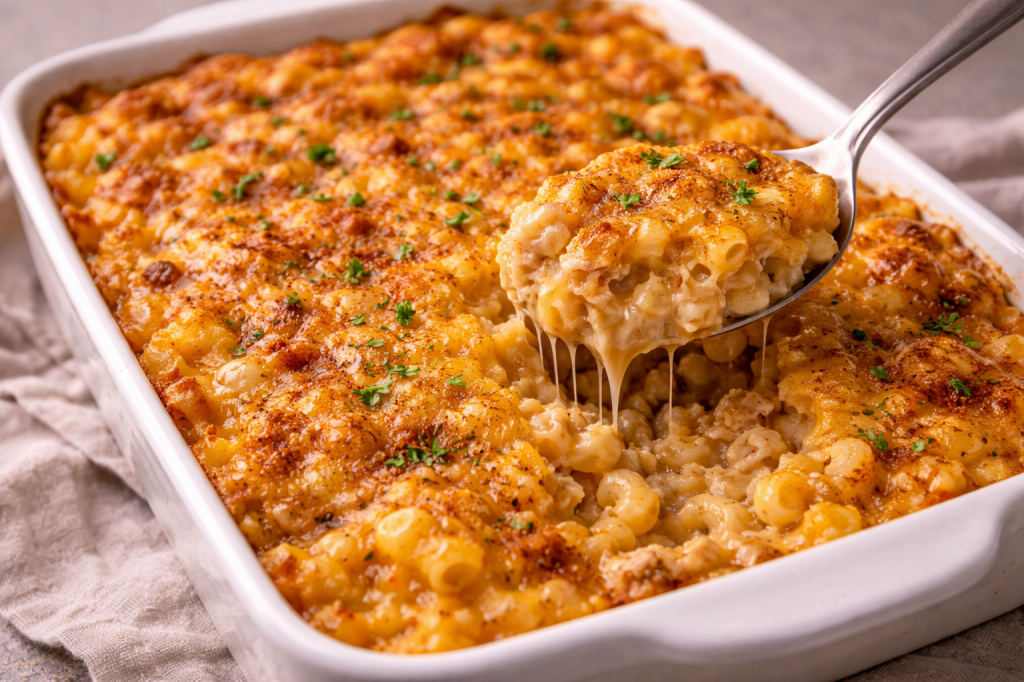
    Chicken and macaroni baked together is one of them.

    It sits somewhere between stretch and celebration — practical enough for a weeknight, rich enough for company. This isn’t the neon orange shortcut version. This is layered. Seasoned. Baked until the edges tell the truth.

    It’s the kind of dish that doesn’t ask who’s coming.

    It just makes room.

    Why This Version Works

    • Seasoned chicken — not plain filler
    • Real cheese, layered
    • Baked, not just stirred
    • Creamy but structured

    This is casserole as care.

    Recipe Details

    Serves: 6–8

    Prep Time: 20 minutes

    Cook Time: 35–40 minutes

    Total Time: About 1 hour

    Ingredients

    For the Chicken

    • 2 cups cooked chicken, shredded or diced
    • (Rotisserie works, but season it again)
    • ½ tsp garlic powder
    • ½ tsp onion powder
    • ½ tsp smoked paprika
    • ¼ tsp black pepper
    • Pinch cayenne (optional)

    For the Mac Base

    • 12 oz elbow macaroni
    • 3 tbsp butter
    • 3 tbsp flour
    • 2 cups whole milk
    • ½ cup heavy cream
    • 1 tsp Dijon mustard (optional but right)
    • ½ tsp salt
    • ½ tsp black pepper
    • ½ tsp smoked paprika

    The Cheese

    • 2 cups sharp cheddar, shredded
    • 1 cup Monterey Jack or Colby, shredded
    • ½ cup mozzarella (for stretch)

    Topping (Optional but Encouraged)

    • ½ cup shredded cheddar
    • ¼ cup crushed butter crackers or seasoned breadcrumbs
    • 1 tbsp melted butter

    Instructions

    1. Boil the pasta

    Cook macaroni in salted water until just shy of al dente.

    Drain. Set aside.

    2. Season the chicken

    Toss cooked chicken with garlic powder, onion powder, smoked paprika, pepper, and cayenne.

    It shouldn’t taste like an afterthought.

    3. Build the sauce

    In a large saucepan:

    Melt butter over medium heat.

    Whisk in the flour and cook for 1–2 minutes, until lightly golden.

    Slowly whisk in milk and cream.

    Cook until thickened — about 4–5 minutes.

    Stir in:

    • salt
    • pepper
    • smoked paprika
    • Dijon

    Lower heat. Add cheddar and Monterey Jack.

    Stir until smooth and fully melted.

    4. Bring it together

    Fold pasta and seasoned chicken into the cheese sauce.

    Taste. Adjust salt if needed.

    It should taste complete before it hits the oven.

    5. Assemble

    Preheat oven to 375°F.

    Lightly grease a 9×13 baking dish.

    Pour the mixture into the dish.

    Top with mozzarella and extra cheddar.

    If using topping:

    Mix crushed crackers with melted butter and sprinkle lightly.

    6. Bake

    Bake uncovered for 30–40 minutes, until bubbly and golden at the edges.

    Let rest 10 minutes before serving.

    Resting matters. It settles everything.

    To Serve

    Serve with:

    • Collard greens
    • Green beans
    • Or just a quiet kitchen and people who came hungry

    Notes

    • Add sautéed onions or bell peppers for depth
    • For extra richness, add 4 oz cream cheese to the sauce
    • This reheats beautifully

    This is not fast food.

    It’s food that remembers why we gather.

    Kyle J. Hayes

    kylehayesblog.com

    Please like, comment, and share

    Resources for Hard Times

    If you’re looking for practical help, food support, or community resources, you can visit the Salt, Ink & Soul Resources Page.

    👉 Resources for Hard Times

  • The First Time

    The First Time

    The first time I had bread pudding, my mother made it.

    I don’t remember the occasion. I don’t remember the day. I only remember the way it landed—soft, warm, familiar in a way that felt older than me. Like something meant to comfort without asking questions.

    I don’t remember her making it again.

    But that first bite stayed. Long enough that, years later, I found myself trying to chase it. First, with store-bought sliced bread. Then with better bread. Then, eventually, with bread I made myself—flour, water, yeast, salt. Learning how texture changes. How time matters. How restraint matters.

    The sauces came next. Heavy ones. Sweet ones. The kind that covers mistakes. Then the lighter ones. Sharper ones. Sauces that don’t hide the pudding, just walk beside it.

    I’m still working on it. On all of it.

    But for now, this is the version I make.

    The one that feels closest to memory without trying to recreate it.

    Bread Pudding with Lemon Sauce

    Warm, custardy, and gently sweet, this bread pudding leans into comfort while the lemon sauce keeps it awake. It’s not loud. It doesn’t perform. It just sits there, waiting for you to notice.

    Recipe Details

    Serves: 6–8

    Prep Time: 20 minutes

    Bake Time: 45–50 minutes

    Total Time: About 1 hour 15 minutes

    Ingredients

    Bread Pudding

    • 4 cups cubed stale bread
    • (My personal bread recipe works well)
    • 2 cups whole milk
    • 1 cup heavy cream
    • 4 large eggs
    • 1 cup granulated sugar
    • 1 tsp vanilla extract
    • ½ tsp ground cinnamon
    • ¼ tsp ground nutmeg
    • ½ cup raisins or chopped pecans (optional)
    • Butter, for greasing the baking dish

    Lemon Sauce

    • ½ cup unsalted butter
    • ¾ cup granulated sugar
    • ½ cup heavy cream
    • Zest of 1 lemon
    • 2–3 tbsp fresh lemon juice (to taste)
    • Pinch of salt

    Instructions

    1. Prepare the pudding

    Preheat oven to 350°F (175°C).

    Butter a 9×13-inch baking dish.

    Place the cubed bread evenly in the dish. Sprinkle with raisins or pecans if using.

    2. Make the custard

    In a large bowl, whisk together:

    • milk
    • heavy cream
    • eggs
    • sugar
    • vanilla
    • cinnamon
    • nutmeg

    Pour the custard over the bread, pressing gently so everything gets soaked.

    Let sit for 20–30 minutes. This matters.

    3. Bake

    Bake uncovered for 45–50 minutes, until the center is set and the top is golden.

    Remove from the oven and let rest for a few minutes before serving.

    4. Make the lemon sauce

    While the pudding bakes, melt butter in a saucepan over medium heat.

    Add sugar and cream, stirring until the sugar dissolves.

    Bring to a gentle simmer and cook 4–5 minutes, stirring occasionally.

    Remove from heat. Stir in:

    • lemon zest
    • lemon juice
    • pinch of salt

    Taste and adjust—this sauce should be bright, not sharp.

    To Serve

    Serve the bread pudding warm.

    Spoon the lemon sauce slowly over the top.

    This isn’t a dessert that rushes you.

    It asks you to sit.

    Kyle J. Hayes

    kylehayesblog.com

    Please like, comment, and share

    Resources for Hard Times

    If you’re looking for practical help, food support, or community resources, you can visit the Salt, Ink & Soul Resources Page.

    👉 Resources for Hard Times

  • Smothered Pork Chops

    Smothered Pork Chops

    Some meals announce themselves.

    And some meals wait.

    Smothered pork chops belong to the second kind. They don’t arrive crispy or loud. They don’t crackle for attention. They lower the heat and take their time. They understand that tenderness isn’t something you rush—it’s something you protect.

    This is the kind of food you make when you’re tired but still want to eat well. When the day took more than it gave back. When you need something steady. Something that doesn’t argue with you.

    Smothering is an act of care.

    You cover the meat to keep it from drying out. You keep it close to the gravy so it can soften without falling apart. You let it go slow enough to become what it’s supposed to be.

    That’s the point.

    This isn’t restaurant food. It isn’t meant to impress. It doesn’t photograph clean. It shows up in a pan and asks you to sit down.

    Smothered Pork Chops

    Serves 2–3. Scales easily.

    Ingredients

    • 4 pork chops
    • (bone-in if you can—flavor and patience live there)
    • Salt and black pepper
    • Garlic powder (optional, but familiar)
    • Onion powder (same)
    • ½ cup all-purpose flour
    • 2–3 tbsp neutral oil or bacon fat
    • 1 large onion, sliced
    • 2 cups chicken broth (or water, if that’s what you have)
    • Optional additions:
      • a splash of milk or cream
      • a pinch of cayenne
      • a little butter at the end

    How to Make Them

    Pat the pork chops dry. Season both sides generously with salt, pepper, and whatever else you think is right. Not measured. Just enough that you’d miss it if it wasn’t there.

    Dredge lightly in flour. Shake off the excess. You’re not breading. You’re giving the gravy something to hold onto later.

    Heat the oil in a wide skillet over medium heat. Brown the chops on both sides until they pick up color. Not cooked through. Just enough to look like they’ve lived a little.

    Remove the chops and set them aside.

    Lower the heat. Add the onions to the same pan. Stir them through the leftover flour and oil. Let them soften. Let them take their time. Scrape up the brown bits. Those matters.

    Slowly pour in the broth, stirring as you go. The gravy will thicken on its own if you let it. If it gets too thick, add a little more liquid. If it’s thin, give it time. Gravy knows what it’s doing.

    Taste. Adjust. This is where you decide what kind of night it’s been.

    Nestle the pork chops back into the gravy. Spoon some over the top. Cover the pan. Lower the heat.

    Let them simmer gently for 30–45 minutes, until tender. Not falling apart. Just easy.

    Finish with a little butter or milk for softness. Or don’t.

    How to Eat Them

    With rice.

    With mashed potatoes.

    With whatever helps you get the gravy where it needs to go.

    Eat them while they’re hot. Save what’s left.

    They’ll be better tomorrow.

    Some meals don’t need applause.

    They just need a fork, a chair, and a little quiet.

    Kyle J. Hayes

    kylehayesblog.com

    Please like, comment, and share

    Resources for Hard Times

    If you’re looking for practical help, food support, or community resources, you can visit the Salt, Ink & Soul Resources Page.

    👉 Resources for Hard Times

  • Sweet Cornmeal Pancakes with Honey Butter

    Sweet Cornmeal Pancakes with Honey Butter

    These pancakes sit somewhere between breakfast and memory. Cornmeal gives them texture and weight — not heavy, just honest. They’re the kind of pancakes that don’t collapse under syrup, that hold warmth a little longer, that feel like something meant to last through a slow morning.

    Cornmeal stretches what you have. It always has. And here, it does so quietly, turning a simple batter into something worth lingering over.

    Recipe Details

    Serves: 4

    Prep Time: 10 minutes

    Cook Time: 15 minutes

    Total Time: About 25 minutes

    Ingredients

    Pancakes

    • 1 cup cornmeal
    • 1 cup all-purpose flour
    • 2 tbsp sugar
    • 2 tsp baking powder
    • 1½ cups milk or buttermilk
    • 1 large egg
    • 2 tbsp oil or melted butter

    Honey Butter (for serving)

    • Softened butter
    • Honey
    • Pinch of salt

    Instructions

    1. Mix the dry ingredients

    In a large bowl, whisk together:

    • cornmeal
    • flour
    • sugar
    • baking powder

    Whisk until evenly combined.

    2. Mix the wet ingredients

    In a separate bowl, whisk together:

    • milk (or buttermilk)
    • egg
    • oil or melted butter

    3. Make the batter

    Add the wet ingredients to the dry ingredients.

    Stir gently just until combined.

    The batter should be thick but pourable.

    If it feels too stiff, add a splash more milk.

    4. Cook the pancakes

    Heat a lightly oiled skillet or griddle over medium heat.

    Pour about ¼ cup batter per pancake onto the hot surface.

    Cook until bubbles form, and the edges begin to set, about 2–3 minutes.

    Flip and cook another 1–2 minutes, until golden and cooked through.

    5. Serve

    Serve warm with a pat of honey butter melting over the top.

    Honey Butter (Quick Mix)

    Stir together:

    • softened butter
    • honey
    • pinch of salt

    Adjust sweetness to taste.

    Budget Tip

    Cornmeal adds texture and stretches the flour — a small shift that feeds more people with the same pantry. Leftover batter can be poured into muffin tins and baked for quick cornbread muffins later in the week.

  • One-Pan Chicken Thighs with Cabbage & Onion

    One-Pan Chicken Thighs with Cabbage & Onion

    Some meals don’t need improvement.

    They just need time, heat, and a little trust.

    This one-pan dinner is built from ingredients that have fed people quietly for generations—chicken thighs, cabbage, and onions. Nothing fancy. Nothing rushed. Everything is doing the work it knows how to do.

    It’s the kind of meal you make when you stop chasing what’s supposed to be better and start listening to what actually sustains you.

    🕰️ Time & Yield

    • Prep Time: 10 minutes
    • Cook Time: 40–45 minutes
    • Total Time: About 55 minutes
    • Serves: 2–3

    🧂 Ingredients

    • 4 bone-in, skin-on chicken thighs
    • ½ medium green cabbage, sliced into thick ribbons
    • 1 large yellow onion, sliced
    • 2 tablespoons olive oil
    • 1 teaspoon kosher salt (plus more to taste)
    • ½ teaspoon black pepper
    • 1 teaspoon paprika (optional, for warmth)
    • 2 cloves garlic, smashed (optional)

    🔥 Instructions

    1. Preheat the oven
    2. Set your oven to 400°F (205°C).
    3. Prepare the vegetables
    4. In a large roasting pan or rimmed baking sheet, toss the sliced cabbage and onion with olive oil, salt, pepper, and paprika if using. Spread into an even layer.
    5. Season the chicken
    6. Pat the chicken thighs dry. Season both sides generously with salt and pepper.
    7. Assemble the pan
    8. Nestle the chicken thighs skin-side up on top of the cabbage and onions. Tuck the garlic cloves around the pan if using.
    9. Roast
    10. Place the pan uncovered in the oven. Roast for 40–45 minutes, until the chicken skin is deeply golden and crisp, and the cabbage is soft and lightly caramelized.
    11. Rest and serve
    12. Let the pan rest for 5 minutes before serving. Spoon the cabbage and onions onto plates and top with a chicken thigh.

    🍽️ Serving Notes

    This meal doesn’t ask for much on the side.

    It’s enough on its own.

    If you want something extra, a simple piece of bread or a spoonful of mustard on the plate is more than sufficient.

    📝 Kitchen Notes

    • Chicken thighs stay tender even if you leave them in a few extra minutes—this is forgiving food.
    • The cabbage sweetens as it cooks; resist the urge to stir too much.
    • This reheats well and tastes even better the next day.

    🌱 A Quiet Thought

    There’s confidence in cooking food you don’t have to explain.

    Ingredients that know their job.

    A pan that does most of the work.

    This is nourishment without performance—food you can trust to carry you through the evening.

  • Skillet Cornbread with Sweet Corn

    Skillet Cornbread with Sweet Corn

    Cornbread has always been more than a side.

    It shows up wherever people had to make something sustaining out of what was close at hand — ground corn, heat, patience, and a good pan passed down long enough to remember the hands that seasoned it. In Southern kitchens, cornbread wasn’t about sweetness or show. It was about balance. About giving beans something to lean against. About soaking up what would otherwise be lost.

    This version, baked hot in a cast-iron skillet and folded with whole kernels of corn, sits at the intersection of memory and adaptation. It honors the bread’s original purpose — to feed, to stretch, to steady — while allowing for the small comforts we now have room to enjoy.

    Cornbread reminds us that the most lasting foods are built on restraint, not excess.

    That nourishment doesn’t need explanation.

    And that sometimes, the quiet things at the table carry the most history.

    Serves: 6–8

    Prep Time: 10 minutes

    Cook Time: 20 minutes

    Total Time: About 30 minutes

    Ingredients

    • 2 cups ground cornmeal
    • 1 tsp sea salt
    • 1 tbsp sugar
    • 2 tsp baking powder
    • ½ tsp baking soda
    • 1 cup buttermilk (plus more if needed)
    • 2 large eggs
    • 1 cup whole-kernel sweet corn
    • 2 tbsp canola oil

    Instructions

    1. Preheat Oven
    2. Preheat oven to 425°F.
    3. Place a 10-inch cast-iron skillet in the oven to heat.
    4. Mix Dry Ingredients
    5. In a bowl, whisk together cornmeal, salt, sugar, baking powder, and baking soda.
    6. Mix Wet Ingredients
    7. In a separate bowl, whisk together buttermilk, eggs, and sweet corn.
    8. Combine Batter
    9. Add dry ingredients to wet ingredients and stir just until combined.
    10. Batter should be thick but pourable.
    11. Add additional buttermilk, 1 tablespoon at a time, if needed.
    12. Bake
    13. Carefully remove the hot skillet from the oven.
    14. Swirl canola oil around the skillet to coat.
    15. Pour batter into the hot skillet.
    16. Bake for about 20 minutes, until golden, and the center springs back when touched.
    17. Serve
    18. Let rest for 5 minutes before slicing.
    19. Serve warm.

    Notes

    • For a crisper crust, make sure the skillet is fully heated before adding batter
    • Leftovers keep well wrapped at room temperature for 1 day or refrigerated for 2–3 days
  • The Quiet Alchemy of Stretching What Remains

    The Quiet Alchemy of Stretching What Remains

    There’s a quiet kind of magic in taking what’s left and turning it into something warm and sustaining. A half-used onion. A lone sausage link. A handful of cabbage that has more to give than anyone expects. This dish honors that ceremony — the alchemy of making enough from what remains.

    As the skillet warms and the ingredients soften, they remind us that transformation often begins in places we overlook. This simple meal is proof that “enough” is not a limitation; it is a beginning.

    Sausage & Cabbage Skillet for Two

    Ingredients

    • 1 tablespoon butter or olive oil
    • 6–8 ounces smoked sausage (leftover links welcome), sliced
    • ½ medium onion, sliced thin
    • 2 cloves garlic, minced
    • 4 cups shredded cabbage (or the last half of a head)
    • Salt and black pepper, to taste
    • ¼ teaspoon smoked paprika (optional, but adds depth)
    • 1 tablespoon Dijon mustard (optional, for brightness)
    • 1–2 tablespoons chicken broth or water, if needed
    • Red pepper flakes (optional, for heat)

    Instructions

    1. Begin with what remains.

    Heat the butter or oil in a large skillet over medium heat.

    Add the sliced sausage and let it brown gently, releasing its smoky scent — a reminder that even small things can carry big flavor.

    2. Build the foundation.

    Add the sliced onion and cook until it softens, turning translucent around the edges.

    Stir in the garlic and let it bloom for 30 seconds.

    This is where the kitchen starts to smell like memory — familiar, grounding, almost ancestral.

    3. Let the cabbage transform.

    Add the cabbage to the skillet.

    Season with salt, pepper, smoked paprika, and red pepper flakes for warmth, if you want.

    The cabbage will seem abundant at first, towering over the pan, but it will yield.

    It always does — softening, sweetening, becoming more than what it appeared.

    4. Stretch it gently.

    If the skillet runs dry, splash in chicken broth or water.

    Cover for 3–4 minutes to let the cabbage steam and tenderize, then uncover and stir.

    Add Dijon mustard if you want brightness — a spark of character in a humble dish.

    5. Taste for enough.

    Adjust seasoning.

    Let the flavors settle into one another, each one offering what it can.

    Serve warm, straight from the pan, honoring the quiet work that made it possible.

    Notes & Reflections

    This meal isn’t meant to be perfect.

    It’s meant to be possible.

    A dish sewn from scraps and softened edges, from small acts of culinary courage.

    It echoes the wisdom passed down through generations who learned how to turn shortage into sustenance and leftovers into legacy.

    They understood something we often forget:

    Enough is a sacred word.

    A reminder that abundance is not always required for nourishment —

    Sometimes, it only takes what we already have.

    Kyle J. Hayes

    kylehayesblog.com

    Please like, comment, and share

    Resources for Hard Times

    If you’re looking for practical help, food support, or community resources, you can visit the Salt, Ink & Soul Resources Page.

    👉 Resources for Hard Times

  • Creamy Garlic Shrimp over Zoodles

    Creamy Garlic Shrimp over Zoodles

    A quick, comforting, keto-friendly dish for two — perfect for the quiet December days between holiday meals.

    Intro

    There are nights in December when you don’t want another casserole, or another pan of leftovers — just something warm, gentle, and easy. This Creamy Garlic Shrimp over Zoodles is a small moment of calm on a plate: simple ingredients, soft flavors, and a little comfort you don’t have to think too hard about. Some meals aren’t meant to impress; they’re intended to steady you. This one does exactly that.

    🦐 Serves: 2

    Prep Time: 10 minutes

    Cook Time: 10 minutes

    Total Time: 20 minutes

    🧂 Ingredients

    For the Zoodles:

    • 2 medium zucchini, spiralized
    • 1 tbsp olive oil or butter
    • Salt and black pepper, to taste

    For the Garlic Shrimp:

    • 1 tbsp butter
    • 1 tbsp olive oil
    • 10–12 large shrimp (about 8 oz), peeled and deveined
    • 3 cloves garlic, minced
    • ½ cup heavy cream
    • ¼ cup grated Parmesan cheese
    • 1 tsp lemon juice
    • ¼ tsp crushed red pepper flakes (optional, for heat)
    • Salt and black pepper, to taste
    • 1 tbsp chopped parsley (optional, for garnish)

    👩🏽‍🍳 Instructions

    1. Prepare the Zoodles

    Heat 1 tbsp olive oil or butter in a large skillet over medium heat.

    Add spiralized zucchini, season lightly with salt and pepper, and sauté for 2–3 minutes, just until tender but not mushy.

    Transfer to a plate and set aside.

    (They’ll release some water — that’s fine; just drain before plating.)

    2. Cook the Shrimp

    In the same skillet, heat 1 tbsp butter + 1 tbsp olive oil over medium heat.

    Add the shrimp in a single layer, season with salt and pepper, and cook for 1–2 minutes per side until pink and opaque.

    Remove shrimp and set aside.

    3. Make the Creamy Garlic Sauce

    In the same skillet, add minced garlic and sauté for 30 seconds, just until fragrant.

    Pour in heavy cream and lemon juice, scraping up any browned bits with a wooden spoon.

    Lower the heat and stir in Parmesan cheese until melted and smooth.

    Add red pepper flakes if using.

    Simmer gently for 2–3 minutes until slightly thickened.

    4. Combine & Serve

    Return the shrimp to the skillet and coat them in the sauce.

    Toss in the zoodles, gently mixing to evenly coat everything.

    Cook for 1 more minute to warm through — avoid overcooking, or the zucchini will get soggy.

    5. Finish

    Garnish with fresh parsley and extra parmesan if desired.

    Serve immediately.

    🍽️ Approximate Nutrition (Per Serving)

    • Calories: 420
    • Net Carbs: 5g
    • Fat: 34g
    • Protein: 26g

    Kyle J. Hayes

    kylehayesblog.com

    Please like, comment, and share

    Resources for Hard Times

    If you’re looking for practical help, food support, or community resources, you can visit the Salt, Ink & Soul Resources Page.

    👉 Resources