
Tag: Food as Care

  • Deep-Dish Grilled Onions & Mushroom Pizza 

    Deep-Dish Grilled Onions & Mushroom Pizza 

    There is something satisfying about making pizza from the beginning.

    Not opening a box.

    Not waiting for someone to knock on the door.

    Flour. Water. Yeast. A little patience.

    And perhaps patience is the ingredient we have become most reluctant to use.

    This dough spends the night in the refrigerator. Nothing dramatic happens. It simply rests while the yeast does its quiet work, turning a handful of ordinary ingredients into something that tastes as though considerably more effort went into it.

    The next day, onions and mushrooms go into a hot skillet. The onions soften and sweeten. The mushrooms lose their water and begin to brown. Shred a pound of mozzarella by hand.

    And yes, shred the cheese yourself.

    The bagged stuff is convenient, but convenience sometimes comes with a small tax on quality. Pre-shredded cheese is coated to keep the pieces separate, which also keeps them from melting quite as beautifully. For this pizza, buy the block.

    Then build the thing.

    No shortcuts necessary.

    10-Inch Overnight Deep-Dish Pizza

    Makes: One 10-inch deep-dish pizza

    Serves: 4 generously

    Dough fermentation: 12–24 hours

    Bake: approximately 25–30 minutes at 475°F / 246°C

    For the Seasoned Overnight Dough

    • 265 g bread flour
    • 158 g warm water, about 95–100°F / 35–38°C
    • 35 g extra-virgin olive oil
    • 6 g kosher salt
    • 2 g sugar
    • 1.5 g instant yeast
    • 1.5 g garlic powder
    • 1.5 g onion powder
    • 0.5 g dried oregano
    • 0.5 g dried basil
    • 0.5 g freshly ground black pepper

    Optional, but very good:

    • 3 g finely grated Parmesan
    • 0.5 g smoked paprika
    • 0.25 g dried thyme

    For the Pan

    • 14 g extra-virgin olive oil
    • 4 g cornmeal

    For the Pizza

    • 1 lb / 454 g low-moisture whole-milk mozzarella, freshly shredded from a block
    • 8 oz / 225 g fresh mushrooms, sliced
    • 1 medium red or yellow onion, about 170–200 g, sliced into approximately ¼-inch strips
    • 1 tablespoon / 14 g olive oil, for grilling the vegetables
    • ¼ teaspoon kosher salt
    • Freshly ground black pepper
    • 1¼ cups / about 300 g thick pizza sauce
    • 20–25 g freshly grated Parmesan or Pecorino Romano
    • ½ teaspoon dried oregano
    • Optional red-pepper flakes

    I like red onion here, especially with mushrooms. It retains a little character after cooking and gives the finished pizza some sweetness without disappearing into the sauce.

    The Night Before

    Put the flour, salt, sugar, yeast, garlic powder, onion powder, oregano, basil, and black pepper into a large bowl.

    If you’re using the Parmesan, smoked paprika, and thyme, add those too.

    Pour in the warm water and olive oil.

    Mix until the ingredients come together into a rough dough.

    Knead by hand for about 8 minutes, or about 5 minutes in a stand mixer.

    You’re not looking for perfection. You’re looking for a dough that has changed beneath your hands—smooth, elastic, soft, and just slightly tacky.

    Lightly oil a bowl and put the dough inside.

    Cover it and leave it on the counter for 30 minutes.

    Then put it in the refrigerator.

    Leave it there for 12–24 hours.

    Eighteen to twenty-four is even better.

    Time is doing some of the cooking before we’ve ever turned on the oven.

    The Next Day

    Take the dough from the refrigerator about 1½–2 hours before you want to make the pizza.

    Cold dough remembers where it has been. Give it time to loosen up.

    While it does, make the toppings.

    Grill the Onions and Mushrooms

    Heat a large skillet—cast iron is excellent here—over medium-high heat.

    Add the tablespoon of olive oil.

    Add the mushrooms first and spread them into a relatively even layer. Let them cook for 3–4 minutes before moving them much.

    Mushrooms contain a remarkable amount of water. We want that water in the skillet, not trapped beneath our cheese.

    Once they’ve begun releasing their moisture, add the sliced onion.

    Season lightly with salt and black pepper.

    Continue cooking for another 5–7 minutes, stirring occasionally, until the mushrooms have browned and the onions are tender with some caramelized edges.

    Don’t cook the onions all the way down into jam. They still have another half hour in a hot oven.

    Transfer everything to a plate and allow it to cool.

    This step matters.

    Raw mushrooms placed directly onto a deep-dish pizza can release enough water to make the center soggy. Cooking them first concentrates their flavor while protecting the crust.

    Shred the Cheese

    While the vegetables cool, shred the mozzarella.

    All of it.

    One pound.

    It sounds excessive until you remember what we’re making.

    This isn’t a thin pizza where cheese is scattered politely across the surface. Deep dish requires structure. That mozzarella forms a rich layer between the crust and everything wet that comes afterward.

    Use low-moisture whole-milk mozzarella, preferably sold as a block.

    Avoid fresh mozzarella packed in water for this particular pizza. It carries too much moisture.

    And skip the pre-shredded bag if you can.

    Freshly grated mozzarella melts into long, uninterrupted pools of cheese that remind you why pizza became beloved in the first place.

    Prepare the Pan

    Preheat the oven to 475°F / 246°C. Give it a good 30–45 minutes to heat through.

    Coat the bottom and sides of a 10-inch / 25-cm deep-dish pan with 14 g olive oil.

    Don’t be timid with it.

    That oil is partly responsible for the wonderful thing that happens to the bottom and edges of this crust. It doesn’t merely bake.

    It almost fries.

    Sprinkle the bottom with the cornmeal.

    Place the dough in the center and begin pressing outward with your fingertips.

    Work it across the bottom and approximately 1½ inches / 4 cm up the sides.

    If the dough keeps shrinking back, stop.

    Give it ten minutes.

    Then try again.

    Sometimes dough, like people, becomes considerably more cooperative when you stop fighting with it.

    Cover the pan and let the shaped dough rest for 45–60 minutes.

    Build the Pizza

    Deep dish asks us to forget some of what we know about pizza.

    The sauce does not go down first.

    Layer it like this:

    1. Freshly shredded mozzarella
    2. Grilled mushrooms and onions
    3. Pizza sauce
    4. Parmesan or Pecorino
    5. Oregano

    Spread most of the mozzarella directly over the dough, taking it nearly to the edges.

    Reserve roughly 75 g if you’d like some browned cheese visible on top, as in your pizza.

    Scatter the grilled mushrooms and onions evenly over the mozzarella.

    Spoon approximately 300 g pizza sauce over everything. Don’t mash it down. Spoon it across the surface and gently spread it.

    Finish with Parmesan or Pecorino, oregano, and the reserved mozzarella.

    A little crushed red pepper is welcome if that’s your way.

    Bake

    Place the pizza on the lower third of the oven.

    Bake at 475°F / 246°C for 25–30 minutes.

    Start watching carefully around 22 minutes.

    The cheese should be bubbling and beautifully browned in places. More importantly, the outer crust should be a deep golden brown.

    If the cheese is getting too dark before the crust is ready, loosely tent the top with aluminum foil.

    When it’s finished, take the pan from the oven and do something surprisingly difficult:

    Leave it alone.

    Give it 10–15 minutes before cutting.

    That rest lets the cheese, sauce, and vegetables settle. Cut immediately, and all that beautiful filling is much more likely to run onto the plate.

    Run a thin spatula around the edge, slice it into wedges, and serve.

    A Note From the Kitchen

    There are easier ways to make pizza.

    That’s worth admitting.

    You can buy dough. Buy shredded cheese. Open a jar. Throw raw vegetables over everything and have dinner on the table considerably sooner.

    And sometimes that is exactly what dinner needs to be.

    But this is something different.

    You make the dough tonight for something you won’t eat until tomorrow. You grate a pound of cheese. You stand over a skillet long enough for mushrooms to brown and onions to soften.

    None of these things is particularly difficult.

    They simply ask you to care.

    And maybe that’s one of the quiet pleasures of cooking at home.

    Every once in a while, we make something slowly, not because we have to, but because we can.

    Kyle J. Hayes

    kylehayesblog.com

    Please like, comment, and share

    Resources for Hard Times

    If you’re looking for practical help, food support, or community resources, you can visit the Salt, Ink & Soul Resources Page.

    👉 Resources for Hard Times

  • It’s Too Hot to Cook, But We Still Have to Eat

    It’s Too Hot to Cook, But We Still Have to Eat

    It has been hot here in New Mexico.

    Not simply summer hot, where you expect the afternoon to be uncomfortable and learn to live with it. This has been the kind of heat that makes you reconsider ordinary decisions.

    Like cooking dinner.

    There is something almost absurd about standing in a kitchen on a hundred-degree day and deciding that what the house really needs is a 400-degree oven.

    You walk into the kitchen.

    You look at the stove.

    You think about what you planned to cook.

    And suddenly, a sandwich sounds pretty good.

    There is nothing wrong with that.

    A good sandwich, some chips, maybe a salad or some cold fruit can feel almost perfect when the heat outside seems determined to follow you into the house.

    But you can only eat that way for so many days.

    Eventually, you want something cooked.

    Something hot.

    Something that feels like dinner.

    And hunger, unlike the rest of us, has never been particularly impressed by the weather.

    We still have to eat.

    So after thinking about it for a while, I finally bought an air fryer.

    I had resisted getting one.

    I’ve lived long enough to watch plenty of kitchen appliances arrive with promises that they were about to revolutionize the way we eat. Some of them eventually found permanent homes in cabinets, sitting beside other machines that had once promised to change breakfast forever.

    But this time, the heat made a better argument than any commercial could.

    An air fryer is small. It cooks quickly. Most importantly right now, I can make dinner without turning the kitchen—and eventually the rest of the house—into an extension of the desert outside.

    So I’ve been using it.

    And I like it.

    I know not everyone has one.

    That is worth saying.

    Because conversations about food have a way of becoming conversations about privilege without anyone noticing.

    We assume everybody has the same kitchen.

    The same appliances.

    The same grocery budget.

    The same amount of time.

    The same energy when the day is over.

    They don’t.

    Food writing sometimes forgets that.

    Cooking can become theater.

    Beautiful kitchens. Expensive cookware. Perfect ingredients arranged across countertops. Recipes requiring twenty ingredients, three pans, and an afternoon nobody seems to have to work through.

    There is nothing inherently wrong with any of that.

    Cooking can be art.

    It can be recreation.

    It can be something we do simply because creating something beautiful with our hands gives us pleasure.

    I understand that.

    I love cooking.

    But cooking has another purpose that existed long before anybody photographed a dinner plate.

    Somebody has to eat.

    And somewhere tonight, somebody will come home tired from work, stand in front of a refrigerator, and try to figure out what can be made with what is inside.

    Somebody else will look at a grocery bill and quietly put something back.

    Someone will be feeding children who do not care that the person making dinner has had a difficult day.

    And somebody will be standing in a hot kitchen wondering what they can cook without making an already uncomfortable home even hotter.

    They are cooking too.

    Maybe that is cooking in its most honest form.

    It doesn’t matter that you worked late.

    It doesn’t matter that you’re tired.

    It doesn’t matter that groceries cost more than you expected.

    And it certainly doesn’t matter that it is a hundred degrees outside.

    Eventually, someone still has to answer one of the most ordinary questions in family life:

    What are we going to eat?

    It is such a simple question.

    But those words can conceal an extraordinary amount of labor.

    Because somebody has usually been thinking about the answer long before anyone asks.

    They checked the refrigerator.

    They know what is left.

    They remember what everybody ate yesterday.

    They know what needs to be used before it spoils.

    They know what the family likes and what somebody will complain about.

    They have considered the weather.

    They have considered the money.

    And perhaps most importantly, they have considered how tired they are.

    Then, somehow, food appears.

    We rarely call this extraordinary.

    Maybe because it happens too often.

    Care has a way of becoming invisible when it becomes dependable.

    Dinner appears.

    People eat.

    The dishes are washed.

    Tomorrow comes.

    And eventually the question returns.

    What are we going to eat?

    Families have been answering that question under conditions far more difficult than mine for generations.

    Before air conditioning cooled our kitchens, people still cooked through the summer.

    Before refrigerators kept everything safely cold, people found ways to preserve food.

    Before supermarkets offered strawberries in winter and nearly anything else we wanted regardless of season, people learned to make meals from what grew nearby, what could be preserved, what could be stretched, and what could be shared.

    Somewhere inside that history are countless people whose names will never appear in a cookbook.

    Mothers.

    Fathers.

    Grandmothers.

    Grandfathers.

    Aunts.

    Uncles.

    Older brothers and sisters.

    Neighbors.

    People who stood in kitchens while everyone else waited somewhere cooler.

    I remember some of this from my own childhood.

    When food was being prepared, we children were often chased out of the kitchen.

    We didn’t belong in there underfoot while somebody was trying to cook. There were hot pans, sharp knives, grease popping on the stove, cabinet doors opening and closing, and grown folks trying to finish a meal.

    So we were sent somewhere else.

    Go play.

    Go sit down.

    Get out of this kitchen.

    At the time, I don’t remember thinking very deeply about it.

    I was a child.

    The kitchen was simply where the food came from.

    Only later do you begin to understand what was happening in the room after you were chased out.

    Someone kept track of what was cooking, what needed stirring, what was almost done, and what still needed another few minutes.

    Then, when everything was ready, the rest of us came back.

    I remember something else too.

    My grandmother would bring my grandfather his food before she sat down and joined the rest of us.

    That was simply how things were in her kitchen.

    And in so many other kitchens.

    As a child, I didn’t question it.

    Children inherit rituals long before they understand them. We watch how the adults move around one another and assume this is simply how the world works.

    Grandpa sat.

    Grandma brought his plate.

    Then eventually she sat down too.

    I know people may look at that differently now.

    Some may see an old expectation placed upon women. Others may recognize a particular language of marriage, family, and care from another generation.

    Maybe both things can be true.

    I don’t need to turn my grandmother’s kitchen into an argument.

    I only need to remember what I saw.

    Because what stays with me now isn’t simply that she brought my grandfather his food.

    It is that she brought his food before she sat down herself.

    There is a difference.

    As children, we tend to remember the meal from the chair.

    Someone else remembers that same meal from their feet.

    We remember what was on the plate.

    We remember whether we liked it.

    We remember asking for seconds.

    We remember the conversations around the table.

    The grown folks talking about things we weren’t supposed to understand while we quietly listened anyway.

    Maybe that is one of the strange things about getting older.

    You begin revisiting childhood memories from the perspective of the adults who were standing just outside the frame.

    You finally notice what their hands were doing while yours were empty.

    We remember the food.

    Sometimes I wonder whether we remember the heat.

    We remember fried chicken.

    Greens.

    Beans that seemed to cook all afternoon.

    Cornbread pulled hot from an oven.

    We remember smells that could travel through an entire house and tell us what was coming before we ever saw the plate.

    We remember sitting down.

    We remember eating.

    We remember asking for seconds.

    Memory is generous to the person being fed.

    It can erase the sweat from the person doing the feeding.

    There was labor inside those meals.

    There was time.

    There was planning.

    Sometimes there was sacrifice.

    And sometimes there was simply someone who would have preferred to sit down but remained standing a little longer because the people they loved needed to eat.

    I didn’t understand any of that when I was a child.

    I only knew that eventually we would be called back into the kitchen. There would be food on the table, my grandfather would have his plate, and my grandmother would finally take her seat.

    Back then, I thought that was simply dinner.

    Kyle J. Hayes

    kylehayesblog.com

    Please like, comment, and share

    Resources for Hard Times

    If you’re looking for practical help, food support, or community resources, you can visit the Salt, Ink & Soul Resources Page.
    👉 Resources for Hard Times

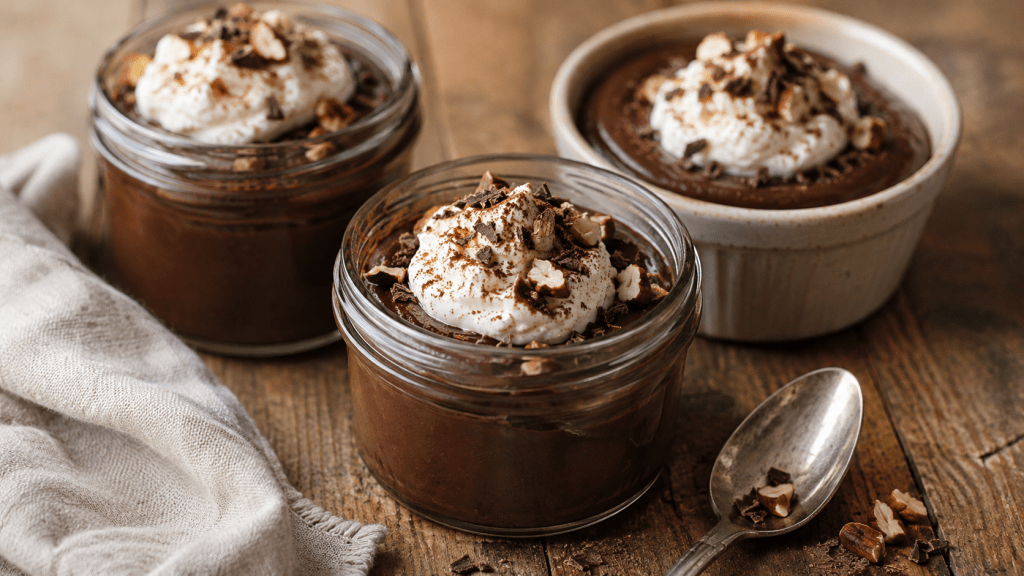
  • Keto Mexican Chocolate Pudding Cups

    Keto Mexican Chocolate Pudding Cups

    Dessert does not always need flour.

    It does not always need a crust, a cake pan, or the kind of sweetness that leaves the body tired afterward.

    Sometimes dessert can be small.

    Cold.

    Dark.

    Quiet.

    A spoon moving through chocolate thickened by cream and patience.

    This week began with green chile lime chicken and cauliflower rice. Then came the green chile avocado salad, cool and sharp and full of New Mexico brightness. So, for dessert, I wanted something that didn’t break the rhythm. Something chilled. Something keto-friendly. Something with depth instead of heaviness.

    That brought me to Mexican-style chocolate.

    I want to be clear about that.

    I am not Latino, and this is not me claiming a tradition that is not mine. This pudding is inspired by the flavors often associated with Mexican chocolate—cocoa, cinnamon, vanilla, and a small whisper of chile. I use those flavors with respect and gratitude, because good food deserves credit. Flavor has a lineage. Ingredients have memory. And when we borrow from a tradition, the least we can do is credit the source.

    This is not a traditional Mexican dessert.

    It is a keto chocolate pudding cup shaped like that.

    Rich cream. Unsweetened cocoa. Cinnamon. Vanilla. A pinch of salt. A little chile powder or cayenne if you want the heat to arrive at the end, quietly, like a door opening in another room.

    The sweetness is controlled.

    The texture is soft.

    The portion is small enough to feel reasonable and rich enough to feel like a dessert.

    Because even when you are trying to eat lighter, even when you are watching carbs, even when you tell yourself you do not need anything after dinner, there is still room for a little something sweet.

    Especially if it knows how to leave gently.

    Keto Mexican Chocolate Pudding Cups

    Serves

    4 small pudding cups

    Ingredients

    • 480 ml heavy cream
    • 25 g unsweetened cocoa powder
    • 40 g powdered monk fruit sweetener or powdered allulose
    • 1 teaspoon vanilla extract
    • 1 teaspoon ground cinnamon
    • ⅛ teaspoon cayenne pepper or ancho chile powder, optional
    • ¼ teaspoon salt
    • 2 large egg yolks
    • 15 g unsalted butter

    Optional Toppings

    • 120 ml heavy cream, whipped
    • 1 teaspoon powdered monk fruit or allulose, for whipped cream
    • A light dusting of cinnamon
    • Sugar-free dark chocolate shavings
    • 15 g chopped pecans or almonds

    Method

    1. Warm the Cream

    In a medium saucepan, add the heavy cream, cocoa powder, powdered sweetener, cinnamon, chile powder if using, and salt.

    Set the pan over medium-low heat.

    Whisk slowly until the cocoa dissolves and the cream begins to steam.

    Do not boil it.

    Chocolate does not need violence to become itself.

    2. Temper the Egg Yolks

    In a small bowl, whisk the egg yolks.

    Slowly pour a small amount of the warm chocolate cream into the egg yolks while whisking constantly.

    This warms the yolks gently so they do not scramble.

    Add the yolk mixture back into the saucepan.

    3. Thicken the Pudding

    Keep the heat on low.

    Whisk constantly for about 5 to 8 minutes, until the pudding thickens enough to coat the back of a spoon.

    Do not rush this part.

    Low heat gives you silk.

    High heat gives you regret.

    4. Finish

    Remove the pan from the heat.

    Stir in the vanilla extract and butter until smooth.

    Taste carefully.

    If you want more warmth, add a pinch more cinnamon or chile.

    If you want more sweetness, add a little more powdered sweetener.

    Let the pudding tell you what it needs.

    5. Chill

    Divide the pudding into 4 small cups or jars.

    Cover and refrigerate for at least 2 hours, or until fully chilled and set.

    6. Serve

    Top with lightly sweetened whipped cream, a dusting of cinnamon, sugar-free dark chocolate shavings, or chopped nuts.

    Serve cold.

    Small spoon recommended.

    Not because you have to be delicate.

    Because this is the kind of dessert that deserves to last a little longer.

    Notes From My Kitchen

    For the smoothest pudding, use powdered sweetener instead of granulated. Granulated sweeteners can leave a gritty texture.

    Allulose usually gives a softer, more sugar-like finish. Monk fruit works well too, especially if powdered.

    Chile is optional. Use just enough to warm the chocolate, not enough to dominate it.

    Ancho chile powder gives a deeper, earthier flavor. Cayenne gives sharper heat.

    For a dairy-free version, use full-fat coconut milk instead of heavy cream and coconut oil instead of butter, though the flavor will change.

    If you want a thicker pudding, chill it longer.

    Why This Dessert Works

    The chocolate brings depth.

    The cinnamon brings warmth.

    The Chile brings a small spark.

    The cream brings softness.

    And the keto structure keeps it from becoming heavier than the meal needs.

    It is a dessert without collapse.

    Sweetness without surrender.

    A small ending after a warm week of green chile, lime, avocado, and sun.

    And while it is only inspired by Mexican-style chocolate, that inspiration matters.

    Because food should not erase where its beauty comes from.

    It should be remembered.

    It should give thanks.

    Then it should be served cold, in a small cup, with a spoon.

    Kyle J. Hayes

    kylehayesblog.com

    Please like, comment, and share

    Resources for Hard Times

    If you’re looking for practical help, food support, or community resources, you can visit the Salt, Ink & Soul Resources Page.
    👉 Resources for Hard Times

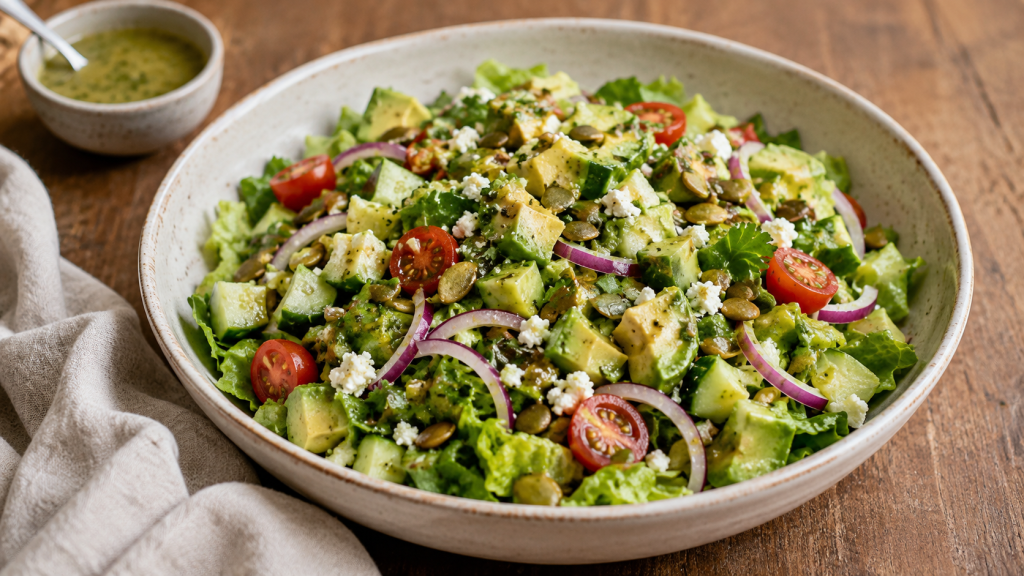
  • Green Chile Avocado Salad

    Green Chile Avocado Salad

    Some meals are not meant to weigh you down.

    They are meant to cool the room.

    After the warmth of green chile lime chicken, after the skillet, after the garlic and lime have done their work, the body may still want the same language—but spoken softer.

    Green chile can do that.

    It does not always have to arrive with smoke, meat, and heat rising from the pan. Sometimes it belongs in a salad, tucked among crisp greens, avocado, cucumber, and lime. Sometimes it becomes less of a flame and more of a reminder.

    This salad keeps the New Mexico thread without repeating the whole meal.

    No chicken this time.

    No cauliflower rice.

    No attempt to make Friday feel like Wednesday by wearing different clothes.

    This is lighter. Cooler. Still grounded.

    Avocado brings softness. Cucumber brings water and crunch. Green chile brings place. Lime sharpens the edges. Cotija or queso fresco gives salt. Pepitas, if you use them, bring just enough crunch to make the salad feel finished.

    It is keto-friendly, but it does not need to announce itself as a restriction.

    That matters.

    Food should not always feel like punishment dressed up as discipline. Sometimes a lower-carb meal can still feel generous. Sometimes the plate can be full of color and texture and still leave you feeling clear instead of heavy.

    This is that kind of salad.

    A warm-weather salad.

    A Friday salad.

    The kind of thing you make when the sun is still hanging around, when dinner should be easy, when the body asks for freshness but still wants flavor with a little backbone.

    Green Chile Avocado Salad

    Serves

    2 to 4 people

    Ingredients

    For the Salad

    • 150 g romaine lettuce or mixed greens, chopped
    • 2 medium avocados, sliced or diced
    • 150 g cucumber, diced
    • 150 g cherry tomatoes, halved
    • 40 g red onion, thinly sliced
    • 80 g roasted green chile, chopped
    • 50 g cotija cheese, queso fresco, or shredded Monterey Jack
    • 10 g fresh cilantro, chopped
    • 25 g pepitas, optional, for crunch

    For the Lime Green Chile Dressing

    • 45 ml olive oil
    • 20 ml fresh lime juice
    • 20 g roasted green chile, finely chopped
    • 10 ml apple cider vinegar
    • ½ teaspoon ground cumin
    • ½ teaspoon garlic powder
    • ½ teaspoon salt, plus more to taste
    • ¼ teaspoon black pepper
    • Optional: 30 g sour cream or Greek yogurt for a creamy dressing

    Method

    1. Make the Dressing

    In a small bowl or jar, combine the olive oil, lime juice, finely chopped green chile, apple cider vinegar, cumin, garlic powder, salt, and black pepper.

    Whisk until the dressing comes together.

    Taste it.

    If it needs more brightness, add a little more lime.

    If it feels too sharp, add a small drizzle more olive oil.

    If you want it creamy, whisk in the sour cream or Greek yogurt.

    A dressing should not bully the salad. It should wake it up.

    2. Prepare the Salad

    Add the chopped romaine or mixed greens to a large bowl.

    Add the cucumber, cherry tomatoes, red onion, roasted green chile, cheese, cilantro, and pepitas if using.

    Wait to add the avocado until close to serving so it stays clean and fresh.

    3. Dress the Salad

    Pour a little of the dressing over the greens and vegetables.

    Toss gently.

    Add the avocado and toss again with care, or arrange the avocado on top after tossing.

    Avocado asks for a softer hand.

    Give it one.

    4. Serve

    Finish with a little extra cilantro, a pinch of salt if needed, and another squeeze of lime if the day calls for it.

    Serve immediately.

    This salad is best when the greens are crisp, the avocado is soft, and the green chile still has something to say.

    Notes From My Kitchen

    For the lowest-carb version, use fewer tomatoes or omit them.

    If you want more protein without repeating the chicken from Wednesday, add boiled eggs, grilled shrimp, or extra cheese.

    For more heat, use hot-roasted green chile or add thinly sliced jalapeños.

    For more crunch, use pepitas. They fit the flavor better than croutons and keep the salad keto-friendly.

    If making ahead, keep the dressing separate and add the avocado just before serving.

    Why This Salad Works

    The green chile carries the week forward.

    The avocado softens it.

    The cucumber cools it.

    The lime keeps it awake.

    And the whole thing stays light enough for a warm Albuquerque evening.

    It is not a side salad pretending to be important.

    It is a real salad.

    A cared-for salad.

    A bowl of freshness with enough salt, heat, and texture to make you remember that light food can still have weight.

    Not heaviness.

    Weight.

    And if this recipe seems like it has too much green chile, remember this:

    I live in New Mexico.

    There is no such thing as too much green chile.

    Kyle J. Hayes

    kylehayesblog.com

    Please like, comment, and share

    Resources for Hard Times

    If you’re looking for practical help, food support, or community resources, you can visit the Salt, Ink & Soul Resources Page.
    👉 Resources for Hard Times

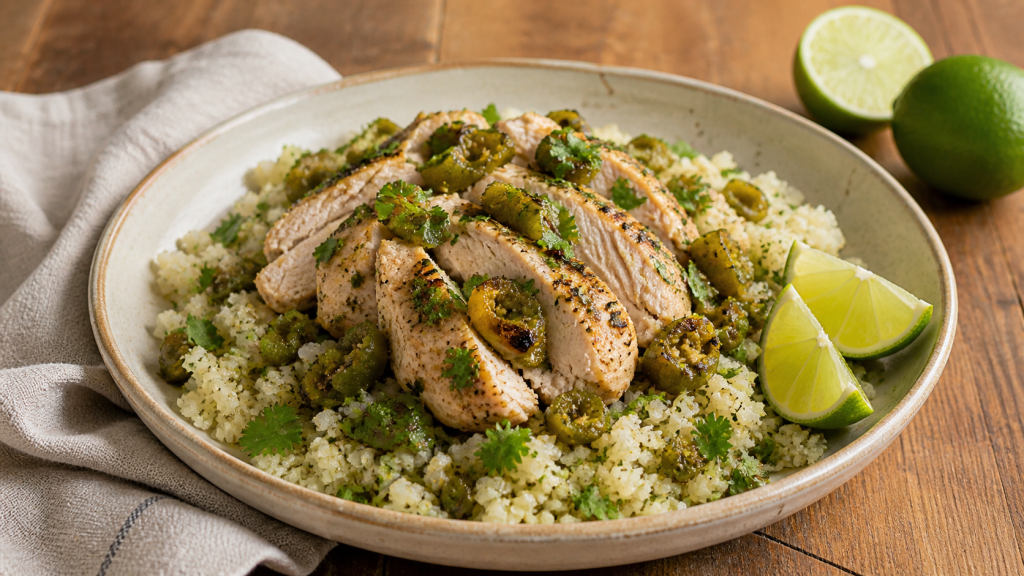
  • Green Chile Lime Chicken with Cilantro-Lime Cauliflower Rice

    Green Chile Lime Chicken with Cilantro-Lime Cauliflower Rice

    Some meals know where they come from.

    Not in a loud way.

    Not in a flag-waving way.

    Not in the way food sometimes gets dressed up, becoming more performance than nourishment.

    This one knows quietly.

    It knows through green chile.

    Through lime.

    Through garlic warming in oil.

    Through chicken taking on smoke, salt, acid, and heat until it becomes something more than the plain thing it started as.

    This is a meal built for a warm New Mexico week, the kind where the sun does not ask for permission before entering the room. The kind of week where the body wants flavor, but not weight. Something satisfying, but not heavy. Something with a little fire in it, but also enough brightness to keep the plate from closing in on itself.

    That is where the lime comes in.

    And that is where the cauliflower rice earns its place.

    I will not pretend cauliflower is rice. It is not. It does not need to be. There is a quiet dignity in letting a thing be what it is. Cauliflower rice works here because it carries flavor. It takes the lime, cilantro, garlic, and the chicken juices and gives the plate a lighter foundation.

    This is practical food.

    Keto-friendly food.

    Home food.

    Food that understands that care does not always arrive as something rich and heavy. Sometimes care is knowing when to lighten the plate. Sometimes care is heat, citrus, herbs, and enough restraint to let the meal breathe.

    Green Chile Lime Chicken with Cilantro-Lime Cauliflower Rice

    Serves

    2 to 4 people

    Ingredients

    For the Green Chile Lime Chicken

    • 600 g boneless, skinless chicken thighs or chicken breasts
    • 120 g roasted green chile, chopped
    • 30 ml olive oil
    • 30 ml fresh lime juice
    • 2 cloves garlic, minced
    • 1 teaspoon ground cumin
    • 1 teaspoon smoked paprika
    • ½ teaspoon dried oregano
    • 1 teaspoon salt
    • ½ teaspoon black pepper
    • ½ teaspoon onion powder
    • Zest of 1 lime
    • Optional: ¼ teaspoon cayenne pepper or chili powder for more heat

    For the Cilantro-Lime Cauliflower Rice

    • 600 g cauliflower rice, fresh or frozen
    • 15 ml olive oil or 15 g butter
    • 1 clove garlic, minced
    • 30 ml fresh lime juice
    • Zest of 1 lime
    • 10 g fresh cilantro, chopped
    • ½ teaspoon salt, plus more to taste
    • ¼ teaspoon black pepper
    • Optional: 1 tablespoon chopped green chile

    Optional Garnishes

    • Extra chopped cilantro
    • Lime wedges
    • Sliced avocado
    • Crumbled cotija cheese or queso fresco
    • Sour cream
    • Thinly sliced jalapeño

    Method

    1. Marinate the Chicken

    In a bowl, combine the chopped green chile, olive oil, lime juice, garlic, cumin, smoked paprika, oregano, salt, black pepper, onion powder, and lime zest.

    Add the chicken and coat it well.

    Cover and let it marinate for at least 30 minutes. If you have more time, let it sit in the refrigerator for 2 to 4 hours.

    Do not worry if you only have 30 minutes.

    A meal made with limited time is still a meal made with care.

    2. Cook the Chicken

    Heat a large skillet over medium-high heat.

    Add a small drizzle of olive oil if needed.

    Place the chicken in the hot pan and cook for about 5 to 7 minutes per side, depending on thickness, until browned on the outside and cooked through.

    The chicken should reach an internal temperature of 74°C.

    If the green chile marinade begins to darken too quickly, lower the heat slightly. You want color. You do not want bitterness.

    Once cooked, move the chicken to a plate and let it rest for 5 minutes before slicing.

    Resting matters.

    It lets the juices return to the meat. It lets the meal collect itself before being asked to serve you.

    3. Make the Cilantro-Lime Cauliflower Rice

    While the chicken rests, heat olive oil or butter in a large skillet over medium heat.

    Add the garlic and cook for about 30 seconds, just until fragrant.

    Add the cauliflower rice.

    Cook for 5 to 8 minutes, stirring often, until the cauliflower is tender and some of the moisture has cooked off.

    If using frozen cauliflower rice, give it a little more time. Let the water leave the pan. That is what keeps it from becoming soggy.

    Stir in the lime juice, lime zest, cilantro, salt, black pepper, and, if desired, chopped green chile.

    Taste and adjust.

    A little more salt may wake it up.

    A little more lime may brighten it.

    Trust the pan.

    4. Serve

    Spoon the cilantro-lime cauliflower rice onto a plate or into a shallow bowl.

    Slice the green chile-lime chicken and lay it on top.

    Add any garnishes you like: avocado, cotija, cilantro, sour cream, lime wedges, or jalapeño.

    Serve warm.

    Notes From My Kitchen

    Chicken thighs will give you the most flavor and stay juicier, but chicken breasts work if you prefer them.

    Fresh cauliflower rice usually gives a better texture, but frozen works well if you cook off the extra moisture.

    For a creamier plate, add a spoonful of sour cream or avocado on the side.

    For more heat, use hot roasted green chile or add a little cayenne to the marinade.

    For meal prep, store the chicken and cauliflower rice separately so the cauliflower does not absorb too much moisture.

    Kyle J. Hayes

    kylehayesblog.com

    Please like, comment, and share

    Resources for Hard Times

    If you’re looking for practical help, food support, or community resources, you can visit the Salt, Ink & Soul Resources Page.
    👉 Resources for Hard Times

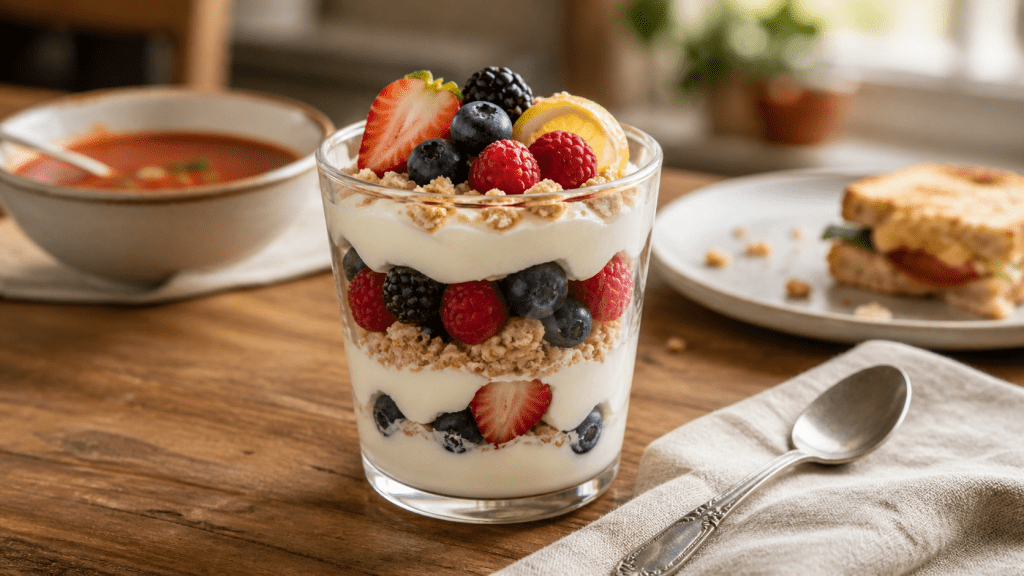
  • Lemon Berry Parfait

    Lemon Berry Parfait

    Most meals do not need dessert.

    That is the sensible answer.

    The practical answer.

    The answer given by people who look at the table, see a sandwich and a bowl of soup, and decide the matter is finished.

    And maybe they are right.

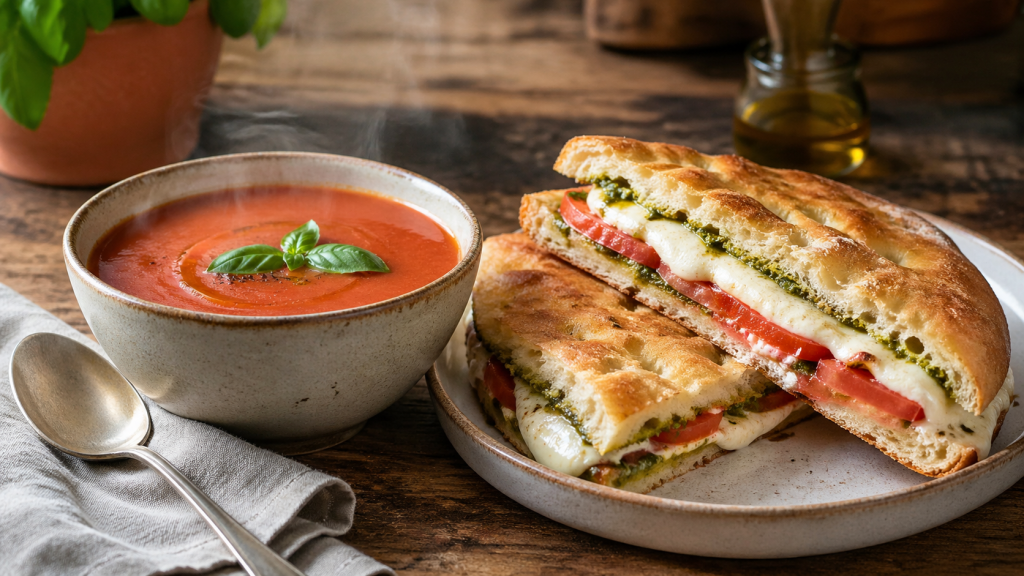
    The Caprese Focaccia Press already brings enough. Crisp bread. Warm mozzarella. Tomato. Pesto. That little touch of balsamic glaze. The tomato soup sits beside it like an old friend, red and steady, made for dipping and slowing down.

    That could be the whole meal.

    But sometimes enough is not the same as complete.

    Sometimes the body does not ask for something heavy. It does not ask for cake, or pie, or anything that demands a fork and a commitment. Sometimes it only asks for a small, bright ending.

    A little coolness after all that warmth.

    A little lemon.

    A little berry.

    A little sweetness that does not shout.

    That is where this parfait belongs.

    It is not here to steal the meal. It is here to close it gently.

    Layered yogurt, berries, lemon zest, and something crisp at the bottom or between the layers. Granola, if you want breakfast to sneak into dessert. Crushed graham crackers, if you want it to feel softer, more like childhood. Shortbread crumbs if you want to pretend you planned all of this from the beginning.

    There is no shame in a light dessert.

    There is only the small mercy of giving yourself something pleasant at the end.

    Lemon Berry Parfait

    Ingredients

    • 1 cup Greek yogurt, vanilla yogurt, or lightly sweetened whipped cream
    • 1 cup mixed berries, such as strawberries, blueberries, raspberries, or blackberries
    • 1 to 2 teaspoons honey or maple syrup
    • 1 teaspoon lemon zest
    • 1 to 2 teaspoons lemon juice
    • ¼ cup granola, crushed graham crackers, or shortbread crumbs
    • Optional: fresh mint

    Method

    In a small bowl, whisk together the yogurt, lemon zest, lemon juice, and honey.

    Taste it.

    That matters.

    Some yogurts are already sweet. Some berries carry their own sugar. Some lemons are sharper than others. Let the mixture tell you what it needs before you decide.

    In a glass, small bowl, or jar, add a spoonful of the lemon yogurt.

    Add a layer of berries.

    Add a little granola, crushed graham cracker, or shortbread crumbs.

    Repeat the layers until the glass is full or until you have enough.

    Finish with more berries on top, a little extra lemon zest, and a drizzle of honey if the day calls for it.

    Add a mint leaf if you have one.

    Do not go to the store just for the mint.

    To Serve

    Serve chilled.

    This is best after the sandwich and soup, when the plate is nearly clean, and the table has gone quiet.

    The parfait brings brightness back into the room. Lemon cuts through the richness. Berries bring color. The yogurt keeps it light. The crumbs remind you that dessert does not have to be large to be real.

    Most people may say dessert is not needed.

    Maybe not.

    But there is always room for a little something sweet.

    Kyle J. Hayes

    kylehayesblog.com

    Please like, comment, and share

    Resources for Hard Times

    If you’re looking for practical help, food support, or community resources, you can visit the Salt, Ink & Soul Resources Page.
    👉 Resources for Hard Times

  • Simple Tomato Soup for the Caprese Focaccia Press

    Simple Tomato Soup for the Caprese Focaccia Press

    Some sandwiches ask for soup.

    Not because they are incomplete, but because certain meals understand the value of companionship. The crisp edge of focaccia. The softened mozzarella. The tomato was tucked inside the bread. The basil carried through the pesto. All of it already works.

    But then there is the bowl beside it.

    Warm. Red. Steady.

    Tomato soup does not need to announce itself. It does not need to be dressed up beyond recognition. It only needs to be honest. A little onion. A little garlic. Good tomatoes. Enough seasoning to wake everything up. Maybe a little cream if the day calls for softness.

    This is the kind of soup made for dipping.

    The kind that turns a sandwich into a meal.

    The kind that reminds you that comfort does not have to be complicated to be real.

    Tomato Soup

    Ingredients

    • 1 tablespoon olive oil or butter
    • 1 small onion, diced
    • 2 cloves garlic, minced
    • 1 can crushed tomatoes, 28 ounces
    • 1 cup vegetable broth or chicken broth
    • ½ teaspoon salt, plus more to taste
    • ¼ teaspoon black pepper
    • ½ teaspoon dried basil or Italian seasoning
    • ½ teaspoon sugar, optional, to soften the acidity
    • ¼ to ½ cup heavy cream, half-and-half, or milk, optional

    Method

    Warm the olive oil or butter in a pot over medium heat.

    Add the diced onion and cook until softened, about 5 minutes. You are not trying to rush it. Let the onion mellow and settle into the oil.

    Add the garlic and cook for about 30 seconds, just until fragrant.

    Pour in the crushed tomatoes and broth.

    Add the salt, black pepper, dried basil or Italian seasoning, and sugar if using.

    Stir everything together and let the soup simmer for 15 to 20 minutes.

    Blend until smooth using an immersion blender. If using a regular blender, work carefully in batches and do not overfill it.

    Stir in the cream, half-and-half, or milk for a richer, softer soup.

    Taste and adjust the salt and pepper.

    To Serve

    Ladle the soup into a bowl.

    Finish with a drizzle of olive oil, a little black pepper, a spoonful of pesto, or a few shreds of Parmesan if you have them.

    Serve beside the Caprese Focaccia Press.

    Dip the sandwich into the soup while the bread is still crisp and the cheese is still warm.

    That is the meal.

    Not fancy.

    Not loud.

    Just bread, tomato, warmth, and the quiet pleasure of making something at home that feels like it could have come from somewhere better lit, with smaller tables, and a bill folded neatly at the end.

    Except this time, you made it yourself.

    Kyle J. Hayes

    kylehayesblog.com

    Please like, comment, and share

    Resources for Hard Times

    If you’re looking for practical help, food support, or community resources, you can visit the Salt, Ink & Soul Resources Page.
    👉 Resources for Hard Times

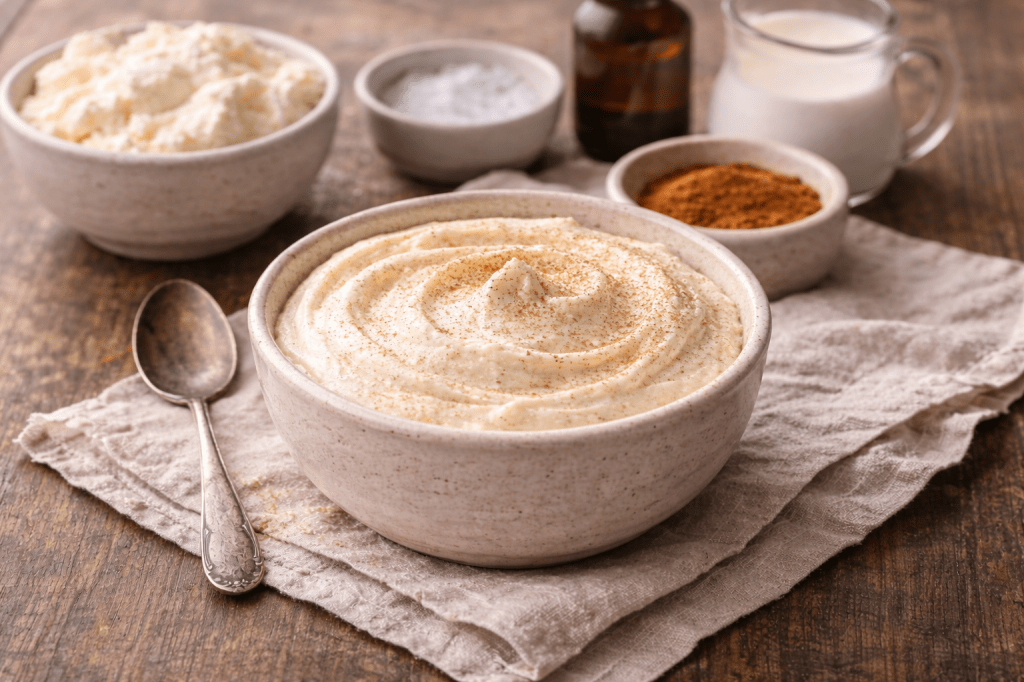
  • Vanilla Cinnamon Ricotta Cream (Keto)

    Vanilla Cinnamon Ricotta Cream (Keto)

    A gentle way to end things

    There’s a moment after a meal where everything slows.

    The plates are mostly empty. The conversation softens. The weight of what you’ve eaten begins to settle, not heavily—but honestly. And in that space, you don’t need another course that tries to impress you.

    You need something that understands the moment.

    Something cool.

    Something light.

    Something that doesn’t ask for attention.

    Just enough sweetness to remind you the meal mattered.

    This is that kind of dessert.

    Ingredients (Serves 2–3)

    • 1 cup whole milk ricotta
    • 1/4 cup heavy cream
    • 1 to 2 tablespoons powdered erythritol (or preferred keto sweetener), to taste
    • 1 teaspoon vanilla extract
    • 1/2 teaspoon ground cinnamon
    • Pinch of salt

    Optional (if you want a little more, but not too much):

    • A few raspberries or sliced strawberries
    • A light drizzle of sugar-free syrup
    • A few shavings of dark chocolate

    Method

    Start by bringing everything into one place.

    In a bowl, add the ricotta, heavy cream, sweetener, vanilla, cinnamon, and a pinch of salt. Nothing complicated. Just ingredients that already understand each other.

    Whisk it gently. Or use a hand mixer if you prefer. A minute or two is enough. You’re not trying to force air into it—you’re just smoothing it out, letting it become something cohesive.

    Taste it.

    This part matters. Adjust the sweetness if needed, but keep it restrained. This isn’t meant to be loud.

    If you have the time, let it rest in the refrigerator for 20 to 30 minutes. It settles there. The texture firms slightly. The flavors come together more quietly.

    Spoon it into a bowl.

    Leave it plain, or add a few berries, a light drizzle of syrup, or a touch of chocolate. Nothing that overwhelms what’s already there.

    Notes From My Kitchen

    • This works best when it stays simple—too much sweetness changes its purpose
    • If your ricotta feels too thick, a small splash of cream will bring it back
    • Best served chilled, especially after a warm meal

    Closing Thought

    Some desserts try to be remembered.

    This one just lets you rest.

    It doesn’t ask for more space than it needs. It doesn’t pull you back into hunger after you’ve already been fed.

    It simply brings things to a close—gently, honestly, and without excess.

    At the Table

    This is how the meal ends.

    But it didn’t begin here.

    It started with something warm and steady—Green Chile Beef & Cauliflower Casserole.

    And something fresh came alongside it—Crisp Lime & Avocado Salad.

    This just carries you the rest of the way.

    Kyle J. Hayes

    kylehayesblog.com

    If this found you at the right time,

    Feel free to like, comment, or share it with someone who might need it too.

    Resources for Hard Times

    If you’re looking for practical help, food support, or community resources, you can visit the Salt, Ink & Soul Resources Page.
    👉 Resources for Hard Times

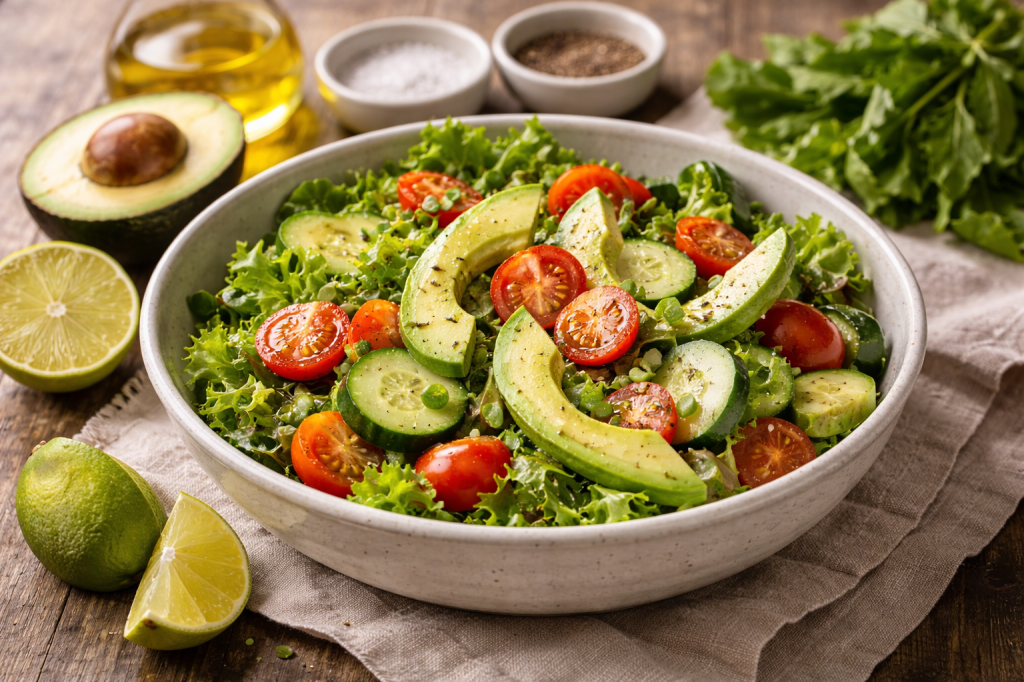
  • Crisp Lime & Avocado Salad

    Crisp Lime & Avocado Salad

    The Space Between Bites

    Not everything on a table is meant to carry weight.

    Some things are meant to make space.

    After a meal that sits heavy—in a good way, in a lasting way—you need something that reminds you that not everything has to. Something that doesn’t compete, doesn’t demand attention, doesn’t try to be more than it is.

    Just something cool.

    Something bright.

    Something that clears the path for the next bite.

    This is that kind of dish.

    Crisp Lime & Avocado Salad

    Ingredients (Serves 2–4)

    • 2 cups romaine or mixed greens
    • 1 large avocado, sliced
    • 1/2 cucumber, thinly sliced
    • 1 cup cherry tomatoes, halved
    • 2 tbsp olive oil
    • Juice of 1 lime
    • Salt and black pepper, to taste

    Optional (if you want a little more):

    • Sliced green onion
    • A few cilantro leaves

    Method

    1. Start with what’s fresh

    In a large bowl, add the greens, cucumber, and tomatoes.

    Nothing complicated here. Just clean, simple ingredients that don’t need much help.

    2. Add the avocado last

    Slice the avocado and place it gently into the bowl.

    Not everything needs to be tossed aggressively. Some things are better handled with care.

    3. Dress it lightly

    In a small bowl, whisk together:

    • Olive oil
    • Lime juice
    • Salt and pepper

    Pour over the salad just before serving.

    4. Toss gently

    Use your hands or a large spoon. Keep the avocado intact as much as possible.

    This isn’t a chopped salad. It’s a composed one.

    Notes From My Kitchen

    • The lime is what makes this work—it cuts through everything that came before it
    • Keep the dressing simple; anything heavier starts to compete
    • This is best made fresh, just before serving

    At the Table

    This was never meant to stand on its own.

    It belongs beside something warm. Something steady. Something that holds the center.

    → Green Chile Beef & Cauliflower Casserole (Mon)

    And after both have done their work—after the meal has said what it needed to say—

    There’s something lighter waiting at the end.

    → Vanilla Cinnamon Ricotta Cream (Fri)

    Not to add more.

    Just to bring it to a close.

    Kyle J. Hayes

    kylehayesblog.com

    If this found you at the right time,

    Feel free to like, comment, or share it with someone who might need it too.

    Resources for Hard Times

    If you’re looking for practical help, food support, or community resources, you can visit the Salt, Ink & Soul Resources Page.

    👉 Resources for Hard Times

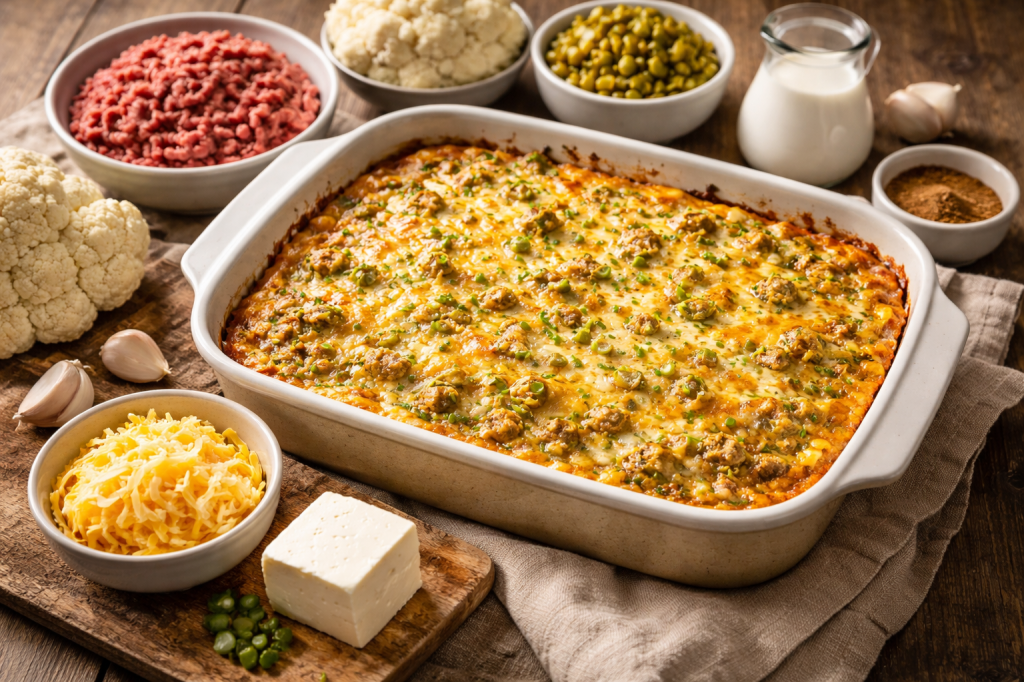
  • The Quiet Work of Making Enough

    The Quiet Work of Making Enough

    There’s a kind of cooking that doesn’t announce itself.

    It doesn’t arrive plated with intention or styled for admiration. It doesn’t ask to be photographed before it’s eaten. It lives somewhere else—closer to memory than performance.

    It’s the kind of cooking that understands what it means to stretch.

    Not out of lack.

    But out of knowing.

    Knowing that a meal doesn’t have to be extravagant to be meaningful.

    That feeding yourself—feeding others—isn’t about excess. It’s about attention.

    It’s about taking what you have and refusing to let it fall short.

    Ground beef. Green chile. A little cream.

    And something else—something that doesn’t try to replace what’s there, only to help carry it further.

    Cauliflower.

    Not as a substitute.

    But as support.

    This is that kind of meal.

    Green Chile Beef & Cauliflower Casserole

    Ingredients (Serves 4–6)

    • 900 g ground beef (80/20 preferred)
    • 300–400 g cauliflower rice (fresh or frozen)
    • 1 small onion, diced
    • 3 cloves garlic, minced
    • 200 g roasted green chiles, chopped (Hatch if you can find them)
    • 120 ml heavy cream
    • 120 g cream cheese, softened
    • 150 g shredded cheddar cheese
    • 100 g shredded Monterey Jack (or mozzarella)
    • 1 tbsp olive oil (if needed)

    Seasoning

    • 1 tsp ground cumin
    • 1 tsp smoked paprika
    • Salt and black pepper, to taste

    Method

    1. Start with the part most people skip

    Heat a large skillet over medium-high heat.

    Add the cauliflower rice with no oil. Let it cook for 5–7 minutes, stirring occasionally, until the moisture cooks off and it begins to feel dry.

    This step matters more than it seems.

    It’s the difference between something that holds together… and something that falls apart.

    Set aside.

    2. Brown the beef

    In the same skillet, cook the ground beef over medium heat until browned, breaking it apart as it cooks.

    Drain excess grease if needed, but don’t take all of it.

    Flavor lives in what you leave behind.

    3. Build the base

    Add the diced onion and cook until softened.

    Stir in garlic, cumin, and smoked paprika. Let it sit in the heat for a moment—just long enough for the aroma to rise.

    4. Bring in the chile

    Add the chopped green chiles and stir.

    Let everything sit together for a minute or two.

    There’s a point where the smell changes—where it stops being a collection of separate ingredients and becomes something whole.

    That’s when you move on.

    5. Make it one thing

    Lower the heat.

    Add the cream cheese and heavy cream. Stir slowly until everything melts together into a single mixture.

    Not layered. Not divided.

    Just one.

    6. Fold in the cauliflower

    Return the cooked cauliflower rice to the skillet.

    Stir until it’s fully combined and coated.

    This is where the dish changes.

    It becomes something that can stretch. Something that can last.

    7. Assemble

    Transfer the mixture to a greased baking dish.

    Top with the shredded cheddar and Monterey Jack. Spread it evenly—enough to cover, not enough to hide what’s underneath.

    8. Bake

    Place in a preheated oven at 375°F (190°C).

    Bake for 20–25 minutes, until bubbling at the edges and lightly golden on top.

    9. Let it rest

    Give it 5–10 minutes before serving.

    It settles here.

    Finds its structure.

    Becomes what it was meant to be.

    Notes From My Kitchen

    • Cooking the cauliflower first isn’t optional—it’s what keeps the dish from becoming watery
    • Pepper Jack can be used if you want more heat
    • This reheats well, and like many things made with care, it often tastes better the next day

    Closing Thought

    There’s a quiet dignity in meals like this.

    Meals that don’t try to be more than they are.

    Meals that understand that feeding someone—yourself included—isn’t about spectacle.

    It’s about presence.

    About taking what’s in front of you and making sure it’s enough.

    Not just for now.

    But for whoever comes back to the table later.

    There’s more to a meal than what sits in the center of it.

    Something fresh to cut through the richness.

    Something light to close it out.

    I’ll share those soon.

    Kyle J. Hayes

    kylehayesblog.com

    If this found you at the right time,

    Feel free to like, comment, or share it with someone who might need it too.

    Resources for Hard Times

    If you’re looking for practical help, food support, or community resources, you can visit the Salt, Ink & Soul Resources Page.

    👉 Resources for Hard Times