Tag: Simple Meals

  • The Sandwich Press Deserved Better

    The Sandwich Press Deserved Better

    Sometimes you just want a good sandwich.

    Not the sad one built over the sink with the refrigerator door hanging open. Not the emergency sandwich. Not the one made because hunger showed up, and standards quietly left the room.

    That sandwich has its place.

    It has saved many of us.

    But this was not that.

    I wanted bread. Warmth. A little crunch. Something that felt like lunch had bothered to put on a clean shirt.

    I had been thinking about a Caprese salad. Tomato. Mozzarella. Basil. Olive oil. Balsamic glaze. Simple ingredients. Dangerous in the wrong hands because there is nowhere to hide.

    But I did not want a salad.

    I wanted focaccia.

    I wanted the sandwich press, that forgotten little appliance sitting there like an unemployed line cook, to do something useful.

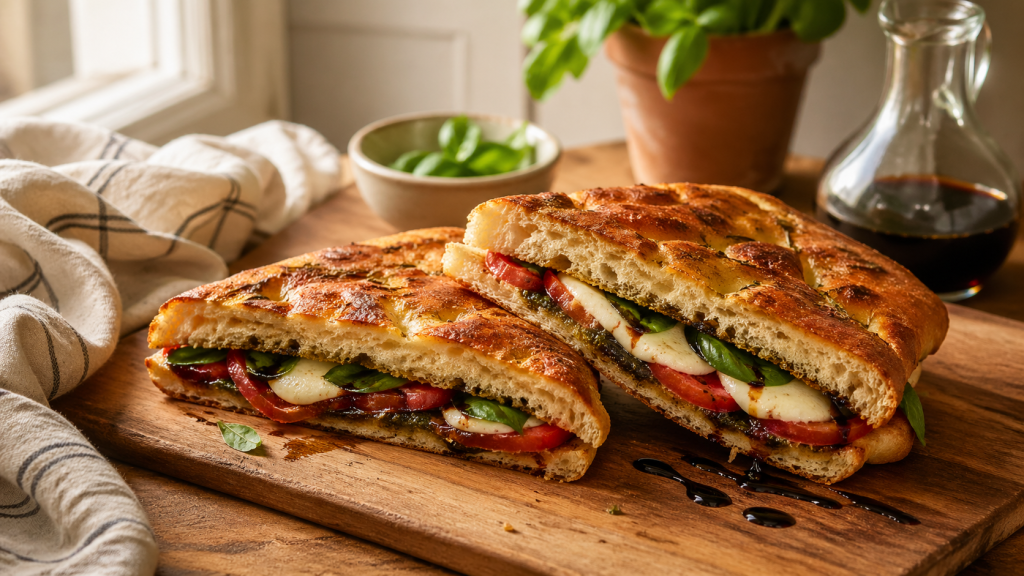
    So I made a Caprese Focaccia Press.

    Focaccia already knows what it is. Oil in the crumb. Salt on the skin. Soft, sturdy, ready for trouble. Press it, and it becomes better. Crisp outside. Warm inside. Mozzarella softening into the tomato. Basil is waking up. Pesto is getting loud in the best way. A small thread of balsamic pulls the whole thing together.

    That is the thing about a good sandwich.

    It is not just filling between bread.

    It is architecture.

    Pressure and tenderness.

    Restraint and appetite.

    This is not fancy food.

    It is not chef food.

    It is home food with better posture.

    Caprese Focaccia Press

    Ingredients

    Makes 1 large sandwich or 2 smaller servings

    • 1 piece of focaccia bread, about 15 x 20 cm, sliced in half horizontally
    • 100–125 g fresh mozzarella, sliced
    • 1 medium tomato, about 120–150 g, thinly sliced
    • 6–8 fresh basil leaves
    • 1–2 tablespoons pesto or 1 tablespoon olive oil
    • 1–2 teaspoons balsamic glaze
    • Pinch of salt
    • Pinch of black pepper
    • 1 teaspoon olive oil, optional, for brushing the outside of the bread

    Optional Additions

    • 15–20 g arugula
    • 2–3 slices prosciutto
    • 30–40 g roasted red peppers, drained and patted dry

    Method

    1. Prepare the tomato

    Slice the tomato thinly.

    Place the slices on a paper towel and gently pat them dry.

    This small step matters. It keeps the sandwich from becoming soggy.

    2. Prepare the focaccia

    Slice the focaccia horizontally in half to create a top and bottom piece.

    Spread 1–2 tablespoons of pesto on the inside of the bread.

    If using olive oil instead of pesto, drizzle about 1 tablespoon over the inside of the focaccia.

    3. Build the sandwich

    Layer the sliced mozzarella over the bottom half of the focaccia.

    Add the tomato slices.

    Season the tomato lightly with salt and black pepper.

    Add the fresh basil leaves.

    Drizzle 1–2 teaspoons of balsamic glaze over the filling.

    Use a light hand here.

    The goal is flavor, not a wet sandwich.

    Add any optional ingredients, if using.

    Close the sandwich with the top half of the focaccia.

    4. Brush the outside

    If the focaccia feels dry, lightly brush the outside with 1 teaspoon olive oil.

    You do not need much.

    Focaccia already carries oil in its bones.

    5. Press the sandwich

    Heat a sandwich press or panini press.

    Place the sandwich inside and press for 4–6 minutes, or until the outside is golden and crisp and the mozzarella has softened.

    If using a skillet, place the sandwich in the pan over medium heat. Press it down gently with another pan or a heavy spatula. Cook for 3–4 minutes per side, until crisp and warmed through.

    6. Rest and serve

    Let the sandwich rest for 1–2 minutes before cutting.

    This helps the cheese settle and keeps the filling from sliding out.

    Cut in half and serve warm.

    Notes From My Kitchen

    Pat the tomato dry.

    Do not overdo the balsamic glaze.

    Let the sandwich rest before cutting.

    Those are small things, but small things often decide whether a meal feels cared for.

    Kyle J. Hayes

    kylehayesblog.com

    Please like, comment, and share

    Resources for Hard Times

    If you’re looking for practical help, food support, or community resources, you can visit the Salt, Ink & Soul Resources Page.

    👉 Resources for Hard Times

  • Crisp Lime & Avocado Salad

    Crisp Lime & Avocado Salad

    The Space Between Bites

    Not everything on a table is meant to carry weight.

    Some things are meant to make space.

    After a meal that sits heavy—in a good way, in a lasting way—you need something that reminds you that not everything has to. Something that doesn’t compete, doesn’t demand attention, doesn’t try to be more than it is.

    Just something cool.

    Something bright.

    Something that clears the path for the next bite.

    This is that kind of dish.

    Crisp Lime & Avocado Salad

    Ingredients (Serves 2–4)

    • 2 cups romaine or mixed greens
    • 1 large avocado, sliced
    • 1/2 cucumber, thinly sliced
    • 1 cup cherry tomatoes, halved
    • 2 tbsp olive oil
    • Juice of 1 lime
    • Salt and black pepper, to taste

    Optional (if you want a little more):

    • Sliced green onion
    • A few cilantro leaves

    Method

    1. Start with what’s fresh

    In a large bowl, add the greens, cucumber, and tomatoes.

    Nothing complicated here. Just clean, simple ingredients that don’t need much help.

    2. Add the avocado last

    Slice the avocado and place it gently into the bowl.

    Not everything needs to be tossed aggressively. Some things are better handled with care.

    3. Dress it lightly

    In a small bowl, whisk together:

    • Olive oil
    • Lime juice
    • Salt and pepper

    Pour over the salad just before serving.

    4. Toss gently

    Use your hands or a large spoon. Keep the avocado intact as much as possible.

    This isn’t a chopped salad. It’s a composed one.

    Notes From My Kitchen

    • The lime is what makes this work—it cuts through everything that came before it
    • Keep the dressing simple; anything heavier starts to compete
    • This is best made fresh, just before serving

    At the Table

    This was never meant to stand on its own.

    It belongs beside something warm. Something steady. Something that holds the center.

    → Green Chile Beef & Cauliflower Casserole (Mon)

    And after both have done their work—after the meal has said what it needed to say—

    There’s something lighter waiting at the end.

    → Vanilla Cinnamon Ricotta Cream (Fri)

    Not to add more.

    Just to bring it to a close.

    Kyle J. Hayes

    kylehayesblog.com

    If this found you at the right time,

    Feel free to like, comment, or share it with someone who might need it too.

    Resources for Hard Times

    If you’re looking for practical help, food support, or community resources, you can visit the Salt, Ink & Soul Resources Page.

    👉 Resources for Hard Times

  • The Quiet Work of Making Enough

    The Quiet Work of Making Enough

    There’s a kind of cooking that doesn’t announce itself.

    It doesn’t arrive plated with intention or styled for admiration. It doesn’t ask to be photographed before it’s eaten. It lives somewhere else—closer to memory than performance.

    It’s the kind of cooking that understands what it means to stretch.

    Not out of lack.

    But out of knowing.

    Knowing that a meal doesn’t have to be extravagant to be meaningful.

    That feeding yourself—feeding others—isn’t about excess. It’s about attention.

    It’s about taking what you have and refusing to let it fall short.

    Ground beef. Green chile. A little cream.

    And something else—something that doesn’t try to replace what’s there, only to help carry it further.

    Cauliflower.

    Not as a substitute.

    But as support.

    This is that kind of meal.

    Green Chile Beef & Cauliflower Casserole

    Ingredients (Serves 4–6)

    • 900 g ground beef (80/20 preferred)
    • 300–400 g cauliflower rice (fresh or frozen)
    • 1 small onion, diced
    • 3 cloves garlic, minced
    • 200 g roasted green chiles, chopped (Hatch if you can find them)
    • 120 ml heavy cream
    • 120 g cream cheese, softened
    • 150 g shredded cheddar cheese
    • 100 g shredded Monterey Jack (or mozzarella)
    • 1 tbsp olive oil (if needed)

    Seasoning

    • 1 tsp ground cumin
    • 1 tsp smoked paprika
    • Salt and black pepper, to taste

    Method

    1. Start with the part most people skip

    Heat a large skillet over medium-high heat.

    Add the cauliflower rice with no oil. Let it cook for 5–7 minutes, stirring occasionally, until the moisture cooks off and it begins to feel dry.

    This step matters more than it seems.

    It’s the difference between something that holds together… and something that falls apart.

    Set aside.

    2. Brown the beef

    In the same skillet, cook the ground beef over medium heat until browned, breaking it apart as it cooks.

    Drain excess grease if needed, but don’t take all of it.

    Flavor lives in what you leave behind.

    3. Build the base

    Add the diced onion and cook until softened.

    Stir in garlic, cumin, and smoked paprika. Let it sit in the heat for a moment—just long enough for the aroma to rise.

    4. Bring in the chile

    Add the chopped green chiles and stir.

    Let everything sit together for a minute or two.

    There’s a point where the smell changes—where it stops being a collection of separate ingredients and becomes something whole.

    That’s when you move on.

    5. Make it one thing

    Lower the heat.

    Add the cream cheese and heavy cream. Stir slowly until everything melts together into a single mixture.

    Not layered. Not divided.

    Just one.

    6. Fold in the cauliflower

    Return the cooked cauliflower rice to the skillet.

    Stir until it’s fully combined and coated.

    This is where the dish changes.

    It becomes something that can stretch. Something that can last.

    7. Assemble

    Transfer the mixture to a greased baking dish.

    Top with the shredded cheddar and Monterey Jack. Spread it evenly—enough to cover, not enough to hide what’s underneath.

    8. Bake

    Place in a preheated oven at 375°F (190°C).

    Bake for 20–25 minutes, until bubbling at the edges and lightly golden on top.

    9. Let it rest

    Give it 5–10 minutes before serving.

    It settles here.

    Finds its structure.

    Becomes what it was meant to be.

    Notes From My Kitchen

    • Cooking the cauliflower first isn’t optional—it’s what keeps the dish from becoming watery
    • Pepper Jack can be used if you want more heat
    • This reheats well, and like many things made with care, it often tastes better the next day

    Closing Thought

    There’s a quiet dignity in meals like this.

    Meals that don’t try to be more than they are.

    Meals that understand that feeding someone—yourself included—isn’t about spectacle.

    It’s about presence.

    About taking what’s in front of you and making sure it’s enough.

    Not just for now.

    But for whoever comes back to the table later.

    There’s more to a meal than what sits in the center of it.

    Something fresh to cut through the richness.

    Something light to close it out.

    I’ll share those soon.

    Kyle J. Hayes

    kylehayesblog.com

    If this found you at the right time,

    Feel free to like, comment, or share it with someone who might need it too.

    Resources for Hard Times

    If you’re looking for practical help, food support, or community resources, you can visit the Salt, Ink & Soul Resources Page.

    👉 Resources for Hard Times

  • The Salad That Doesn’t Compete

    The Salad That Doesn’t Compete

    Caesar Salad (As It Was Meant to Be)

    There’s a misunderstanding that follows certain dishes.

    Caesar salad is one of them.

    Somewhere along the way, it became something else.

    Covered. Overloaded. Turned into a platform for whatever someone felt like adding that day. Chicken most of all—placed on top like it needed saving, like it wasn’t enough on its own.

    But it was always enough.

    It was never meant to be heavy.

    Never meant to carry the whole meal.

    It was meant to support.

    To balance.

    To bring something sharp and clean to a plate that needed it.

    That may be why it belongs here.

    Next to something rich.

    Something warm.

    Something like jalapeño popper chicken.

    Because not everything on the plate needs to speak loudly.

    Some things just need to be right.

    Caesar Salad

    Serves 4 to 8

    Ingredients

    For the Croutons

    • 1 cup extra-virgin olive oil (from total below)
    • 4 oil-packed anchovies, drained
    • 2 garlic cloves, peeled and smashed
    • 6 slices of white sandwich bread, cut into ¾-inch cubes
    • ¼ cup finely grated Parmigiano-Reggiano
    • Salt and freshly ground black pepper

    For the Dressing

    • Remaining 1½ cups extra-virgin olive oil
    • 6 oil-packed anchovies, drained
    • 2 garlic cloves, finely chopped
    • 1 teaspoon Dijon mustard
    • Juice of 1 lemon (about 2 tablespoons)
    • ½ teaspoon Worcestershire sauce
    • Dash of Tabasco
    • 3 egg yolks
    • Salt and freshly ground black pepper

    For the Salad

    • 1 large or 2 small heads of romaine lettuce, washed, chilled, and coarsely chopped
    • ¾ cup finely grated Parmigiano-Reggiano
    • Boquerones (optional, for garnish)

    Instructions

    1. Make the Croutons

    In a wide pan, heat 1 cup of olive oil over medium-low heat.

    Add anchovies and smashed garlic, letting them slowly dissolve into the oil.

    Not rushed. Not forced.

    Increase the heat slightly and add the bread cubes.

    Toss until golden on all sides.

    Remove and transfer to a bowl.

    Toss gently with parmesan, salt, and pepper.

    Let them rest.

    2. Build the Dressing

    In a food processor or blender, combine:

    • anchovies
    • chopped garlic
    • mustard
    • lemon juice
    • Worcestershire
    • Tabasco
    • egg yolks

    Blend until smooth.

    Slowly drizzle in the remaining olive oil.

    Let it come together gradually.

    Taste. Adjust.

    This is where it becomes yours.

    3. Bring It Together

    In a large bowl, add the lettuce.

    Toss with dressing—just enough to coat.

    Not drown.

    Add the remaining parmesan.

    Toss again, gently.

    Plate it simply.

    This salad was made to sit beside something richer.

    Something warm. Something with weight.

    Like the Jalapeño Popper Chicken.

    Notes from the Kitchen

    • This salad is meant to balance, not compete.
    • Keep it clean. Keep it intentional.
    • The anchovies matter.
    • They don’t make it “fishy”—they make it complete.
    • Use enough dressing to coat, not overwhelm.
    • There’s a difference between flavor and excess.
    • And leave the chicken off.
    • It already has its place on the plate.

    A Quiet Understanding

    There’s something honest about a dish that knows what it is.

    It doesn’t try to become more.

    Don’t try to carry everything.

    It just does its job well.

    And next to something rich—

    something heavy with flavor and warmth—

    This salad reminds you that balance isn’t subtraction.

    Its intention.

    Not everything needs to stand alone.

    Some things are meant to stand beside one another.

    And when they do…

    The whole plate makes sense.

    Kyle J. Hayes

    kylehayesblog.com

    If this found you at the right time,

    Feel free to like, comment, or share it with someone who might need it too.

    Resources for Hard Times

    If you’re looking for practical help, food support, or community resources, you can visit the Salt, Ink & Soul Resources Page.

    👉 Resources for Hard Times