Tag: Southern Cooking

  • Peach BBQ Chicken

    Peach BBQ Chicken

    Some foods seem to know exactly when they are supposed to arrive.

    Peaches are one of them.

    For most of the year, they are simply another fruit sitting quietly in the produce section. Then summer arrives, and suddenly they become something else entirely. Sweeter. Juicier. Full of sunshine and possibility.

    Around Juneteenth, peaches begin appearing in markets across much of the country. Their arrival feels like a reminder that summer has finally settled in.

    Not rushed.

    Not hurried.

    Just here.

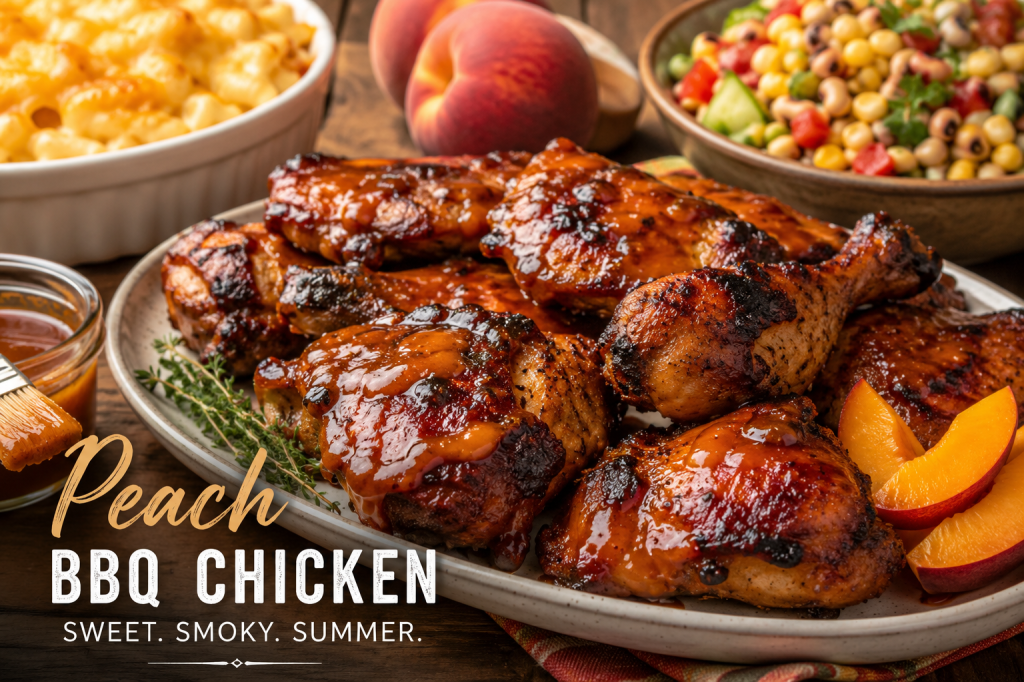
    This recipe brings together that sweetness with a little vinegar, a little garlic, and enough heat to keep things interesting. The result is a sticky barbecue glaze that clings to chicken and caramelizes beautifully over the grill.

    The peaches bring sweetness.

    The hot sauce brings attitude.

    The smoke does the rest.

    Serves

    4 to 6

    Ingredients

    For the Chicken

    • 2 pounds chicken thighs or drumsticks
    • 1 tablespoon olive oil
    • 1 teaspoon kosher salt
    • 1 teaspoon black pepper
    • 1 teaspoon smoked paprika
    • ½ teaspoon garlic powder

    For Cleaning the Chicken

    • ½ cup white vinegar
    • ½ lemon

    For the Peach BBQ Glaze

    • 1 cup peach preserves
    • ¼ cup apple cider vinegar
    • 2 tablespoons hot sauce
    • 2 cloves garlic, finely minced
    • ½ teaspoon black pepper
    • Pinch of salt

    Directions

    1. Clean the Chicken

    Begin by washing the chicken under cool running water.

    Place the chicken in a large bowl and add the Vinegar. Squeeze the juice from half a lemon over the chicken, then use the lemon itself to gently rub and scrub the chicken pieces.

    Rinse thoroughly under cool water and pat dry with paper towels.

    This step was common in many kitchens long before recipes ever found their way online. It is one of those habits passed from one generation to another, a small ritual before the cooking begins.

    2. Season the Chicken

    Drizzle the chicken with olive oil and season evenly with the salt, pepper, smoked paprika, and garlic powder.

    Allow the chicken to rest for about 20 minutes while you prepare the glaze.

    3. Make the Peach Glaze

    In a small saucepan, combine the peach preserves, apple cider vinegar, hot sauce, Garlic, black pepper, and salt.

    Bring the mixture to a gentle simmer over medium-low heat.

    Cook for 5 to 7 minutes, stirring occasionally, until smooth and slightly thickened.

    Remove from the heat and set aside.

    4. Cook the Chicken

    Preheat a grill to medium heat.

    Place the chicken on the grill and cook, turning occasionally, until nearly cooked through, about 25 to 30 minutes.

    If cooking indoors, roast the chicken at 400°F for 35 to 40 minutes.

    5. Glaze and Finish

    During the final 10 minutes of cooking, brush the chicken generously with the peach glaze.

    Turn and brush several times, allowing the glaze to build into layers.

    As the sugars caramelize, the chicken will develop a beautiful shine and a little char around the edges.

    That is where the magic happens.

    6. Rest and Serve

    Transfer the chicken to a platter and allow it to rest for a few minutes before serving.

    Reserve a little extra glaze for the table.

    Nobody ever complains about extra sauce.

    What to Serve With It

    For a Juneteenth table, I like to serve this chicken alongside a pan of baked macaroni and cheese and a Summer Garden Salad filled with black-eyed peas, sweet corn, tomatoes, cucumbers, and fresh herbs.

    The combination works because each dish brings something different.

    The chicken is sweet, smoky, and just a little spicy.

    The macaroni and cheese is rich and comforting.

    The salad adds brightness, freshness, and a reminder that summer gardens are beginning to wake up.

    Together, they create the kind of meal that encourages people to linger at the table a little longer.

    To go back for seconds.

    To tell one more story before the sun goes down.

    From the Kitchen

    Food has a way of marking the seasons.

    Peaches arrive.

    Gardens begin producing more than we can eat.

    Families gather around tables that seem to grow larger with every chair that gets pulled up.

    This meal reminds me that celebration does not always require extravagance.

    Sometimes it is chicken glazed with peaches and heat.

    A bubbling dish of macaroni and cheese.

    A bowl of vegetables gathered from the season.

    And the people sitting around the table.

    The food matters.

    But the company matters more.

    The meal ends.

    The memories stay.

    Kyle J. Hayes

    kylehayesblog.com

    Please like, comment, and share

    Resources for Hard Times

    If you’re looking for practical help, food support, or community resources, you can visit the Salt, Ink & Soul Resources Page.

    👉 Resources for Hard Times

  • Grits Are Just the Beginning

    Grits Are Just the Beginning

    Let’s talk about grits.

    I grew up in the Midwest, and if you asked for grits, there was a good chance they arrived with butter and sugar. That’s how I ate them. That’s how I liked them.

    When I tell people that now, I usually get the same look. The kind of look normally reserved for people who put ketchup on steak or think chili belongs on cinnamon rolls.

    Apparently, I had committed some sort of culinary crime.

    The thing is, nobody told me there were rules.

    To me, grits were breakfast. Warm, simple, and filling. A bowl of comfort before school or work. Butter melting into every corner. Sugar disappearing into the steam.

    Then I moved.

    That’s when I learned grits are really just a foundation.

    Some people eat them with salt and pepper. Some with scrambled eggs folded in. Some with cheese. Some with sausage. Some with whatever happened to be left over from the night before.

    And then I discovered shrimp and grits.

    Though I have to be honest, I think that name is a little misleading.

    Because every truly good plate I’ve had contained a lot more than shrimp and grits.

    There was bacon.

    There were peppers.

    There were onions.

    There were seasonings.

    Somebody was standing over a stove who understood that flavor doesn’t happen by accident.

    These days, shrimp and grits have become my favorite way to eat them.

    And before we go any further, let’s establish one rule.

    No instant grits.

    Take your time.

    Learn how to make them properly.

    I’m not even completely convinced instant grits are real grits. And we won’t even discuss the ones that come in little packets and tell you to use the microwave.

    Some shortcuts are worth taking.

    This isn’t one of them.

    Good grits require patience. Not much. Just enough.

    The reward is worth it.

    Serve them with buttered toast made from homemade bread and a hot cup of coffee, and you’ve got the kind of breakfast that makes you slow down for a few minutes before the world starts making demands.

    Here’s my version.

    Shrimp, Bacon, Pepper & Onion Grits

    For the Grits

    Ingredients

    • 1 cup stone-ground grits
    • 4 cups chicken stock
    • 1 cup whole milk
    • 4 tablespoons butter
    • 1 cup sharp cheddar cheese, shredded
    • 1 teaspoon kosher salt
    • ½ teaspoon black pepper

    Directions

    1. Bring the chicken stock and milk to a gentle boil in a large saucepan.
    2. Slowly whisk in the grits.
    3. Reduce the heat to low.
    4. Cook for 25–35 minutes, stirring often.
    5. Once creamy, stir in the butter, cheddar cheese, salt, and pepper.
    6. Keep warm while preparing the topping.

    For the Shrimp Topping

    Ingredients

    • 1 pound large shrimp, peeled and deveined
    • 6 slices bacon, diced
    • 1 medium onion, diced
    • 1 bell pepper, diced
    • 2 cloves garlic, minced
    • 1 teaspoon smoked paprika
    • ½ teaspoon Cajun seasoning
    • ½ teaspoon black pepper
    • 1 tablespoon butter
    • 2 green onions, sliced

    Directions

    1. Cook the bacon in a large skillet until crisp.
    2. Remove the bacon and set it aside, leaving the drippings in the pan.
    3. Add the onion and bell pepper and cook until softened.
    4. Stir in the garlic and cook for 30 seconds.
    5. Add the shrimp, smoked paprika, Cajun seasoning, and black pepper.
    6. Cook for 2–3 minutes per side until the shrimp are pink and cooked through.
    7. Return the bacon to the skillet.
    8. Stir in the tablespoon of butter.
    9. Remove from heat.

    To Serve

    Spoon the hot grits into a bowl.

    Top generously with the shrimp mixture.

    Scatter sliced green onions over the top.

    Serve with thick slices of homemade bread, toasted and spread with butter.

    And if someone tells you grits should only be eaten one way, smile politely.

    Then keep eating them however you like.

    A Note From The Cook

    Food has a funny way of following us through life. What begins as a bowl of grits with butter and sugar can become a bowl of shrimp, bacon, peppers, and onions, and a lesson in patience. The ingredients may change. The people around the table may change. But the purpose stays the same.

    To feed the people you care about.

    Kyle J. Hayes

    kylehayesblog.com

    Please like, comment, and share

    Resources for Hard Times

    If you’re looking for practical help, food support, or community resources, you can visit the Salt, Ink & Soul Resources Page.

    👉 Resources for Hard Times

  • Learning What Good Tastes Like

    Learning What Good Tastes Like

    Some foods sneak in through a side door.

    Biscuits and gravy did just that.

    Now, before the South collectively revokes my biscuit privileges, let me explain. Of course, I had heard of biscuits. I had even made them once in a high school cooking class. But somehow, despite growing up in America, I made it all the way to joining the military before I ever sat down in front of a plate of biscuits and gravy.

    I know. It sounds strange.

    The first time I had it, I wasn’t impressed. The biscuits were fine. The gravy was… there. It filled space. It occupied a plate. It tasted like someone had waved a sausage over a pan and called it seasoning.

    Then, a few weeks later, somebody else made it.

    Everything changed.

    The biscuits were still scratch-made, but now they had character. The gravy had pepper. It had flavor. It had purpose. It wasn’t just something poured over bread. It was comfort disguised as breakfast.

    The difference between those two plates was the difference between hearing music through a wall and sitting in the front row of the concert.

    And that’s when I learned one of the great truths of cooking:

    A recipe is only half the story.

    The other half is whether the cook understands seasoning.

    Years later, after leaving the Army, I’d occasionally order biscuits and gravy at restaurants. Sometimes it was fantastic. Other times it tasted suspiciously like the first version I’d ever encountered—bland, pale, and forgettable.

    Eventually, I decided to learn how to make it myself.

    The biscuits stayed traditional.

    The gravy got some attention.

    And somewhere along the way, I swapped pork sausage for turkey sausage. My heart would thank me later, even if a few Southern grandmothers might shake their heads at me from across the room.

    The result is a breakfast that still feels like comfort food, still feels Southern, but doesn’t leave me needing a nap before noon.

    If you’re looking for a Saturday morning breakfast that fills the kitchen with the smell of fresh biscuits and black pepper gravy, this is the one.

    One of the reasons I love biscuits and gravy is that it proves comfort food doesn’t have to be expensive. Using turkey sausage and basic pantry ingredients, this recipe can typically feed 4 people for around $8–$10, depending on local grocery prices. Sometimes the best meals aren’t the expensive ones. They’re the ones that leave everyone full and happy without leaving your wallet empty.

    Biscuits and Turkey Sausage Gravy

    For the Biscuits

    Ingredients

    • 2 cups all-purpose flour
    • 1 tablespoon baking powder
    • 1 teaspoon salt
    • 1 teaspoon sugar
    • 6 tablespoons cold butter, cubed
    • ¾ cup cold buttermilk

    Directions

    1. Preheat oven to 425°F.
    2. In a large bowl, whisk together flour, baking powder, salt, and sugar.
    3. Cut in the cold butter until the mixture resembles coarse crumbs.
    4. Pour in buttermilk and stir just until the dough comes together.
    5. Turn onto a lightly floured surface and gently fold the dough several times.
    6. Pat to about 1-inch thickness.
    7. Cut biscuits with a biscuit cutter or drinking glass.
    8. Place on a baking sheet with sides touching.
    9. Bake 12–15 minutes until golden brown.

    Turkey Sausage Gravy

    Ingredients

    • 1 pound turkey breakfast sausage
    • 3 tablespoons butter
    • ¼ cup all-purpose flour
    • 3 cups whole milk
    • 1 teaspoon kosher salt
    • 1 teaspoon coarse black pepper
    • ½ teaspoon garlic powder
    • ½ teaspoon onion powder
    • ¼ teaspoon smoked paprika
    • Pinch of cayenne pepper (optional)

    Directions

    1. Brown the turkey sausage in a large skillet over medium heat.
    2. Add the butter and let it melt.
    3. Sprinkle flour over the sausage and stir continuously for about 2 minutes.
    4. Slowly add milk while whisking to prevent lumps.
    5. Bring to a gentle simmer.
    6. Add salt, black pepper, garlic powder, onion powder, smoked paprika, and cayenne.
    7. Continue cooking until thick and creamy, about 5–7 minutes.
    8. Taste and adjust seasoning as needed.

    To Serve

    Split a warm biscuit in half.

    Spoon a generous amount of gravy over the top.

    Add an extra crack of black pepper.

    Pour yourself a cup of coffee.

    Then do what Saturday mornings were always meant for.

    Sit still for a few minutes.

    The world will be waiting when you’re done.

    The biscuits don’t care about your deadlines.

    The gravy isn’t worried about your inbox.

    For once, sit, relax, and enjoy your food.

    A Note From The Cook

    There is a strange belief that good food has to be expensive. Maybe that’s because we’ve confused luxury with quality. Biscuits and gravy remind me that some of the best meals ever were made by people who didn’t have much money to spare. Good seasoning, a little patience, and a warm kitchen can still turn a few dollars’ worth of ingredients into something worth remembering.

    Kyle J. Hayes

    kylehayesblog.com

    Please like, comment, and share

    Resources for Hard Times

    If you’re looking for practical help, food support, or community resources, you can visit the Salt, Ink & Soul Resources Page.

    👉 Resources for Hard Times

  • Soulful Low-Carb Coleslaw

    Soulful Low-Carb Coleslaw

    Cool. Crisp. Familiar, but a little lighter.

    There’s a version of coleslaw most of us know.

    It shows up beside barbecue, next to something hot, something smoky, something meant to be eaten with your hands. It’s cold. A little sweet. A little tangy. Meant to balance everything else on the plate.

    This version keeps that spirit.

    But it pulls back just enough.

    Less sugar. More brightness. A little more edge.

    Still creamy—but not heavy.

    Still familiar—but not stuck.

    Ingredients

    • 4 cups green cabbage, thinly sliced
    • 1 cup purple cabbage, thinly sliced
    • ½ cup carrots, finely shredded (optional, for color—use lightly to keep carbs low)
    • ¼ cup mayonnaise
    • 1 tablespoon apple cider vinegar
    • 1 tablespoon Dijon mustard
    • 1–2 teaspoons low-carb sweetener (to taste, just enough to soften the edges)
    • ½ teaspoon garlic powder
    • ½ teaspoon onion powder
    • ½ teaspoon smoked paprika
    • Salt, to taste
    • Freshly cracked black pepper

    Optional (for depth)

    • 1 teaspoon pickle juice
    • pinch of celery seed

    Instructions

    1. Build the base

    Place the cabbage (and carrots, if using) into a large bowl.

    Give it space. Slaw needs room to move.

    2. Make the dressing

    In a separate bowl, combine:

    • mayonnaise
    • apple cider vinegar
    • Dijon mustard
    • sweetener
    • garlic powder
    • onion powder
    • smoked paprika
    • salt and pepper

    Stir until smooth.

    Taste it.

    It should feel balanced—not too sweet, not too sharp. Adjust if needed.

    3. Bring it together

    Pour the dressing over the cabbage.

    Toss slowly, making sure everything is coated.

    Not drowned. Just coated.

    4. Let it rest

    Let the slaw sit for 15–30 minutes before serving.

    This matters.

    The cabbage softens slightly. The flavors settle.

    It becomes something more than just mixed ingredients.

    To Serve

    Serve cold, beside something warm and rich.

    This is where it does its best work.

    Cutting through heaviness. Resetting the palate.

    Making the next bite feel like the first one again.

    Serve This As a Complete Table

    This slaw belongs beside something that needs balance.

    • Cheeseburger Casserole — warm, rich, and grounding
    • Soulful Low-Carb Coleslaw — crisp, cool, and cutting through
    • Almond Cream Cake — quiet, balanced, and just enough (posting Saturday)

    Together, they hold the table steady.

    Not too heavy.

    Not too sharp.

    Just right.

    Kyle J. Hayes

    kylehayesblog.com

    If this found you at the right time,

    Feel free to like, comment, or share it with someone who might need it too.

    Resources for Hard Times

    If you’re looking for practical help, food support, or community resources, you can visit the Salt, Ink & Soul Resources Page.

    👉 Resources for Hard Times