Category: Food & Meaning

  • The Change-in-the-Weather Flu

    The Change-in-the-Weather Flu

    Fall is here.

    You can see it arriving before the temperature fully agrees.

    Halloween decorations begin appearing on porches. Balloons drift across the morning sky. Grocery stores stack bags of freshly roasted green chile near the entrance, and the smell follows you all the way to the car.

    Soon, there will be green chile stew.

    There should always be green chile stew.

    But for me, the changing season brings something else.

    What I call the change-in-the-weather flu.

    I know this is not an official medical diagnosis. No doctor has ever looked over a clipboard and solemnly announced that I have a severe case of autumn.

    Still, I know what I feel.

    The scratchy throat.

    The stuffy head.

    The sudden desire to remain on the couch and cancel every responsibility that requires shoes.

    It seems to happen whenever the weather begins changing its mind. The afternoons are still warm, but the mornings have developed an attitude. You leave home dressed for summer and return wondering why you did not bring a jacket.

    Mother Nature is rearranging the furniture.

    My body notices.

    Over the years, I have developed my own treatment plan.

    It begins with homemade chicken soup.

    Nothing elaborate. This is not the time for culinary ambition. The soup only needs to be hot, comforting, and able to make me believe I am taking care of myself.

    Something about chicken soup feels older than medicine.

    Maybe it is the steam rising from the bowl. Maybe it is the warmth settling into your chest. Maybe it is simply the memory of being cared for.

    Sometimes comfort works because we remember it working before.

    Then comes green tea with lemon and honey.

    The honey soothes my throat. The lemon brings a little brightness. The warm cup gives my hands something to hold while I sit beneath a weighted blanket and consider whether I have the strength to choose another show.

    I usually do.

    Binge-watching is an important part of recovery.

    The show does not have to be especially good. In fact, it may be better if it is not. A complicated plot requires attention, and I don’t have it when my head feels stuffed with cotton.

    I need something familiar.

    Something that will continue playing if I fall asleep halfway through and wake up three episodes later with no idea what happened.

    The weighted blanket completes the prescription.

    Something about its gentle pressure makes the couch feel less like a place where I have collapsed and more like a place where I have intentionally chosen to recover.

    That distinction matters.

    We sometimes treat rest as though it must be earned. We push ourselves until our bodies make the decision for us. Then we lie down reluctantly, still thinking about everything we should be doing.

    But the changing seasons offer their own instruction.

    Slow down.

    Make something warm.

    Pull the blanket a little higher.

    Let the world continue without your supervision for an afternoon.

    Perhaps my change-in-the-weather flu is simply Mother Nature’s way of telling me that summer is over.

    The long days are shortening. The air is cooling. The season of open windows and cold drinks is giving way to soup, tea, blankets, and the quiet comfort of staying home.

    Outside, the balloons will rise.

    The Halloween decorations will multiply.

    Somewhere, someone will begin making the first pot of green chile stew.

    And I will be on the couch with my tea, my soup, and my weighted blanket, accepting the message my body has been trying to deliver.

    Fall has arrived.

    Apparently, it would like me to sit down.

    Kyle J. Hayes

    kylehayesblog.com

    Please like, comment, and share

    Resources for Hard Times

    If you’re looking for practical help, food support, or community resources, you can visit the Salt, Ink & Soul Resources Page.

    👉 Resources for Hard Times

  • Deep-Dish Grilled Onions & Mushroom Pizza 

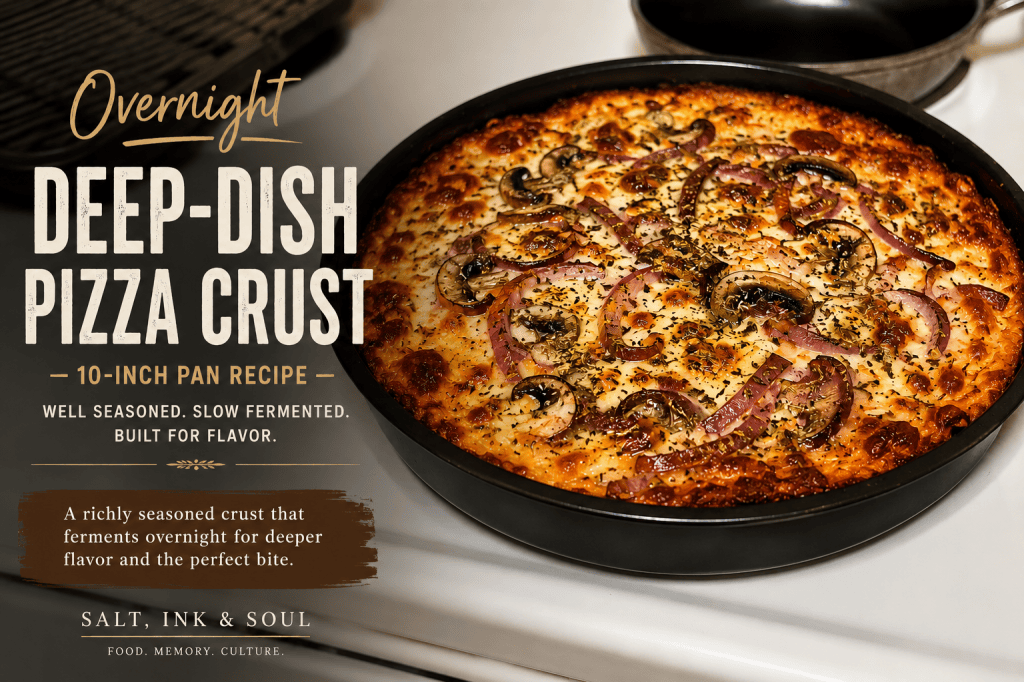
    Deep-Dish Grilled Onions & Mushroom Pizza 

    There is something satisfying about making pizza from the beginning.

    Not opening a box.

    Not waiting for someone to knock on the door.

    Flour. Water. Yeast. A little patience.

    And perhaps patience is the ingredient we have become most reluctant to use.

    This dough spends the night in the refrigerator. Nothing dramatic happens. It simply rests while the yeast does its quiet work, turning a handful of ordinary ingredients into something that tastes as though considerably more effort went into it.

    The next day, onions and mushrooms go into a hot skillet. The onions soften and sweeten. The mushrooms lose their water and begin to brown. Shred a pound of mozzarella by hand.

    And yes, shred the cheese yourself.

    The bagged stuff is convenient, but convenience sometimes comes with a small tax on quality. Pre-shredded cheese is coated to keep the pieces separate, which also keeps them from melting quite as beautifully. For this pizza, buy the block.

    Then build the thing.

    No shortcuts necessary.

    10-Inch Overnight Deep-Dish Pizza

    Makes: One 10-inch deep-dish pizza

    Serves: 4 generously

    Dough fermentation: 12–24 hours

    Bake: approximately 25–30 minutes at 475°F / 246°C

    For the Seasoned Overnight Dough

    • 265 g bread flour
    • 158 g warm water, about 95–100°F / 35–38°C
    • 35 g extra-virgin olive oil
    • 6 g kosher salt
    • 2 g sugar
    • 1.5 g instant yeast
    • 1.5 g garlic powder
    • 1.5 g onion powder
    • 0.5 g dried oregano
    • 0.5 g dried basil
    • 0.5 g freshly ground black pepper

    Optional, but very good:

    • 3 g finely grated Parmesan
    • 0.5 g smoked paprika
    • 0.25 g dried thyme

    For the Pan

    • 14 g extra-virgin olive oil
    • 4 g cornmeal

    For the Pizza

    • 1 lb / 454 g low-moisture whole-milk mozzarella, freshly shredded from a block
    • 8 oz / 225 g fresh mushrooms, sliced
    • 1 medium red or yellow onion, about 170–200 g, sliced into approximately ¼-inch strips
    • 1 tablespoon / 14 g olive oil, for grilling the vegetables
    • ¼ teaspoon kosher salt
    • Freshly ground black pepper
    • 1¼ cups / about 300 g thick pizza sauce
    • 20–25 g freshly grated Parmesan or Pecorino Romano
    • ½ teaspoon dried oregano
    • Optional red-pepper flakes

    I like red onion here, especially with mushrooms. It retains a little character after cooking and gives the finished pizza some sweetness without disappearing into the sauce.

    The Night Before

    Put the flour, salt, sugar, yeast, garlic powder, onion powder, oregano, basil, and black pepper into a large bowl.

    If you’re using the Parmesan, smoked paprika, and thyme, add those too.

    Pour in the warm water and olive oil.

    Mix until the ingredients come together into a rough dough.

    Knead by hand for about 8 minutes, or about 5 minutes in a stand mixer.

    You’re not looking for perfection. You’re looking for a dough that has changed beneath your hands—smooth, elastic, soft, and just slightly tacky.

    Lightly oil a bowl and put the dough inside.

    Cover it and leave it on the counter for 30 minutes.

    Then put it in the refrigerator.

    Leave it there for 12–24 hours.

    Eighteen to twenty-four is even better.

    Time is doing some of the cooking before we’ve ever turned on the oven.

    The Next Day

    Take the dough from the refrigerator about 1½–2 hours before you want to make the pizza.

    Cold dough remembers where it has been. Give it time to loosen up.

    While it does, make the toppings.

    Grill the Onions and Mushrooms

    Heat a large skillet—cast iron is excellent here—over medium-high heat.

    Add the tablespoon of olive oil.

    Add the mushrooms first and spread them into a relatively even layer. Let them cook for 3–4 minutes before moving them much.

    Mushrooms contain a remarkable amount of water. We want that water in the skillet, not trapped beneath our cheese.

    Once they’ve begun releasing their moisture, add the sliced onion.

    Season lightly with salt and black pepper.

    Continue cooking for another 5–7 minutes, stirring occasionally, until the mushrooms have browned and the onions are tender with some caramelized edges.

    Don’t cook the onions all the way down into jam. They still have another half hour in a hot oven.

    Transfer everything to a plate and allow it to cool.

    This step matters.

    Raw mushrooms placed directly onto a deep-dish pizza can release enough water to make the center soggy. Cooking them first concentrates their flavor while protecting the crust.

    Shred the Cheese

    While the vegetables cool, shred the mozzarella.

    All of it.

    One pound.

    It sounds excessive until you remember what we’re making.

    This isn’t a thin pizza where cheese is scattered politely across the surface. Deep dish requires structure. That mozzarella forms a rich layer between the crust and everything wet that comes afterward.

    Use low-moisture whole-milk mozzarella, preferably sold as a block.

    Avoid fresh mozzarella packed in water for this particular pizza. It carries too much moisture.

    And skip the pre-shredded bag if you can.

    Freshly grated mozzarella melts into long, uninterrupted pools of cheese that remind you why pizza became beloved in the first place.

    Prepare the Pan

    Preheat the oven to 475°F / 246°C. Give it a good 30–45 minutes to heat through.

    Coat the bottom and sides of a 10-inch / 25-cm deep-dish pan with 14 g olive oil.

    Don’t be timid with it.

    That oil is partly responsible for the wonderful thing that happens to the bottom and edges of this crust. It doesn’t merely bake.

    It almost fries.

    Sprinkle the bottom with the cornmeal.

    Place the dough in the center and begin pressing outward with your fingertips.

    Work it across the bottom and approximately 1½ inches / 4 cm up the sides.

    If the dough keeps shrinking back, stop.

    Give it ten minutes.

    Then try again.

    Sometimes dough, like people, becomes considerably more cooperative when you stop fighting with it.

    Cover the pan and let the shaped dough rest for 45–60 minutes.

    Build the Pizza

    Deep dish asks us to forget some of what we know about pizza.

    The sauce does not go down first.

    Layer it like this:

    1. Freshly shredded mozzarella
    2. Grilled mushrooms and onions
    3. Pizza sauce
    4. Parmesan or Pecorino
    5. Oregano

    Spread most of the mozzarella directly over the dough, taking it nearly to the edges.

    Reserve roughly 75 g if you’d like some browned cheese visible on top, as in your pizza.

    Scatter the grilled mushrooms and onions evenly over the mozzarella.

    Spoon approximately 300 g pizza sauce over everything. Don’t mash it down. Spoon it across the surface and gently spread it.

    Finish with Parmesan or Pecorino, oregano, and the reserved mozzarella.

    A little crushed red pepper is welcome if that’s your way.

    Bake

    Place the pizza on the lower third of the oven.

    Bake at 475°F / 246°C for 25–30 minutes.

    Start watching carefully around 22 minutes.

    The cheese should be bubbling and beautifully browned in places. More importantly, the outer crust should be a deep golden brown.

    If the cheese is getting too dark before the crust is ready, loosely tent the top with aluminum foil.

    When it’s finished, take the pan from the oven and do something surprisingly difficult:

    Leave it alone.

    Give it 10–15 minutes before cutting.

    That rest lets the cheese, sauce, and vegetables settle. Cut immediately, and all that beautiful filling is much more likely to run onto the plate.

    Run a thin spatula around the edge, slice it into wedges, and serve.

    A Note From the Kitchen

    There are easier ways to make pizza.

    That’s worth admitting.

    You can buy dough. Buy shredded cheese. Open a jar. Throw raw vegetables over everything and have dinner on the table considerably sooner.

    And sometimes that is exactly what dinner needs to be.

    But this is something different.

    You make the dough tonight for something you won’t eat until tomorrow. You grate a pound of cheese. You stand over a skillet long enough for mushrooms to brown and onions to soften.

    None of these things is particularly difficult.

    They simply ask you to care.

    And maybe that’s one of the quiet pleasures of cooking at home.

    Every once in a while, we make something slowly, not because we have to, but because we can.

    Kyle J. Hayes

    kylehayesblog.com

    Please like, comment, and share

    Resources for Hard Times

    If you’re looking for practical help, food support, or community resources, you can visit the Salt, Ink & Soul Resources Page.
    👉 Resources for Hard Times

  • The Rice Cooker Was Up There the Whole Time

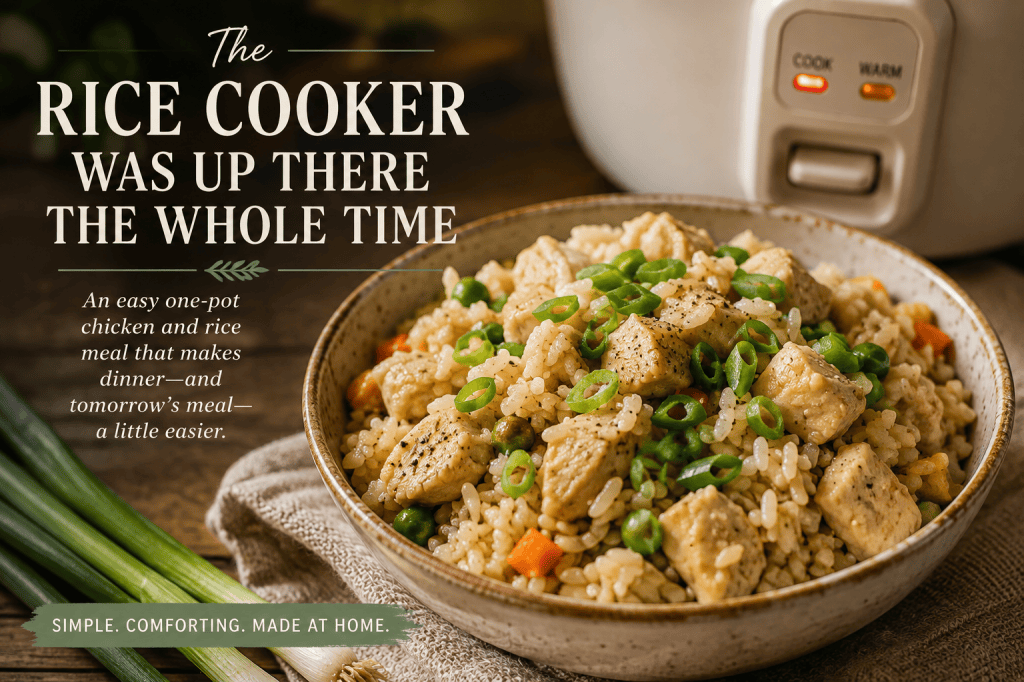
    The Rice Cooker Was Up There the Whole Time

    I have written before about my air fryer and its role in my ongoing battle against kitchen heat.

    When it is hot outside, I have very little interest in making it hotter inside.

    There are meals worth suffering for.

    There are also days when I don’t particularly feel like suffering for dinner.

    The air fryer became one of my weapons in that fight. It lets me cook something good without turning on the oven and making the kitchen feel like somewhere I immediately regret being.

    But lately, I have recruited another appliance.

    My rice cooker.

    The funny thing is, it was already here.

    It had been sitting on top of my kitchen cabinets for who knows how long, quietly watching me complain about the heat while apparently knowing it could have helped the entire time.

    I just wasn’t really using it.

    I had always thought of a rice cooker as exactly what the name says it is.

    You put rice in.

    You put water in.

    You push a button.

    Rice comes out.

    Useful, certainly.

    Exciting, not particularly.

    Then the YouTube algorithm did what the YouTube algorithm does.

    You watch one video.

    Then another appears.

    Then another.

    Before long, I started seeing people making entire meals in rice cookers.

    Not just rice.

    Chicken.

    Vegetables.

    Seasonings.

    Sauces.

    Everything going into one pot and coming out as dinner.

    I looked up at the top of my cabinets.

    Apparently, I had been underestimating an employee.

    The Beauty of One Pot

    There is something deeply appealing to me about a meal that doesn’t require much ceremony.

    Maybe that comes from getting older.

    Maybe it comes from cooking enough meals to understand that good food doesn’t always need to announce how hard you worked to make it.

    Sometimes you want to chop a few things, put them into a pot, push a button, and go about your business.

    Especially when it is hot.

    And especially when you are meal prepping.

    That was the other thing that caught my attention.

    One cup of uncooked rice becomes roughly three cups once cooked. Add a chicken breast, some seasoning, and green onion, and suddenly I have about three portions of food without dirtying three pans or spending an hour standing over the stove.

    There is something satisfying about that kind of efficiency.

    Not the efficiency of eating something you don’t particularly want simply because it is convenient.

    The efficiency of making actual food convenient.

    I think there is a difference.

    I still want dinner to taste like somebody cared about it.

    Even when the somebody is me.

    Rice Cooker Chicken & Rice with Green Onion

    Makes approximately 3 servings

    This is deliberately simple.

    It isn’t supposed to be the kind of recipe that sends you searching three grocery stores for an ingredient you will use once and then discover in the back of the cabinet two years from now.

    Most of this is probably already somewhere in the kitchen.

    Ingredients

    • 1 cup uncooked white rice, rinsed
    • 1 boneless, skinless chicken breast, cut into small bite-size pieces
    • 2 cups chicken broth or water (or the amount recommended on your rice package)
    • 1 tablespoon soy sauce
    • 1 teaspoon sesame oil
    • 1 teaspoon honey or brown sugar, optional
    • ½ teaspoon garlic powder
    • ¼ teaspoon onion powder
    • ½ teaspoon ground ginger, optional
    • Black pepper to taste
    • 2 green onions, thinly sliced
    • ½–1 cup frozen peas and carrots, optional

    Directions

    1. Prepare the green onions.

    Slice the green onions and separate the white and light-green portions from the darker green tops.

    Add the lighter portions to the rice cooker. Save those beautiful dark-green pieces for the end.

    2. Make the sauce.

    Pour the chicken broth into the rice cooker.

    Add the soy sauce, sesame oil, honey or brown sugar, garlic powder, onion powder, ginger, and a little black pepper.

    Give everything a quick stir.

    3. Add the rice.

    Add the rinsed rice to the liquid and gently stir it once so everything is evenly distributed.

    4. Add the chicken.

    Spread the uncooked chicken pieces evenly over the rice.

    Sprinkle the white and light-green portions of the green onions over everything.

    Close the lid.

    5. Push the button.

    Use your rice cooker’s normal white-rice setting.

    Then leave it alone.

    This may actually be the most difficult part of the recipe.

    There is a temptation when cooking to keep looking at things.

    To stir.

    To check.

    To interfere.

    Resist it.

    The machine knows what it is doing.

    6. Make sure the chicken is done.

    When the rice cooker finishes, check one of the largest pieces of chicken with a food thermometer.

    The chicken needs to reach an internal temperature of 165°F (74°C).

    If it hasn’t reached that temperature, continue cooking until it does.

    7. Finish with the green onions.

    Fluff the chicken and rice together.

    Stir in some of the dark-green onion tops and sprinkle the rest over each serving.

    If you are adding frozen peas and carrots, stir them into the piping-hot chicken and rice, close the lid again, and let everything sit for about five minutes, or until the vegetables are thoroughly heated.

    Taste.

    If it needs a little more soy sauce, add it now.

    Then eat.

    Or, if you are meal prepping like I am, divide everything into three containers.

    Tomorrow’s dinner has already been handled.

    Use What You Already Have

    I think there may be a small lesson hiding somewhere in all of this.

    We accumulate things with good intentions.

    Appliances.

    Books.

    Tools.

    Ideas.

    We tell ourselves we are going to use them.

    Then life happens.

    They sit there.

    And sometimes all it takes is seeing an old thing differently.

    My rice cooker hasn’t changed.

    I stopped seeing it as something that only makes rice and started seeing what else it could do for me.

    It gives me another way to cook without heating up the kitchen.

    It makes meal prep easier.

    It gives me three meals from one pot.

    There is less cleanup.

    Less standing over the stove.

    Less thinking about what I am going to eat tomorrow.

    And most importantly, it still allows me to eat something that feels like dinner.

    Something made at home.

    I think that matters.

    Because convenience has somehow become associated with not caring.

    Fast food.

    Frozen dinners.

    Something eaten standing over the sink because we don’t feel like making anything.

    But convenience doesn’t have to mean neglect.

    Sometimes convenience can be another form of care.

    It can mean making things a little easier for the person you’ll be tomorrow.

    The person who will open the refrigerator, tired and hungry, and discover that someone already thought about dinner.

    Even if that someone was you yesterday.

    Cook’s Note: Rice varieties and rice cookers can behave differently. The rice I used calls for 2 cups of liquid for every 1 cup of uncooked rice. I initially tried less and ended up with rice that was undercooked and burned in places. Check the directions on your rice package and adjust the liquid if necessary.

    Kyle J. Hayes

    kylehayesblog.com

    Please like, comment, and share

    Resources for Hard Times

    If you’re looking for practical help, food support, or community resources, you can visit the Salt, Ink & Soul Resources Page.

    👉 Resources for Hard Times

  • It’s Too Hot to Cook, But We Still Have to Eat

    It’s Too Hot to Cook, But We Still Have to Eat

    It has been hot here in New Mexico.

    Not simply summer hot, where you expect the afternoon to be uncomfortable and learn to live with it. This has been the kind of heat that makes you reconsider ordinary decisions.

    Like cooking dinner.

    There is something almost absurd about standing in a kitchen on a hundred-degree day and deciding that what the house really needs is a 400-degree oven.

    You walk into the kitchen.

    You look at the stove.

    You think about what you planned to cook.

    And suddenly, a sandwich sounds pretty good.

    There is nothing wrong with that.

    A good sandwich, some chips, maybe a salad or some cold fruit can feel almost perfect when the heat outside seems determined to follow you into the house.

    But you can only eat that way for so many days.

    Eventually, you want something cooked.

    Something hot.

    Something that feels like dinner.

    And hunger, unlike the rest of us, has never been particularly impressed by the weather.

    We still have to eat.

    So after thinking about it for a while, I finally bought an air fryer.

    I had resisted getting one.

    I’ve lived long enough to watch plenty of kitchen appliances arrive with promises that they were about to revolutionize the way we eat. Some of them eventually found permanent homes in cabinets, sitting beside other machines that had once promised to change breakfast forever.

    But this time, the heat made a better argument than any commercial could.

    An air fryer is small. It cooks quickly. Most importantly right now, I can make dinner without turning the kitchen—and eventually the rest of the house—into an extension of the desert outside.

    So I’ve been using it.

    And I like it.

    I know not everyone has one.

    That is worth saying.

    Because conversations about food have a way of becoming conversations about privilege without anyone noticing.

    We assume everybody has the same kitchen.

    The same appliances.

    The same grocery budget.

    The same amount of time.

    The same energy when the day is over.

    They don’t.

    Food writing sometimes forgets that.

    Cooking can become theater.

    Beautiful kitchens. Expensive cookware. Perfect ingredients arranged across countertops. Recipes requiring twenty ingredients, three pans, and an afternoon nobody seems to have to work through.

    There is nothing inherently wrong with any of that.

    Cooking can be art.

    It can be recreation.

    It can be something we do simply because creating something beautiful with our hands gives us pleasure.

    I understand that.

    I love cooking.

    But cooking has another purpose that existed long before anybody photographed a dinner plate.

    Somebody has to eat.

    And somewhere tonight, somebody will come home tired from work, stand in front of a refrigerator, and try to figure out what can be made with what is inside.

    Somebody else will look at a grocery bill and quietly put something back.

    Someone will be feeding children who do not care that the person making dinner has had a difficult day.

    And somebody will be standing in a hot kitchen wondering what they can cook without making an already uncomfortable home even hotter.

    They are cooking too.

    Maybe that is cooking in its most honest form.

    It doesn’t matter that you worked late.

    It doesn’t matter that you’re tired.

    It doesn’t matter that groceries cost more than you expected.

    And it certainly doesn’t matter that it is a hundred degrees outside.

    Eventually, someone still has to answer one of the most ordinary questions in family life:

    What are we going to eat?

    It is such a simple question.

    But those words can conceal an extraordinary amount of labor.

    Because somebody has usually been thinking about the answer long before anyone asks.

    They checked the refrigerator.

    They know what is left.

    They remember what everybody ate yesterday.

    They know what needs to be used before it spoils.

    They know what the family likes and what somebody will complain about.

    They have considered the weather.

    They have considered the money.

    And perhaps most importantly, they have considered how tired they are.

    Then, somehow, food appears.

    We rarely call this extraordinary.

    Maybe because it happens too often.

    Care has a way of becoming invisible when it becomes dependable.

    Dinner appears.

    People eat.

    The dishes are washed.

    Tomorrow comes.

    And eventually the question returns.

    What are we going to eat?

    Families have been answering that question under conditions far more difficult than mine for generations.

    Before air conditioning cooled our kitchens, people still cooked through the summer.

    Before refrigerators kept everything safely cold, people found ways to preserve food.

    Before supermarkets offered strawberries in winter and nearly anything else we wanted regardless of season, people learned to make meals from what grew nearby, what could be preserved, what could be stretched, and what could be shared.

    Somewhere inside that history are countless people whose names will never appear in a cookbook.

    Mothers.

    Fathers.

    Grandmothers.

    Grandfathers.

    Aunts.

    Uncles.

    Older brothers and sisters.

    Neighbors.

    People who stood in kitchens while everyone else waited somewhere cooler.

    I remember some of this from my own childhood.

    When food was being prepared, we children were often chased out of the kitchen.

    We didn’t belong in there underfoot while somebody was trying to cook. There were hot pans, sharp knives, grease popping on the stove, cabinet doors opening and closing, and grown folks trying to finish a meal.

    So we were sent somewhere else.

    Go play.

    Go sit down.

    Get out of this kitchen.

    At the time, I don’t remember thinking very deeply about it.

    I was a child.

    The kitchen was simply where the food came from.

    Only later do you begin to understand what was happening in the room after you were chased out.

    Someone kept track of what was cooking, what needed stirring, what was almost done, and what still needed another few minutes.

    Then, when everything was ready, the rest of us came back.

    I remember something else too.

    My grandmother would bring my grandfather his food before she sat down and joined the rest of us.

    That was simply how things were in her kitchen.

    And in so many other kitchens.

    As a child, I didn’t question it.

    Children inherit rituals long before they understand them. We watch how the adults move around one another and assume this is simply how the world works.

    Grandpa sat.

    Grandma brought his plate.

    Then eventually she sat down too.

    I know people may look at that differently now.

    Some may see an old expectation placed upon women. Others may recognize a particular language of marriage, family, and care from another generation.

    Maybe both things can be true.

    I don’t need to turn my grandmother’s kitchen into an argument.

    I only need to remember what I saw.

    Because what stays with me now isn’t simply that she brought my grandfather his food.

    It is that she brought his food before she sat down herself.

    There is a difference.

    As children, we tend to remember the meal from the chair.

    Someone else remembers that same meal from their feet.

    We remember what was on the plate.

    We remember whether we liked it.

    We remember asking for seconds.

    We remember the conversations around the table.

    The grown folks talking about things we weren’t supposed to understand while we quietly listened anyway.

    Maybe that is one of the strange things about getting older.

    You begin revisiting childhood memories from the perspective of the adults who were standing just outside the frame.

    You finally notice what their hands were doing while yours were empty.

    We remember the food.

    Sometimes I wonder whether we remember the heat.

    We remember fried chicken.

    Greens.

    Beans that seemed to cook all afternoon.

    Cornbread pulled hot from an oven.

    We remember smells that could travel through an entire house and tell us what was coming before we ever saw the plate.

    We remember sitting down.

    We remember eating.

    We remember asking for seconds.

    Memory is generous to the person being fed.

    It can erase the sweat from the person doing the feeding.

    There was labor inside those meals.

    There was time.

    There was planning.

    Sometimes there was sacrifice.

    And sometimes there was simply someone who would have preferred to sit down but remained standing a little longer because the people they loved needed to eat.

    I didn’t understand any of that when I was a child.

    I only knew that eventually we would be called back into the kitchen. There would be food on the table, my grandfather would have his plate, and my grandmother would finally take her seat.

    Back then, I thought that was simply dinner.

    Kyle J. Hayes

    kylehayesblog.com

    Please like, comment, and share

    Resources for Hard Times

    If you’re looking for practical help, food support, or community resources, you can visit the Salt, Ink & Soul Resources Page.

    👉 Resources for Hard Times

  • Family Meal

    Family Meal

    Inspired by The Bear Rooted in My Kitchen.

    One of the many things I’ve grown to love about The Bear is the idea of the family meal.

    I’ve never worked in a restaurant, but I’ve heard chefs talk about it over the years. Before the dining room opens and before the first customer walks through the door, someone cooks a meal for the people who have spent all day preparing to take care of everyone else.

    I’ve always liked that idea.

    It’s never about showing off.

    No one is trying to create the next award-winning dish.

    It’s simply about making sure everyone is fed.

    Watching those scenes made me wonder what a family meal would look like if it came from my own kitchen.

    For me, it begins with herb-roasted chicken.

    Because it feels like home.

    Add a pan of creamy baked macaroni and cheese, seasoned green beans, and a piece of warm cornbread, and you have the kind of meal that asks people to slow down, sit together, and stay awhile.

    Nothing fancy.

    Just good food made with care.

    When I think about family meals, 

    I think about the meals many of us grew up with.

    The kind of dinners that filled the house with familiar smells long before anyone sat down to eat.

    Meals that didn’t need a special occasion.

    Sunday dinner.

    A Wednesday evening after work.

    A table where everyone knew there would always be room for one more plate if someone unexpected stopped by.

    That’s what family meal means to me.

    Home food.

    Food that quietly says,

    “I’m glad you’re here.”

    That’s one of the reasons I enjoy cooking so much.

    The meal is important.

    But so are the conversations that happen around it.

    The laughter.

    The stories.

    The moments that become memories long after the dishes have been washed.

    I hope this week’s meal reminds you that the best food isn’t always the fanciest.

    Sometimes it’s simply the meal that brings everyone home.

    This Week’s Family Meal

    Herb-Roasted Chicken

    Serves: 4–6

    Ingredients

    • 1 whole chicken (4–5 pounds)
    • 2 tablespoons softened butter
    • 2 tablespoons olive oil
    • 4 cloves garlic, minced
    • 1 tablespoon fresh rosemary, finely chopped
    • 1 tablespoon fresh thyme leaves
    • 1 teaspoon parsley
    • 1 teaspoon kosher salt
    • 1 teaspoon black pepper
    • 1 teaspoon paprika
    • 1 lemon, halved

    Instructions

    1. Preheat the oven to 425°F.
    2. Pat the chicken dry with paper towels. Dry skin helps create a beautifully crisp finish.
    3. In a small bowl, combine the butter, olive oil, garlic, rosemary, thyme, parsley, salt, pepper, and paprika.
    4. Gently loosen the skin over the breast and spread some of the herb butter underneath. Rub the remaining mixture over the entire chicken.
    5. Place the lemon halves inside the cavity.
    6. Roast for 20 minutes at 425°F.
    7. Reduce the oven temperature to 375°F and continue roasting for 60–75 minutes, or until the thickest part of the thigh reaches 165°F.
    8. Let the chicken rest for 15 minutes before carving.

    The resting time allows the juices to redistribute, giving you tender, flavorful meat.

    Green Beans

    While the chicken rests, sauté fresh green beans with a little butter, onion, garlic, salt, pepper, and a pinch of smoked paprika until they’re just tender. Finish with a squeeze of fresh lemon if you’d like a little brightness.

    Serving the Meal

    Serve the herb-roasted chicken alongside your favorite Salt, Ink & Soul baked macaroni and cheese and homemade cornbread, with a generous helping of seasoned green beans.

    It’s a meal that’s simple enough for a Wednesday evening and comforting enough to remind us why Sunday dinners became traditions in the first place.

    A Final Thought

    However your table looks this week—whether you’re cooking for a full house, sharing dinner with one other person, or making a meal just for yourself—I hope you find a reason to slow down.

    Good food has a way of bringing us together.

    And when we’re lucky, it reminds us that the people around the table matter even more than what’s on the plate.

    Enjoy.

    Kyle J. Hayes

    kylehayesblog.com

    Please like, comment, and share

    Resources for Hard Times

    If you’re looking for practical help, food support, or community resources, you can visit the Salt, Ink & Soul Resources Page.

    👉 Resources for Hard Times

  • The Family Table Is Still Waiting

    The Family Table Is Still Waiting

    There is a particular kind of loneliness that doesn’t arrive when you’re by yourself.

    It arrives when the room is full.

    The plates are set. Glasses gather little rings of water on the table. Someone reaches for the salt without asking. Someone else laughs at a story you’ve all heard before, yet somehow it still earns another smile.

    And still…

    Something feels absent.

    Not because the chairs are empty.

    Because our attention is.

    I’ve watched it happen more times than I care to admit. Friends. Family. Holidays. Birthdays. A table filled with people I genuinely wanted to see.

    Then the food arrives.

    Almost instinctively, hands reach for phones before forks. Plates are turned toward the light. Someone asks everyone to wait while they find the right angle. Steam rises, curls into the air, and quietly disappears while filters are chosen and captions are written.

    “I’ll be just a second.”

    “Don’t eat yet.”

    “I haven’t posted it.”

    It’s become so ordinary that we rarely question it anymore.

    The meal is here.

    The people are here.

    Yet we’re busy proving it to everyone who isn’t.

    I’m not writing this as a complaint about technology. Some of my favorite conversations have happened because of it. I’ve stayed close to people who live hundreds of miles away. I’ve shared recipes with strangers who now feel like neighbors. This very blog exists because of a screen.

    Technology isn’t the enemy.

    Forgetfulness is.

    Somewhere along the way, we began forgetting what the table was for.

    Growing up, our table wasn’t remarkable. It wasn’t made from expensive wood, and nobody would’ve mistaken our dinners for something from a magazine.

    But that table had a way of telling the truth.

    You could tell who’d had a hard day before anyone said a word. You noticed who was quieter than usual. If someone pushed food around their plate instead of eating, someone would eventually ask, “You alright?”

    Not because they had studied body language.

    Because they were paying attention.

    That’s what the table did.

    It slowed us down just enough to notice one another.

    It was never really about the food.

    The fried chicken, the greens, the spaghetti, the macaroni—they were invitations. Reasons to gather. The meal gave everyone something to do with their hands while their hearts slowly caught up.

    Looking back, I couldn’t tell you exactly what every Sunday dinner tasted like.

    But I remember who sat beside me.

    I remember the laughter that made sweet tea come out somebody’s nose.

    I remember conversations that started over cornbread and somehow became lessons about life.

    I remember discovering that people rarely tell you the most important things right away. They tell you after the plates have been cleared. After dessert. After everyone has settled into the comfort of simply being together.

    Those moments didn’t happen because someone planned them.

    They happened because nobody was trying to be somewhere else.

    Today, we carry with us everywhere.

    A notification from work.

    A headline from across the world.

    A video someone says we have to watch.

    A message that feels urgent until tomorrow reminds us it wasn’t.

    Little by little, our attention leaves the room before we ever do.

    We call it staying connected.

    Sometimes I wonder if we’ve confused being connected with being present.

    They’re not the same thing.

    Presence asks something more of us.

    It asks us to look into someone’s eyes long enough to notice what they aren’t saying.

    To hear the hesitation before the words.

    To recognize that a quiet “I’m fine” can carry the weight of an entire year.

    No photograph captures that.

    No caption can.

    I’ve been thinking lately about a small act of rebellion.

    Nothing dramatic.

    Just a stack of phones in the middle of the table.

    Face down.

    Not because the phones are bad.

    Because the people around the table deserve our undivided attention, if only for the length of a meal.

    That stack becomes its own centerpiece.

    A quiet promise.

    For the next hour, no one outside this room needs more of us than the people inside it.

    Without the glow of our screens, we begin to notice things again.

    The way your father pauses before mentioning an old friend.

    The way your sister laughs a little harder than usual because she’s trying not to cry.

    The way your grandmother reaches for your hand without saying why.

    Those moments don’t trend.

    They don’t go viral.

    Most of them will never be photographed.

    But they are the moments that become our lives.

    The digital world will always ask us for another picture, another opinion, another performance of ourselves.

    The family table asks for something much simpler.

    It asks us to arrive.

    Not polished.

    Not interesting.

    Not curated.

    Just present.

    Maybe that’s enough.

    Maybe it always was.

    The family table is still waiting.

    The chairs are still there.

    The empty seat still knows your name.

    All it has ever wanted is the one thing no screen can offer.

    You.

    Kyle J. Hayes

    kylehayesblog.com

    Please like, comment, and share

    Resources for Hard Times

    If you’re looking for practical help, food support, or community resources, you can visit the Salt, Ink & Soul Resources Page.
    👉 Resources for Hard Times

  • Keto Lemon Ricotta Bars: Sweetness After the Meal

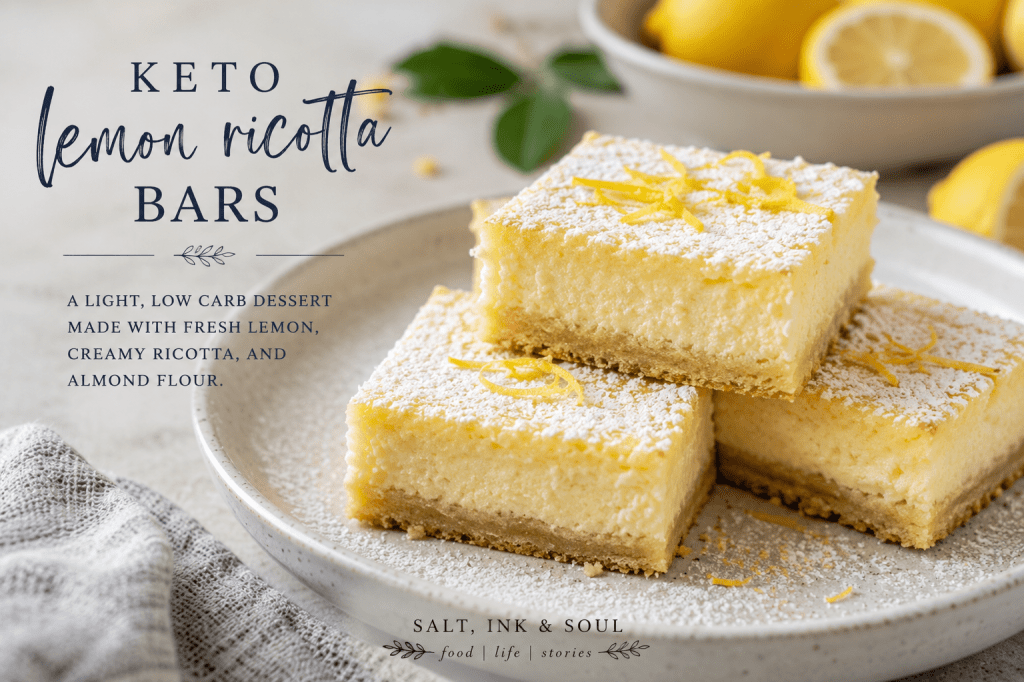
    Keto Lemon Ricotta Bars: Sweetness After the Meal

    After a meal like spaghetti, something rich, red, and familiar, I don’t always want a heavy dessert.

    I want something small.

    Something bright.

    Something that does not feel like I have abandoned the care I was trying to practice.

    That is the strange balance of trying to eat better. You still want pleasure. You still want comfort. You still want the little ceremony of something sweet after dinner. But you also want to wake up the next morning without feeling like one craving turned into a whole surrender.

    So this dessert is meant to live in that space.

    Keto lemon ricotta bars.

    Soft, lightly sweet, touched with lemon, and held together by the quiet richness of ricotta.

    They are not as sharp as traditional lemon bars. Not as heavy as cheesecake. They sit somewhere in between. Gentle. Bright. Creamy. The kind of dessert that does not need to be large to feel satisfying.

    And maybe that is the lesson.

    Sometimes enough does not have to be much.

    Sometimes enough is one small square, cold from the refrigerator, eaten slowly after a meal you planned instead of a meal you fell into.

    This is not about pretending dessert does not matter.

    It does.

    It matters because food is not only fuel. It is comfort. Memory. Reward. Routine. A small kindness at the end of the day.

    The work is learning how to make room for that kindness without letting it take the whole house.

    Keto Lemon Ricotta Bars

    Ingredients

    For the Crust

    • 1 1/2 cups almond flour
    • 1/4 cup powdered keto sweetener
    • 1/4 teaspoon salt
    • 6 tablespoons unsalted butter, melted
    • 1 teaspoon vanilla extract

    For the Lemon Ricotta Filling

    • 1 cup whole milk ricotta cheese
    • 3 large eggs
    • 1/2 cup powdered keto sweetener
    • 1/3 cup fresh lemon juice
    • 1 tablespoon lemon zest
    • 1 teaspoon vanilla extract
    • 2 tablespoons almond flour
    • 2 tablespoons heavy cream
    • 1/4 teaspoon salt

    Optional Topping

    • Powdered keto sweetener, for dusting
    • Extra lemon zest

    Instructions

    1. Prepare the Pan

    Preheat the oven to 350°F.

    Line an 8×8 baking pan with parchment paper, leaving some overhang on the sides.

    That small piece of paper hanging over the edge may not look important now.

    Later, it becomes the thing that helps you lift everything out cleanly.

    Some things are like that.

    Quietly useful.

    2. Make the Crust

    In a mixing bowl, combine the almond flour, powdered keto sweetener, and salt.

    Add the melted butter and vanilla extract.

    Stir until the mixture comes together and looks like soft crumbs.

    Press the crust firmly into the bottom of the prepared pan.

    Take your time here. A crust needs pressure. It needs to be shaped. It needs a foundation before anything sweet can be poured over it.

    Bake for 10 to 12 minutes, until the edges are lightly golden.

    Remove from the oven and let it cool slightly while you make the filling.

    3. Make the Lemon Ricotta Filling

    In a bowl, whisk together the ricotta cheese, eggs, powdered keto sweetener, lemon juice, lemon zest, vanilla extract, almond flour, heavy cream, and salt.

    Whisk until the filling is smooth.

    If your ricotta is a little grainy, you can blend the filling in a food processor or blender for a silkier texture.

    The lemon should come through clearly, but not loudly.

    The ricotta should soften it.

    That is what ricotta does here. It takes the sharpness and gives it somewhere to rest.

    4. Bake the Bars

    Pour the lemon ricotta filling over the warm crust.

    Smooth the top gently with a spatula.

    Bake for 25 to 30 minutes, or until the center is set but still slightly soft.

    Do not overbake.

    These bars should feel tender, not dry.

    They will continue to firm up as they cool.

    5. Cool and Chill

    Let the pan cool at room temperature for about 30 minutes.

    Then place it in the refrigerator for at least 3 hours.

    Overnight is even better.

    Some desserts need time. Not because they are difficult, but because they become better when left alone.

    There is a lesson in that too.

    6. Slice and Serve

    Once chilled, lift the bars from the pan using the parchment paper.

    Slice into 12 squares.

    Dust lightly with powdered keto sweetener if desired.

    Add a little extra lemon zest on top for more brightness.

    Serve cold.

    That is when they are best.

    Soft.

    Creamy.

    Bright at the edges.

    Storage

    Store the bars in an airtight container in the refrigerator for up to 5 days.

    They can also be frozen for up to 2 months.

    If freezing, place parchment paper between layers so the bars do not stick together.

    Thaw in the refrigerator before serving.

    Notes from the Kitchen

    Use fresh lemon juice if you can.

    Bottled lemon juice will work, but fresh lemon gives the bars their lift. Their clean edge.

    Whole milk ricotta gives the best texture. Part-skim ricotta can work, but the filling may be slightly less creamy.

    Powdered keto sweetener works better than granular sweetener because it keeps the filling smoother.

    Allulose will give a softer texture. Erythritol-based sweeteners may firm up more and can have a slight cooling effect.

    If you want these bars more like cheesecake, add 2 ounces of softened cream cheese to the filling.

    If you want them lighter, leave the recipe as written.

    Serving Size

    Cut into 12 squares.

    Depending on the exact sweetener and brands used, each bar is usually around 3 to 5 net carbs.

    Final Thought

    A dessert does not have to be reckless to be good.

    It doesn’t have to be large.

    It doesn’t have to be a return to old habits just because it is sweet.

    Sometimes dessert can be measured. Planned. Held in the hand without guilt.

    One small square after dinner.

    A little lemon.

    A little ricotta.

    A little reminder that discipline does not mean removing every pleasure from the table.

    Kyle J. Hayes

    kylehayesblog.com

    Please like, comment, and share

    Resources for Hard Times

    If you’re looking for practical help, food support, or community resources, you can visit the Salt, Ink & Soul Resources Page.
    👉 Resources for Hard Times

  • Salt, Ink & Soul Healthy Spaghetti

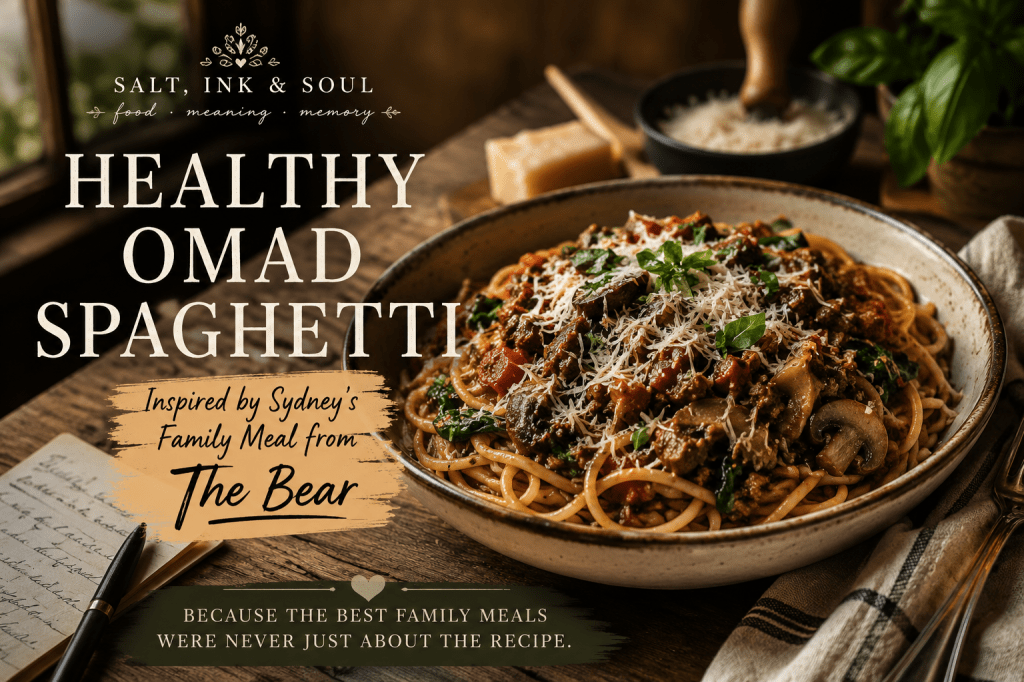
    Salt, Ink & Soul Healthy Spaghetti

    Inspired by Sydney’s Family Meal from “The Bear”

    I’ve been trying to watch as much of The Bear as I can. It’s not always easy. The show has a way of turning up the heat—not just in the kitchen, but in the people. There are moments when the intensity becomes a little too much for me, so I pause it, step away, and come back another day. But every time I do, I find myself thinking about the food. It isn’t just something to eat; it’s another way the characters care for one another, even when they don’t know how to say the words.

    One of my favorite parts of the show is the family meal. It reminded me that the meals we remember most are rarely about the recipe itself. Years later, we don’t always remember exactly what was seasoned with this or cooked for that long. We remember who was sitting around the table. The conversations that stretched a little longer than the meal. The laughter. The stories. The comfort of knowing that, for a little while, everyone belonged in the same place.

    That inspired me to try making some of the dishes from the show in my own kitchen. Not exact copies, and probably not all of them. Just the ones that feel within reach, with a few small changes to better fit the way I’m eating these days. My goal isn’t to recreate the restaurant. It’s to bring a little of that feeling home.

    So here’s my healthier take on Sydney’s family meal spaghetti—a version made for One Meal A Day (OMAD), with plenty of lean protein, vegetables, and just enough real pasta to remind me that eating well doesn’t have to mean giving up the foods that bring us comfort.

    Salt, Ink & Soul Healthy Spaghetti

    Servings

    4 meal-prep portions

    Ingredients

    Protein

    • 2 pounds (907 g) 93% lean ground beef
    • (Optional) Replace ½ pound with lean Italian turkey sausage for a little extra flavor.

    Pasta

    • 8 ounces (227 g) high-quality dried spaghetti
      • This works out to 2 ounces (56 g) dry pasta per serving.

    Sauce

    • 1 (24-ounce) jar no-sugar-added marinara sauce
    • 1 (15-ounce) can crushed tomatoes
    • 2 tablespoons tomato paste

    Vegetables

    • 8 ounces mushrooms, sliced
    • 1 medium onion, diced
    • 1 medium zucchini, diced small
    • 1 bell pepper, diced
    • 3 cups fresh spinach
    • 4 cloves garlic, minced

    Seasonings

    • 2 tablespoons olive oil
    • 2 teaspoons Italian seasoning
    • 1 teaspoon dried oregano
    • 1 teaspoon dried basil
    • 1 teaspoon garlic powder
    • 1 teaspoon onion powder
    • ½ teaspoon crushed red pepper flakes (optional)
    • 1 teaspoon kosher salt, or to taste
    • ½ teaspoon freshly ground black pepper

    To Finish

    • Fresh basil, chopped (optional)
    • Freshly grated Parmesan cheese

    Instructions

    1. Build the Flavor

    Heat the olive oil in a large Dutch oven or heavy-bottomed pot over medium-high heat.

    Add the onions and mushrooms and cook for 5–6 minutes until they begin to soften and develop color.

    Stir in the garlic and cook for another 30 seconds.

    Add the ground beef and cook until browned, breaking it into small pieces as it cooks. If necessary, drain any excess fat.

    2. Add the Vegetables

    Stir in the zucchini and bell pepper.

    Cook for about 5 minutes until they begin to soften.

    Fold in the spinach and cook just until wilted.

    3. Simmer the Sauce

    Add:

    • Marinara sauce
    • Crushed tomatoes
    • Tomato paste
    • Italian seasoning
    • Oregano
    • Basil
    • Garlic powder
    • Onion powder
    • Salt
    • Pepper
    • Red pepper flakes (if using)

    Stir well.

    Reduce the heat to low and let the sauce simmer for 30–40 minutes, stirring occasionally.

    The longer it simmers, the deeper and richer the flavors become.

    4. Cook the Pasta

    While the sauce simmers, cook the spaghetti according to the package directions until al dente.

    Before draining, reserve about ½ cup of the pasta water.

    If the sauce needs thinning, stir in a splash of the reserved pasta water.

    5. Assemble

    Place approximately 2 ounces (56 g dry, cooked) spaghetti into each bowl or meal-prep container.

    Top generously with the meat-and-vegetable sauce.

    Finish with freshly grated Parmesan and chopped basil.

    Garlic Green Beans

    Ingredients

    • 1 pound fresh green beans
    • 1 tablespoon olive oil
    • 2 cloves garlic, minced
    • Salt and pepper
    • Juice of ½ lemon

    Instructions

    Bring a pot of salted water to a boil.

    Cook the green beans for 4–5 minutes until tender-crisp.

    Drain well.

    Heat the olive oil in a skillet over medium heat.

    Add the garlic and cook for about 30 seconds until fragrant.

    Add the green beans and toss for 2–3 minutes.

    Season with salt, pepper, and a squeeze of fresh lemon juice.

    Meal Prep

    Divide everything into four containers:

    • 2 ounces dry (56 g) cooked spaghetti
    • Generous serving of meat and vegetable sauce
    • Garlic green beans

    Each meal is packed with lean protein, colorful vegetables, and just enough pasta to satisfy the craving without overwhelming the plate.

    Salt, Ink & Soul

    One thing I’ve learned is that eating healthier doesn’t have to mean giving up the meals you love. Sometimes it simply means making room for better ingredients, a little more balance, and a little more intention.

    Like the family meals that inspired this recipe, this isn’t about perfection.

    It’s about taking the time to feed yourself well.

    Because the people gathered around the table always mattered more than the recipe.

    Kyle J. Hayes

    kylehayesblog.com

    Please like, comment, and share

    Resources for Hard Times

    If you’re looking for practical help, food support, or community resources, you can visit the Salt, Ink & Soul Resources Page.
    👉 Resources for Hard Times

  • Grilled Zucchini and Summer Squash

    Grilled Zucchini and Summer Squash

    The Quiet Work of Ordinary Things

    Some ingredients never become famous.

    Nobody waits all year for zucchini season the way they wait for peaches or tomatoes.

    Summer squash rarely becomes the centerpiece of a celebration.

    It doesn’t ask for attention.

    It simply arrives.

    Year after year.

    Garden after garden.

    Kitchen after kitchen.

    Reliable.

    Dependable.

    Quietly doing its work.

    I’ve always admired things that don’t need applause to have value.

    The people who show up every day.

    The neighbor who checks on an elderly friend without anyone knowing.

    The teacher who remembers every student’s name.

    The parent who packs lunches before sunrise.

    The grandparent who somehow makes every meal feel like home.

    Their work is rarely celebrated in headlines.

    But if they disappeared, we’d notice immediately.

    Zucchini reminds me of those people.

    It doesn’t demand the spotlight.

    It simply makes the meal better.

    Sometimes that’s enough.

    Maybe more than enough.

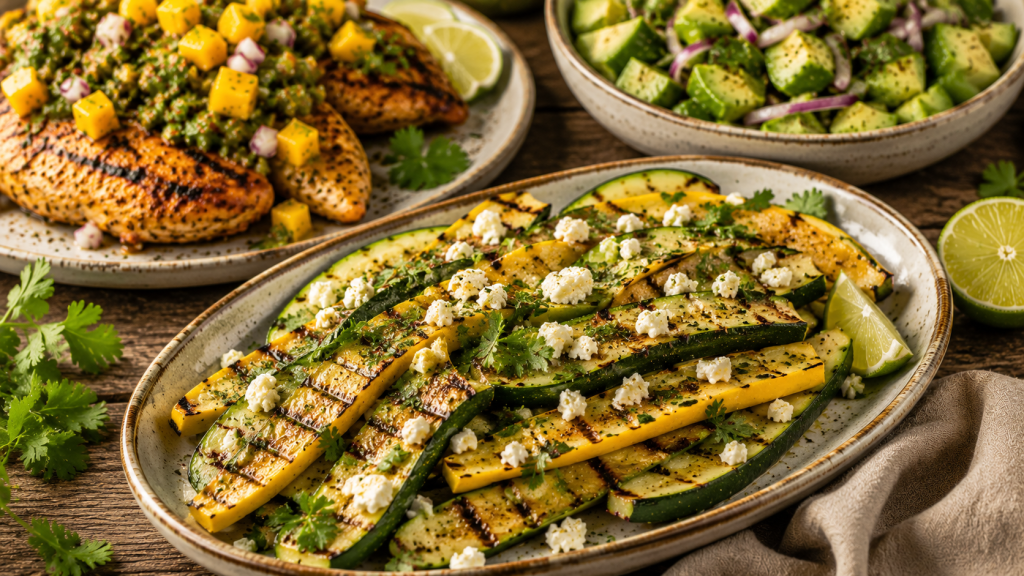
    Grilled Zucchini and Summer Squash

    Serves 4

    Ingredients

    • 2 zucchini, sliced lengthwise
    • 2 yellow summer squash, sliced lengthwise
    • 2 tablespoons extra-virgin olive oil
    • 1 teaspoon garlic powder
    • ½ teaspoon smoked paprika
    • Kosher salt, to taste
    • Freshly ground black pepper, to taste
    • Juice of 1 fresh lime
    • 1 tablespoon chopped fresh parsley
    • 1 tablespoon crumbled feta cheese (optional)

    Instructions

    Step 1: Prepare the Vegetables

    Slice the zucchini and summer squash lengthwise into even planks.

    Brush both sides lightly with olive oil.

    Season with garlic powder, smoked paprika, salt, and black pepper.

    Simple ingredients deserve thoughtful attention.

    Step 2: Grill

    Heat a grill or grill pan over medium-high heat.

    Cook the vegetables for 3 to 4 minutes per side until they are tender but still have a little bite.

    Look for those dark grill marks.

    They’re more than decoration.

    They’re proof that fire, when treated with respect, adds character rather than destroys it.

    Step 3: Finish

    Transfer the vegetables to a serving platter.

    Squeeze fresh lime juice over everything.

    Scatter chopped parsley across the top.

    If you like, finish with a light sprinkle of crumbled feta.

    The feta isn’t there to take over.

    It’s there to remind you that sometimes the smallest finishing touch changes the entire experience.

    Serve With

    This dish pairs beautifully with:

    • Green Chile Mango Salsa Chicken
    • Avocado and Cucumber Salad

    Together they make a colorful, fresh summer dinner that feels satisfying without feeling heavy.

    Sweet.

    Fresh.

    Smoky.

    Bright.

    A plate that tastes like sunshine.

    Closing Thought

    The world has a habit of celebrating whatever is loudest.

    The kitchen teaches a quieter lesson.

    Not everything valuable arrives with fanfare.

    Some things simply keep showing up.

    Again and again.

    Steady.

    Reliable.

    Making everything around them a little better.

    People can be like that.

    So can ingredients.

    If we’re paying attention, both deserve our gratitude.

    And maybe that’s one of the reasons we gather around a table in the first place.

    Not simply to eat.

    But to remember that ordinary things, given care and shared with others, have a remarkable way of becoming unforgettable.

    Kyle J. Hayes

    kylehayesblog.com

    Please like, comment, and share

    Resources for Hard Times

    If you’re looking for practical help, food support, or community resources, you can visit the Salt, Ink & Soul Resources Page.
    👉 Resources for Hard Times

  • Green Chile Mango Salsa Chicken

    Green Chile Mango Salsa Chicken

    Healthy Food Doesn’t Have to Be a Punishment

    There was a time when healthy eating got a bad reputation.

    Somewhere along the way, people started believing that taking care of yourself meant giving up joy. Meals became spreadsheets. Flavor became suspicious. Every bite was measured against guilt instead of pleasure.

    That has never made much sense to me.

    Food is one of the few things we do every day that can nourish both the body and the spirit. Why would we willingly strip away the part that makes it worth looking forward to?

    The best meals are not the ones that make you feel deprived. They are the ones that remind you how much goodness can fit on a single plate.

    This is one of those meals.

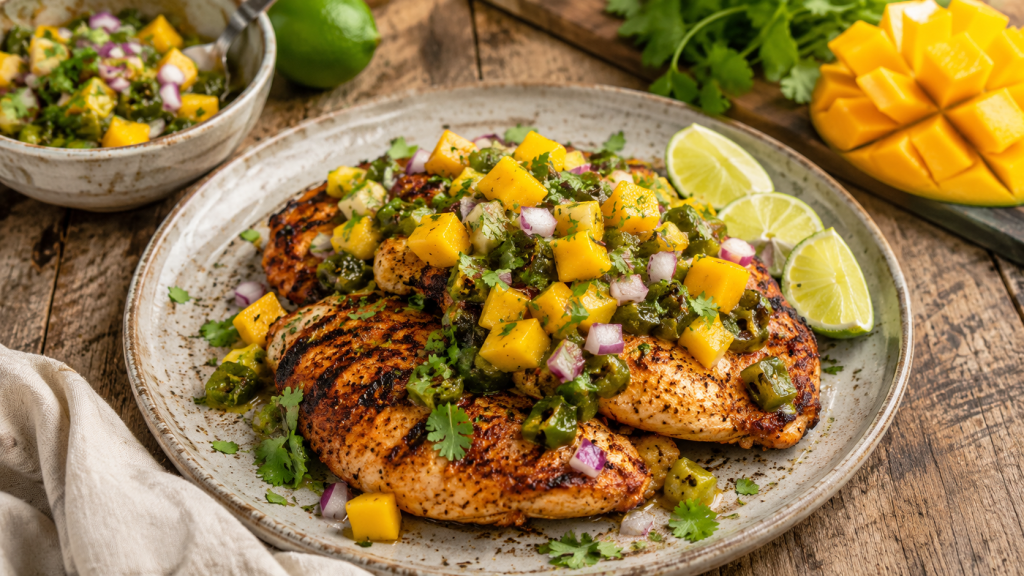
    The sweetness of ripe mango. The earthy heat of green chile. Smoke from the grill. Fresh lime. A little cilantro. Chicken that stays juicy because you gave it the attention it deserved.

    Nothing complicated.

    Nothing trendy.

    Just ingredients doing what they were meant to do.

    A meal that feels like summer, even when life feels heavy.

    Green Chile Mango Salsa Chicken

    Serves 4

    Ingredients

    For the Chicken

    • 4 boneless, skinless chicken breasts
    • 2 tablespoons olive oil
    • 1 teaspoon smoked paprika
    • 1 teaspoon garlic powder
    • 1 teaspoon onion powder
    • ½ teaspoon ground cumin
    • 1 teaspoon kosher salt
    • ½ teaspoon black pepper
    • Juice of 1 lime

    For the Green Chile Mango Salsa

    • 2 ripe mangoes, diced
    • 1 cup roasted green chiles, chopped
    • ¼ cup red onion, finely diced
    • 2 tablespoons fresh cilantro, chopped
    • Juice of 1 lime
    • Pinch of salt

    Instructions

    Step 1: Season the Chicken

    In a small bowl, combine smoked paprika, garlic powder, onion powder, cumin, salt, and pepper.

    Coat the Chicken with olive oil and lime juice. Sprinkle generously with the seasoning mixture and rub it into every surface.

    Let the chicken rest for at least 20 minutes. Longer if you have the time.

    Good food often begins with patience.

    Step 2: Make the Salsa

    Combine diced mango, green chiles, red onion, cilantro, lime juice, and salt in a bowl.

    Stir gently.

    Taste.

    Then taste again.

    The mango should bring sweetness. Chile should bring warmth. The lime should wake everything up.

    If one ingredient is shouting louder than the others, adjust.

    Cooking is as much about listening as it is about following instructions.

    Step 3: Grill the Chicken

    Preheat a grill or grill pan over medium-high heat.

    Cook the Chicken for about 6–7 minutes per side, depending on thickness, until the internal temperature reaches 165°F.

    Remove from the heat and let it rest for five minutes.

    Do not skip this step.

    A rushed cook often creates dry Chicken and regrets.

    Step 4: Assemble

    Place the Chicken on a serving platter.

    Spoon the green chile mango salsa generously over the top.

    Serve immediately.

    What to Serve Alongside

    This Chicken pairs beautifully with:

    • Avocado and Cucumber Salad
    • Grilled Zucchini and Summer Squash
    • Cilantro-lime cauliflower rice
    • Black beans seasoned with garlic and cumin

    Keep it simple.

    The Chicken is the star.

    Everything else is there to support the performance.

    Closing Thought

    Some meals leave you feeling full.

    Others leave you feeling cared for.

    There is a difference.

    One fills a space.

    The other reminds you that your well-being matters.

    In a world that often encourages shortcuts, drive-thru windows, and eating while distracted, there is something quietly radical about preparing a meal like this.

    You take a few fresh ingredients.

    You give them your attention.

    You sit down and enjoy them without apology.

    That is not dieting.

    That is not deprivation.

    That is care.

    And sometimes care is the healthiest thing we can put on the table.

    Kyle J. Hayes

    kylehayesblog.com

    Please like, comment, and share

    Resources for Hard Times

    If you’re looking for practical help, food support, or community resources, you can visit the Salt, Ink & Soul Resources Page.

    👉 Resources for Hard Times