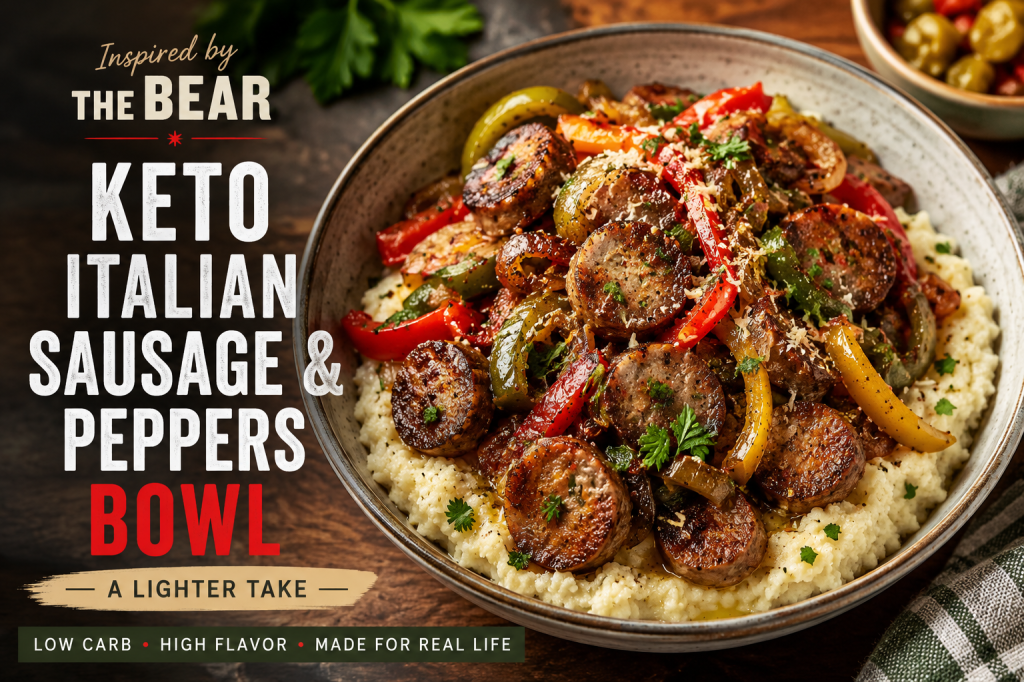
Category: recipes

  • Crisp Lime & Avocado Salad

    Crisp Lime & Avocado Salad

    The Space Between Bites

    Not everything on a table is meant to carry weight.

    Some things are meant to make space.

    After a meal that sits heavy—in a good way, in a lasting way—you need something that reminds you that not everything has to. Something that doesn’t compete, doesn’t demand attention, doesn’t try to be more than it is.

    Just something cool.

    Something bright.

    Something that clears the path for the next bite.

    This is that kind of dish.

    Crisp Lime & Avocado Salad

    Ingredients (Serves 2–4)

    • 2 cups romaine or mixed greens
    • 1 large avocado, sliced
    • 1/2 cucumber, thinly sliced
    • 1 cup cherry tomatoes, halved
    • 2 tbsp olive oil
    • Juice of 1 lime
    • Salt and black pepper, to taste

    Optional (if you want a little more):

    • Sliced green onion
    • A few cilantro leaves

    Method

    1. Start with what’s fresh

    In a large bowl, add the greens, cucumber, and tomatoes.

    Nothing complicated here. Just clean, simple ingredients that don’t need much help.

    2. Add the avocado last

    Slice the avocado and place it gently into the bowl.

    Not everything needs to be tossed aggressively. Some things are better handled with care.

    3. Dress it lightly

    In a small bowl, whisk together:

    • Olive oil
    • Lime juice
    • Salt and pepper

    Pour over the salad just before serving.

    4. Toss gently

    Use your hands or a large spoon. Keep the avocado intact as much as possible.

    This isn’t a chopped salad. It’s a composed one.

    Notes From My Kitchen

    • The lime is what makes this work—it cuts through everything that came before it
    • Keep the dressing simple; anything heavier starts to compete
    • This is best made fresh, just before serving

    At the Table

    This was never meant to stand on its own.

    It belongs beside something warm. Something steady. Something that holds the center.

    → Green Chile Beef & Cauliflower Casserole (Mon)

    And after both have done their work—after the meal has said what it needed to say—

    There’s something lighter waiting at the end.

    → Vanilla Cinnamon Ricotta Cream (Fri)

    Not to add more.

    Just to bring it to a close.

    Kyle J. Hayes

    kylehayesblog.com

    If this found you at the right time,

    Feel free to like, comment, or share it with someone who might need it too.

    Resources for Hard Times

    If you’re looking for practical help, food support, or community resources, you can visit the Salt, Ink & Soul Resources Page.

    👉 Resources for Hard Times

  • The Quiet Work of Making Enough

    The Quiet Work of Making Enough

    There’s a kind of cooking that doesn’t announce itself.

    It doesn’t arrive plated with intention or styled for admiration. It doesn’t ask to be photographed before it’s eaten. It lives somewhere else—closer to memory than performance.

    It’s the kind of cooking that understands what it means to stretch.

    Not out of lack.

    But out of knowing.

    Knowing that a meal doesn’t have to be extravagant to be meaningful.

    That feeding yourself—feeding others—isn’t about excess. It’s about attention.

    It’s about taking what you have and refusing to let it fall short.

    Ground beef. Green chile. A little cream.

    And something else—something that doesn’t try to replace what’s there, only to help carry it further.

    Cauliflower.

    Not as a substitute.

    But as support.

    This is that kind of meal.

    Green Chile Beef & Cauliflower Casserole

    Ingredients (Serves 4–6)

    • 900 g ground beef (80/20 preferred)
    • 300–400 g cauliflower rice (fresh or frozen)
    • 1 small onion, diced
    • 3 cloves garlic, minced
    • 200 g roasted green chiles, chopped (Hatch if you can find them)
    • 120 ml heavy cream
    • 120 g cream cheese, softened
    • 150 g shredded cheddar cheese
    • 100 g shredded Monterey Jack (or mozzarella)
    • 1 tbsp olive oil (if needed)

    Seasoning

    • 1 tsp ground cumin
    • 1 tsp smoked paprika
    • Salt and black pepper, to taste

    Method

    1. Start with the part most people skip

    Heat a large skillet over medium-high heat.

    Add the cauliflower rice with no oil. Let it cook for 5–7 minutes, stirring occasionally, until the moisture cooks off and it begins to feel dry.

    This step matters more than it seems.

    It’s the difference between something that holds together… and something that falls apart.

    Set aside.

    2. Brown the beef

    In the same skillet, cook the ground beef over medium heat until browned, breaking it apart as it cooks.

    Drain excess grease if needed, but don’t take all of it.

    Flavor lives in what you leave behind.

    3. Build the base

    Add the diced onion and cook until softened.

    Stir in garlic, cumin, and smoked paprika. Let it sit in the heat for a moment—just long enough for the aroma to rise.

    4. Bring in the chile

    Add the chopped green chiles and stir.

    Let everything sit together for a minute or two.

    There’s a point where the smell changes—where it stops being a collection of separate ingredients and becomes something whole.

    That’s when you move on.

    5. Make it one thing

    Lower the heat.

    Add the cream cheese and heavy cream. Stir slowly until everything melts together into a single mixture.

    Not layered. Not divided.

    Just one.

    6. Fold in the cauliflower

    Return the cooked cauliflower rice to the skillet.

    Stir until it’s fully combined and coated.

    This is where the dish changes.

    It becomes something that can stretch. Something that can last.

    7. Assemble

    Transfer the mixture to a greased baking dish.

    Top with the shredded cheddar and Monterey Jack. Spread it evenly—enough to cover, not enough to hide what’s underneath.

    8. Bake

    Place in a preheated oven at 375°F (190°C).

    Bake for 20–25 minutes, until bubbling at the edges and lightly golden on top.

    9. Let it rest

    Give it 5–10 minutes before serving.

    It settles here.

    Finds its structure.

    Becomes what it was meant to be.

    Notes From My Kitchen

    • Cooking the cauliflower first isn’t optional—it’s what keeps the dish from becoming watery
    • Pepper Jack can be used if you want more heat
    • This reheats well, and like many things made with care, it often tastes better the next day

    Closing Thought

    There’s a quiet dignity in meals like this.

    Meals that don’t try to be more than they are.

    Meals that understand that feeding someone—yourself included—isn’t about spectacle.

    It’s about presence.

    About taking what’s in front of you and making sure it’s enough.

    Not just for now.

    But for whoever comes back to the table later.

    There’s more to a meal than what sits in the center of it.

    Something fresh to cut through the richness.

    Something light to close it out.

    I’ll share those soon.

    Kyle J. Hayes

    kylehayesblog.com

    If this found you at the right time,

    Feel free to like, comment, or share it with someone who might need it too.

    Resources for Hard Times

    If you’re looking for practical help, food support, or community resources, you can visit the Salt, Ink & Soul Resources Page.

    👉 Resources for Hard Times

  • Honey Butter Brown Sugar Detroit-Style Dessert Pizza

    Honey Butter Brown Sugar Detroit-Style Dessert Pizza

    A Different Kind of Ending

    There’s a moment at the end of a meal where you realize you don’t need more.

    Not more weight. Not more richness. Not something trying to outdo what came before it.

    Just something that settles in gently.

    Something warm. Slightly sweet. Familiar in a way that doesn’t ask for attention.

    This comes from the same place as the main dish.

    Same dough. At the same time. Same care.

    It just chooses a different direction.

    Ingredients

    Base

    Topping

    • 3 tablespoons unsalted butter
    • ¼ cup brown sugar
    • 1–2 tablespoons honey
    • Pinch of sea salt

       Method

    1. Bring the dough back

    Remove your overnight dough from the refrigerator about 2 hours before baking.

    Let it come to room temperature.

    Transfer it to your well-oiled 9×13 pan and gently stretch it toward the edges.

    If it resists, let it rest.

    Then come back to it.

    Let it rise until it looks soft. Slightly puffy. Ready.

    2. Prepare the butter

    Melt the butter gently over low heat.

    If you want to take it a step further, let it cook just long enough to turn lightly golden—until it smells slightly nutty.

    Not dark. Not burnt. Just deeper.

    3. Build the base

    Brush the dough generously with the melted butter.

    Sprinkle the brown sugar evenly across the surface.

    Not too much. Just enough to melt into the dough as it bakes.

    4. Bake

    Preheat your oven to 500°F (or as high as it will go).

    Bake for 12–15 minutes.

    You’re looking for:

    • A golden surface
    • Light caramelization
    • Edges that crisp slightly against the pan

    5. Finish

    As soon as it comes out of the oven:

    • Drizzle with honey
    • Add a small pinch of sea salt

    Let it rest for about 5 minutes.

    Then slice.

    This wasn’t the beginning.

    It started with something structured. Something that took time.

    Not Every Square Pizza Is Detroit Style 

    And somewhere in between, there was something that brought it back into balance.

    What Cuts Through the Richness 

    This is just where it settles.

    Kyle J. Hayes

    kylehayesblog.com

    If this found you at the right time,

    Feel free to like, comment, or share it with someone who might need it too.

    Resources for Hard Times

    If you’re looking for practical help, food support, or community resources, you can visit the Salt, Ink & Soul Resources Page.

    👉 Resources for Hard Times

  • Crisp Garden Salad with Lemon Shallot Vinaigrette

    Crisp Garden Salad with Lemon Shallot Vinaigrette

    A lighter, sharper version built to sit beside Detroit-style pizza

    Ingredients

    Salad

    • 1 head Boston lettuce, washed and torn into bite-size pieces
    • 3 red radishes (or watermelon/breakfast radish), very thinly sliced
    • 1 large or 2 medium carrots, peeled and coarsely grated
    • 1 apple (Granny Smith), cored and julienned
    • 3 tablespoons chopped fresh chives (or mix with parsley, mint, or basil)

    Lemon Shallot Vinaigrette

    • 3 tablespoons extra-virgin olive oil
    • 2 tablespoons fresh lemon juice
    • 1 tablespoon finely minced shallot (or a small amount of red onion)
    • 1 teaspoon Dijon mustard
    • ¾ teaspoon salt (adjust to taste)
    • ¼ teaspoon freshly ground black pepper

    Method

    1. Make the vinaigrette

    In a small bowl, whisk together:

    • Lemon juice
    • Shallot
    • Dijon mustard
    • Salt and pepper

    Then slowly whisk in the olive oil until lightly emulsified.

    Taste it.

    It should feel bright first—then settle.

    2. Prepare the salad

    In a large bowl, combine:

    • Lettuce
    • Radishes
    • Carrots
    • Apple
    • Chives or herbs

      If prepping ahead:

    • Toss apples lightly in lemon juice to prevent browning

    3. Dress just before serving

    Drizzle a small amount of vinaigrette over the salad and toss gently.

      Important:

    • Use less than you think you need
    • You can always add more
    • You can’t take it away

    4. Serve immediately

    Once dressed, the salad should be served right away.

    This isn’t a salad that waits.

    Notes From My Kitchen

    This wasn’t meant to stand on its own.

    It sits beside something richer. Something structured. Something that asked for time.

    If you haven’t seen it yet, the beginning starts here:

    Not Every Square Pizza Is Detroit Style 

    And after this—

    There’s something softer waiting.

    A different kind of ending. Built from the same foundation, but moving in another direction:

    → A Different Kind of Ending (Honey Butter Detroit-Style Dessert Pizza) (tomorrow)

    This is the middle of it.

    A meal that moves in parts.

    Not all at once. Not rushed.

    Just enough at a time to understand what’s in front of you

    before moving on to the next step.

    Kyle J. Hayes

    kylehayesblog.com

    If this found you at the right time,

    Feel free to like, comment, or share it with someone who might need it too.

    Resources for Hard Times

    If you’re looking for practical help, food support, or community resources, you can visit the Salt, Ink & Soul Resources Page.

    👉 Resources for Hard Times

  • Not Every Square Pizza Is Detroit Style

    Not Every Square Pizza Is Detroit Style

    It seems lately that everywhere I turn, I see the words “Detroit-style pizza.”

    On menus. In passing conversations. In videos where the crust is held up like proof of something—something important, something worth noticing. For a while, I thought I understood it. I thought the difference was simple. That Detroit-style pizza was just pizza that had been squared off. A shape. A presentation. Something visual.

    I was wrong.

    That’s the danger of distance. From far enough away, everything starts to look the same. Dough becomes Dough. Pizza becomes pizza. Regions blur into each other until all that’s left is the outline of something that used to mean more.

    But I’m from the Midwest, and the Midwest doesn’t really believe in sameness, no matter how often it’s flattened into that idea.

    Chicago is not Detroit.

    Casey’s is not Chicago.

    And Detroit is not trying to be either one.

    Each of them carries something specific. Built from the people who made it. The work they did. The pace at which they lived. The kind of hunger they came home with. Food like this isn’t accidental. It doesn’t happen because someone wanted to be different. It happens because the difference was already there.

    And maybe that’s why I kept seeing it.

    Because something in me recognized that I had mistaken shape for substance.

    So here I am, in Albuquerque, New Mexico, standing in a kitchen far from where this pizza began, trying to understand it the only way that ever really works—by making it.

    Not quickly. Not forcefully. But with time.

    Because Detroit-style pizza, the kind people talk about like it matters, doesn’t come together in a rush. The Dough sits overnight. It rests. It changes. It becomes something else while you’re doing something else. And by the time you come back to it, it’s no longer just ingredients. It’s something with structure. With intention.

    And that feels familiar.

    Because many things in life don’t reveal themselves immediately, a lot of things ask you to wait. Ask you to trust that something is happening even when you can’t see it yet.

    This is my attempt at that kind of patience.

    My attempt at making something I once misunderstood.

    Detroit-Style Pizza

    9 x 13 Pan — Overnight Dough

    Why This Pizza Is Different

    Detroit-style pizza isn’t just square.

    It’s built in layers that challenge expectations.

    Cheese goes to the edges.

    Sauce comes last.

    Oil becomes part of the crust, not just something used to keep it from sticking.

    And the Dough—maybe the most important part—takes its time.

    Dough Ingredients (Overnight Fermentation)

    • 2 ½ cups (300g) bread flour
    • 1 teaspoon salt
    • 1 teaspoon sugar
    • ½ teaspoon instant yeast
    • 1 cup (240g) warm water
    • 1 tablespoon olive oil

    For the Pan

    • 2 to 3 tablespoons olive oil

    Cheese and Toppings

    • 12 to 16 ounces low-moisture mozzarella, shredded or cubed
    • Optional: brick cheese, if available
    • Pepperoni, if desired

    Sauce

    • 1 cup crushed tomatoes
    • 1 tablespoon olive oil
    • 1 clove garlic, grated
    • Salt to taste
    • Pinch of sugar (optional)
    • Dried oregano or basil

    Method

    Night Before — Let It Begin

    In a bowl, combine the flour, salt, sugar, yeast, warm water, and olive oil. Stir until a sticky, shaggy dough forms.

    It won’t look finished. That’s fine.

    Let it rest for about 10 to 15 minutes. Then, if you want, do one gentle stretch and fold in the bowl. Just once. Enough to give it some direction without forcing it into something it isn’t ready to be.

    Cover the bowl and refrigerate overnight.

    12 to 18 hours.

    This is where the real work happens. Quietly. Without you.

    Next Day — Bring It Back

    Take the Dough out of the refrigerator about 2 hours before you plan to bake. Let it come to room temperature slowly.

    Oil your 9 x 13 pan with 2 to 3 tablespoons of olive oil. Spread it generously.

    Transfer the Dough into the pan and gently stretch it toward the corners.

    If it resists, don’t force it. Let it rest. Come back in 10 to 15 minutes. Dough responds better to patience than pressure.

    Second Rise — In the Pan

    Let the Dough rise in the pan for 1 to 2 hours.

    It should look soft. Puffy. Alive in a quiet way.

    Make the Sauce

    In a small saucepan, combine the crushed tomatoes, olive oil, garlic, salt, and herbs. Add a pinch of sugar if needed.

    Simmer for 10 to 15 minutes until slightly thickened.

    Set aside.

    Build the Pizza

    Preheat your oven to 500°F, or as high as it will go.

    Add the cheese across the entire surface of the Dough, pushing it to the edges. This matters more than it seems. The cheese that touches the pan becomes something else entirely—dark, crisp, almost laced into the crust itself.

    Add pepperoni if you like.

    Bake

    Place the pizza in the oven and bake for 12 to 15 minutes, until the cheese is bubbling and the edges are deeply golden.

    Remove it briefly and spoon the sauce across the top in stripes.

    Return it to the oven for another 3 to 5 minutes.

    Finish

    Let the pizza rest in the pan for about 5 minutes.

    Then carefully loosen it and lift it out.

    If everything came together the way it should, the bottom will be crisp, the inside soft and airy, and the edges will carry that deep, caramelized texture that makes this style unmistakable.

    Notes From My Kitchen

    Overnight Dough changes things.

    Not dramatically. Not in a way that demands attention. But in a way, you notice once you’ve had it.

    The flavor is deeper. Slightly more complex. The texture feels more settled. More certain of itself.

    That could be the part that stays with me.

    Because we live in a time that pushes for speed. For immediacy. For results that appear as quickly as the desire for them.

    But some things don’t respond well to that kind of urgency.

    Some things need to sit.

    Need to rest.

    Need to become.

    This pizza reminded me of that.

    Reminded me that what looks simple from the outside often carries more intention than we realize. That shape isn’t the story. That time is part of the recipe, whether we acknowledge it or not.

    And that sometimes, if you’re willing to wait—

    What you end up with isn’t just better.

    It’s understood.

    Kyle J. Hayes

    kylehayesblog.com

    If this found you at the right time,

    Feel free to like, comment, or share it with someone who might need it too.

    Resources for Hard Times

    If you’re looking for practical help, food support, or community resources, you can visit the Salt, Ink & Soul Resources Page.

    👉 Resources for Hard Times

  • Ginger, Turmeric, and the Work of Taking Care

    Ginger, Turmeric, and the Work of Taking Care

    A daily anti-inflammatory citrus shot

    Some mornings don’t arrive gently.

    They come carrying what yesterday left unfinished.

    The weight you didn’t set down. The thoughts that stayed up longer than you did.

    And before the world begins asking anything of you, there is a small window.

    A moment that still belongs to you.

    This is something you can do in that moment.

    Not to fix everything.

    Not to become someone new.

    Just to take care.

    The Drink

    This is not a miracle.

    It is ginger, sharp and awake.

    Turmeric, steady and grounding.

    Citrus is bright enough to cut through the heaviness.

    Pepper and oil, doing quiet work you don’t see but still feel.

    Nothing here is dramatic.

    But taken daily, it adds up.

    Ingredients

    Makes 8 oz — enough for four 2-oz morning shots

    • 3 inches of fresh ginger
    • (or 1½–2 tablespoons organic minced ginger)
    • 1 orange
    • 1 lemon
    • ¾ teaspoon ground turmeric
    • ⅛ teaspoon freshly ground black pepper
    • 1 teaspoon extra virgin olive oil
    • ¼ teaspoon ground cinnamon

    Optional

    • 1 teaspoon raw honey
    • 1–2 oz water (if you need to soften it)

    Method

    Wash the ginger.

    Peel it if you want. Leave it if you don’t.

    Peel the orange and lemon.

    Run everything through a juicer.

    Or blend it with a small splash of water, then strain it until only the liquid remains.

    In a separate bowl, mix the turmeric and olive oil together first.

    It will look like nothing at first. Then it will come together.

    Add that into the juice.

    Stir in the black pepper.

    Add the cinnamon.

    Mix it well.

    Then mix it again.

    Pour into a jar.

    Refrigerate.

    Each Morning

    Shake the jar before pouring.

    The parts that matter tend to settle.

    Measure out 2 oz.

    Take it in one go.

    Or take your time.

    You can drink it on an empty stomach.

    Or after a few sips of water if your body needs a gentler start.

    What It Tastes Like

    It will not taste like comfort.

    It will be sharp.

    Warm.

    Earthy.

    Alive in a way that asks your attention.

    If it feels like too much, adjust it.

    A little water.

    A little honey.

    Not to make it easy.

    Please make sure you come back to it tomorrow.

    Notes from My Kitchen

    Consistency does more than intensity ever will.

    A perfect recipe you abandon does nothing.

    A simple one you return to—daily, quietly—changes things.

    This is not about chasing inflammation away in a single morning.

    It’s about showing your body, again and again, that it is worth the effort.

    There are enough things in this world that take from you.

    Let this one give something back.

    Kyle J. Hayes

    kylehayesblog.com

    If this found you at the right time,

    Feel free to like, comment, or share it with someone who might need it too.

    Resources for Hard Times

    If you’re looking for practical help, food support, or community resources, you can visit the Salt, Ink & Soul Resources Page.

    👉 Resources for Hard Times

  • Lemon Berry Cream

    Lemon Berry Cream

    Something Light at the End of the Meal

    There is a particular kind of wisdom in knowing when enough has already been given.

    Not every table needs a final act that arrives loud, rich, and certain of its own importance. Sometimes the meal has already said what it came to say. Sometimes the broth, the roast, the skillet, the bread, whatever carried the weight of the evening, has already done the hard labor of comfort. What comes after should be understood. What comes after should know how to step lightly.

    There is a kind of tenderness in restraint. A care in not asking the body, or the heart, to carry more than it already has. That is what this dessert is for.

    Lemon Berry Cream is not here to dazzle. It is here to soften the landing.

    It is cold where the rest of the meal was warm. Bright where the rest may have been deep and heavy. The berries bring their own honesty. The cream brings ease. The lemon cuts through whatever lingered and leaves behind something cleaner, quieter. It does not erase what came before. It reminds you that ending gently is also a form of grace.

    Ingredients

    Serves 2 to 4

    • 1 cup heavy whipping cream
    • 1 to 2 tablespoons sweetener, such as monk fruit, erythritol, or sugar, to taste
    • 1 teaspoon vanilla extract
    • Zest of 1/2 lemon
    • 1 to 2 teaspoons fresh lemon juice
    • 1 1/2 to 2 cups fresh berries
    • (strawberries, blueberries, blackberries, or any simple mix that looks and feels right to you)

    Method

    1. Make the cream

    Pour the heavy cream into a bowl. Add the sweetener and vanilla.

    Whip it gently with a whisk or mixer until soft peaks form. Not stiff. Not dense. Just enough for the cream to hold itself with a little dignity.

    This part matters more than people think. Too loose, and it disappears. Too firm, and it starts to feel like work. What you want is something in between. Something with a little body but still willing to be soft.

    2. Add the lemon

    Fold in the lemon zest and a small amount of the lemon juice. Taste it.

    If it needs a little more brightness, add another small squeeze. The goal is not sharpness. The goal is lift. You want the lemon to open the cream, not overpower it.

    3. Prepare the berries

    Wash the berries and dry them well. Slice the larger ones if needed.

    This is not complicated food, which is part of its honesty. The berries do not need to be turned into anything else. They do not need sugar poured over them to become worthy. They just need to be handled with care.

    4. Bring it together

    Spoon the berries into small bowls or glasses. Add a generous spoonful of the lemon cream over the top.

    Serve it right away, or let it chill briefly if you want it colder.

    That is all.

    Notes From My Kitchen

    This is not meant to be overly sweet. Let the fruit carry most of the flavor. Let the cream support it. Let the lemon bring the final balance.

    You can make the cream ahead of time and keep it chilled, but wait to assemble everything until you are ready to eat. The berries should still feel fresh. The cream should still feel alive.

    And keep it simple. There is a temptation, especially now, to decorate every plate as if it were auditioning for applause. But not everything needs performance. Some things are better when they arrive quietly and tell the truth.

    This is one of those things.

    A bowl of berries and cream with a little lemon in it is not trying to change your life. But it might remind you of something easy to forget: not all comfort comes from abundance. Sometimes comfort comes from contrast. From relief. From knowing when to stop. From giving a meal, and yourself, a softer place to end.

    This dish is part of a simple three-part meal:

    Jalapeño Popper Chicken — something rich and filling

    Caesar Salad — something fresh and balanced

    • Lemon Berry Cream — something light to finish

    Kyle J. Hayes

    kylehayesblog.com

    If this found you at the right time,

    Feel free to like, comment, or share it with someone who might need it too.

    Resources for Hard Times

    If you’re looking for practical help, food support, or community resources, you can visit the Salt, Ink & Soul Resources Page.

    👉 Resources for Hard Times

  • The Salad That Doesn’t Compete

    The Salad That Doesn’t Compete

    Caesar Salad (As It Was Meant to Be)

    There’s a misunderstanding that follows certain dishes.

    Caesar salad is one of them.

    Somewhere along the way, it became something else.

    Covered. Overloaded. Turned into a platform for whatever someone felt like adding that day. Chicken most of all—placed on top like it needed saving, like it wasn’t enough on its own.

    But it was always enough.

    It was never meant to be heavy.

    Never meant to carry the whole meal.

    It was meant to support.

    To balance.

    To bring something sharp and clean to a plate that needed it.

    That may be why it belongs here.

    Next to something rich.

    Something warm.

    Something like jalapeño popper chicken.

    Because not everything on the plate needs to speak loudly.

    Some things just need to be right.

    Caesar Salad

    Serves 4 to 8

    Ingredients

    For the Croutons

    • 1 cup extra-virgin olive oil (from total below)
    • 4 oil-packed anchovies, drained
    • 2 garlic cloves, peeled and smashed
    • 6 slices of white sandwich bread, cut into ¾-inch cubes
    • ¼ cup finely grated Parmigiano-Reggiano
    • Salt and freshly ground black pepper

    For the Dressing

    • Remaining 1½ cups extra-virgin olive oil
    • 6 oil-packed anchovies, drained
    • 2 garlic cloves, finely chopped
    • 1 teaspoon Dijon mustard
    • Juice of 1 lemon (about 2 tablespoons)
    • ½ teaspoon Worcestershire sauce
    • Dash of Tabasco
    • 3 egg yolks
    • Salt and freshly ground black pepper

    For the Salad

    • 1 large or 2 small heads of romaine lettuce, washed, chilled, and coarsely chopped
    • ¾ cup finely grated Parmigiano-Reggiano
    • Boquerones (optional, for garnish)

    Instructions

    1. Make the Croutons

    In a wide pan, heat 1 cup of olive oil over medium-low heat.

    Add anchovies and smashed garlic, letting them slowly dissolve into the oil.

    Not rushed. Not forced.

    Increase the heat slightly and add the bread cubes.

    Toss until golden on all sides.

    Remove and transfer to a bowl.

    Toss gently with parmesan, salt, and pepper.

    Let them rest.

    2. Build the Dressing

    In a food processor or blender, combine:

    • anchovies
    • chopped garlic
    • mustard
    • lemon juice
    • Worcestershire
    • Tabasco
    • egg yolks

    Blend until smooth.

    Slowly drizzle in the remaining olive oil.

    Let it come together gradually.

    Taste. Adjust.

    This is where it becomes yours.

    3. Bring It Together

    In a large bowl, add the lettuce.

    Toss with dressing—just enough to coat.

    Not drown.

    Add the remaining parmesan.

    Toss again, gently.

    Plate it simply.

    This salad was made to sit beside something richer.

    Something warm. Something with weight.

    Like the Jalapeño Popper Chicken.

    Notes from the Kitchen

    • This salad is meant to balance, not compete.
    • Keep it clean. Keep it intentional.
    • The anchovies matter.
    • They don’t make it “fishy”—they make it complete.
    • Use enough dressing to coat, not overwhelm.
    • There’s a difference between flavor and excess.
    • And leave the chicken off.
    • It already has its place on the plate.

    A Quiet Understanding

    There’s something honest about a dish that knows what it is.

    It doesn’t try to become more.

    Don’t try to carry everything.

    It just does its job well.

    And next to something rich—

    something heavy with flavor and warmth—

    This salad reminds you that balance isn’t subtraction.

    Its intention.

    Not everything needs to stand alone.

    Some things are meant to stand beside one another.

    And when they do…

    The whole plate makes sense.

    Kyle J. Hayes

    kylehayesblog.com

    If this found you at the right time,

    Feel free to like, comment, or share it with someone who might need it too.

    Resources for Hard Times

    If you’re looking for practical help, food support, or community resources, you can visit the Salt, Ink & Soul Resources Page.

    👉 Resources for Hard Times

  • Cooking Once, Living Twice

    Cooking Once, Living Twice

    Jalapeño Popper Chicken (Keto-Friendly Main Dish)

    There’s a certain kind of heat that doesn’t come from the stove.

    It comes from the day itself.

    From the bill you just paid.

    From the receipt, you didn’t want to look at too closely.

    From the quiet math you do in your head while standing in the grocery aisle, deciding what stays and what goes.

    And in the middle of all that, the kitchen still calls.

    Not for perfection.

    Not for performance.

    Just for something steady.

    I’ve learned this slowly—meals don’t always need to be made fresh every night to be meaningful. Sometimes the most honest kind of cooking is the kind that understands tomorrow before it gets here. The kind that asks: How do I take care of myself now… so I don’t have to struggle later?

    That’s where this dish lives.

    Not in nostalgia.

    Not in tradition alone.

    But in adaptation.

    Because this isn’t the casserole people expect.

    This is something sharper.

    Warmer.

    A little louder in flavor, but still grounded in the same idea that built kitchens long before ours—cook once, stretch it, make it last.

    And more importantly… make it good.

    Ingredients

    • 4 boneless, skinless chicken breasts
    • 8 oz cream cheese, softened
    • 1 cup shredded cheddar cheese
    • 1/2 cup diced jalapeños (adjust to your comfort)
    • 1/2 teaspoon garlic powder
    • 1/2 teaspoon onion powder
    • Salt and pepper, to taste
    • 1 cup crushed pork rinds (or almond flour for a softer coating)
    • Olive oil or cooking spray

    Instructions

    1. Preheat your oven to 375°F (190°C).
    2. Give the space time to warm up. Rushing the beginning rarely helps the end.
    3. Prepare the filling.
    4. In a bowl, combine cream cheese, cheddar, jalapeños, garlic powder, onion powder, salt, and pepper.
    5. Mix until it becomes one thing. Smooth. Intentional.
    6. Create space in the chicken.
    7. Lay each breast flat and slice a pocket into the side.
    8. Not too deep. Just enough.
    9. Sometimes that’s all that anything needs.
    10. Stuff the chicken.
    11. Divide the mixture evenly and fill each piece.
    12. Secure with toothpicks if needed. Nothing fancy. Just hold it together.
    13. Prepare the coating.
    14. Crush the pork rinds into fine crumbs—or use almond flour.
    15. Spread them on a plate, then press each chicken breast into the coating until it’s fully coated.
    16. Set the pan.
    17. Place the chicken on a parchment-lined baking sheet. Lightly coat with oil or spray.
    18. Give everything its place before the heat begins.
    19. Bake for 25–30 minutes, until the chicken is cooked through and the outside turns golden and crisp.
    20. This is the part where the house changes. Where effort becomes something you can smell.
    21. Rest before serving.
    22. Let it sit for a few minutes.
    23. Not everything needs to be rushed to the plate.

    Notes from the Kitchen

    • This dish holds well. That matters.
    • It reheats without losing itself, which makes it more than dinner—it becomes tomorrow, already handled.
    • Adjust the jalapeños to your tolerance.
    • Heat should support the dish, not overwhelm it.
    • If you’re planning ahead—and I suggest you do—prep everything the night before.
    • When the time comes, all you’ll need to do is move.
    • Pair it with something simple.
    • A side salad. Steamed vegetables. Nothing that competes. Just something that completes.

    A Quiet Understanding

    There’s a kind of respect that doesn’t get talked about enough.

    Respect for your time.

    For your energy.

    For the version of you that will walk into the kitchen tomorrow already tired.

    This kind of cooking honors that person.

    It says: I thought about you already.

    I made sure you’d have something waiting.

    And maybe that’s what this really is.

    Not just a recipe.

    Not just another meal.

    But a small refusal to live in constant reaction.

    A decision to step ahead of the moment instead of being caught inside it.

    Cooking once.

    Living twice.

    And in times like these…

    That’s not just practical.

    That’s necessary.

    Kyle J. Hayes

    kylehayesblog.com

    If this found you at the right time,

    Feel free to like, comment, or share it with someone who might need it too.

    Resources for Hard Times

    If you’re looking for practical help, food support, or community resources, you can visit the Salt, Ink & Soul Resources Page.

    👉 Resources for Hard Times

  • Almond Cream Cake 

    Almond Cream Cake 

    I have never said I was the best at making cakes.

    That belongs to other people. The ones with steady hands, stacking layers higher than they need to be, smoothing edges until nothing looks like it struggled to get there. I can respect that kind of work.

    But respect and need are not the same thing.

    I can make a pound cake. A few others. Enough to understand that not everything has to be impressive to be worth keeping. Enough to know that sometimes what you’re really looking for is something you can rely on.

    I eat keto as much as I can. Not perfectly. Not always. Just enough to notice the difference when I don’t. And when I went looking for a cake I could buy that fit into that way of eating, I ran into the same thing a lot of us do.

    It wasn’t there.

    Or it was—, but it didn’t feel like food made for someone who actually wanted to eat it.

    So I learned to make one.

    Not something complicated. Not something fragile. Something simple enough that I could make it again without second-guessing myself.

    And over time, I realized something.

    This kind of dessert doesn’t stand alone.

    It belongs at the end of a table.

    After something warm.

    After something bright.

    After a meal that needed balance more than it needed perfection.

    Ingredients

    For the cake

    • 1 cup (240 mL) heavy whipping cream
    • 3 large eggs
    • 2 cups (200 g) blanched almond flour
    • ¼ cup (45 g) granulated erythritol (or sweetener of choice)
    • 1 ½ teaspoons (6 g) baking powder
    • ½ teaspoon (2 g) salt
    • 1 teaspoon (4 mL) vanilla extract
    • 1 teaspoon (4 mL) almond extract (optional, but recommended)

    For the top

    • ¼ to ⅓ cup sliced almonds

    Instructions

    1. Prepare

    Preheat your oven to 350°F (175°C).

    Grease or line an 8-inch round cake pan.

    This stays a single layer.

    Not everything needs to be built higher to feel complete.

    2. Dry ingredients

    In a bowl, whisk together:

    • almond flour
    • sweetener
    • baking powder
    • salt

    Break up the clumps. Almond flour clumps if you let it.

    3. Wet ingredients

    In a separate bowl, whisk:

    • eggs
    • heavy cream
    • vanilla
    • almond extract

    Until smooth.

    Until it feels like one thing instead of many.

    4. Bring it together

    Pour the wet into the dry.

    Fold slowly until a thick, smooth batter forms.

    Not rushed.

    Not forced.

    Spread it evenly into your pan.

    5. The top

    Scatter the sliced almonds across the surface.

    Let them sit where they land.

    They’ll find their place as the cake rises.

    6. Bake

    Bake for 30–35 minutes, until:

    • The top is golden
    • The almonds are lightly toasted
    • The center is set

    The smell will shift before the timer does.

    Pay attention.

    7. Rest

    Let the cake cool in the pan for 10–15 minutes, then transfer if you like.

    It needs that time.

    Almond flour always does.

    Notes from My Kitchen: What I Learned Slowly

    This is not a loud dessert.

    It doesn’t try to win you over in the first bite.

    It’s balanced. Subtle. The kind of thing you come back to without thinking too much about why.

    The almond extract matters. It deepens everything. Without it, the cake is softer. With it, the flavor settles in a little more.

    And the top is where it lives.

    Soft underneath.

    Light resistance above.

    That contrast carries the whole thing.

    How to Serve

    • Slightly warm, if you can wait
    • With a spoonful of whipped cream
    • Or with nothing at all

    Sometimes that’s enough.

    Serve This As a Complete Table

    This dessert was never meant to stand alone.

    It belongs at the end of a table built on contrast.

    Together, they create something steady.

    Not heavy.

    Not complicated.

    Just complete.

    Kyle J. Hayes

    kylehayesblog.com

    If this found you at the right time,

    Please like, comment, and share.

    Resources for Hard Times

    If you’re looking for practical help, food support, or community resources, you can visit the Salt, Ink & Soul Resources Page.

    👉 Resources for Hard Times